Q: “Can I play DVD on 75 inch 4K TV via Plex? I am copying my DVD collection to using the Plex Media Server in my home theater. In order to maximize my flexibility from playing on my 75 inch 4K TV to an iPad I am converting them into original format use Wondershare. It is taking about 1 hour to 1.5 hours per DVD. Is that normal? Any great software can recommend for me?”
There’s 4K TV - Sony’s 75-inch, XBR-75X910C 4K TV, the real winner here is that 4K screen: If you are looking for the best TV experience you can get outside a theater with the latest in resolution quality, that screen is hard to beat. If you have a number of DVDs, wouldn't it be nice to have all these movies backed up and saved to watch anytime you want without having to pull out the disc use Plex Media Server. In this article will focus on how to rip DVD to Plex Media Sever for playing and streaming on 75 inch 4K TV.
Since physical discs are always encrypted with copy protection, you can't simply copy your DVD library to your Plex library and play the contents of disc on 4K TV. To rip DVD contents for 4K TV, What you need is a powerful DVD Converting tool. Here Pavtube DVDAid is highly recommend which works as the best software to convert DVD files to 75 inch 4K TV friendly format MP4/MKV etc with least quality loss. Moreover, this program also comes with optimized format presets for almost all popular multimedia devices. Read the review.
With it, you should be able to open, play, edit, upload the new file without any hassle. And you could get wonderful output files and never worry about out of audio/video sync. If you are running on Mac, please turn to its equivalent Mac version. Just get the right version and follow the steps below to encode DVD for adding to Plex Media Sever for playing on 75 inch 4K TV.
Free download DVD to 4K TV Converter

 Rip DVD off for loading to Plex Media Server and Stream to 75 inch 4K TV
Step 1. Load DVD files
Start up this DVD to 4K TV Converter, and then click disc icon to import all DVD video files.
Rip DVD off for loading to Plex Media Server and Stream to 75 inch 4K TV
Step 1. Load DVD files
Start up this DVD to 4K TV Converter, and then click disc icon to import all DVD video files.
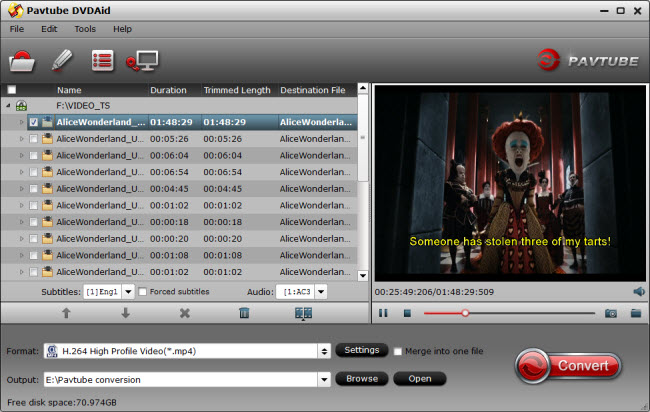 Step 2. Choose format
Click Format bar and choose “H.264 High Profile Video(*.mp4)” from “Common Video”, which can be recognized by 75 inch 4K TV and Plex well. MKV is also a good choice; as a container format it takes whatever you give it. Or backup DVD withMain Title only and original structure for storage.
Step 2. Choose format
Click Format bar and choose “H.264 High Profile Video(*.mp4)” from “Common Video”, which can be recognized by 75 inch 4K TV and Plex well. MKV is also a good choice; as a container format it takes whatever you give it. Or backup DVD withMain Title only and original structure for storage.
 Learn >> Plex Supported Format | Best Video/Audio Formats for Sony TV...
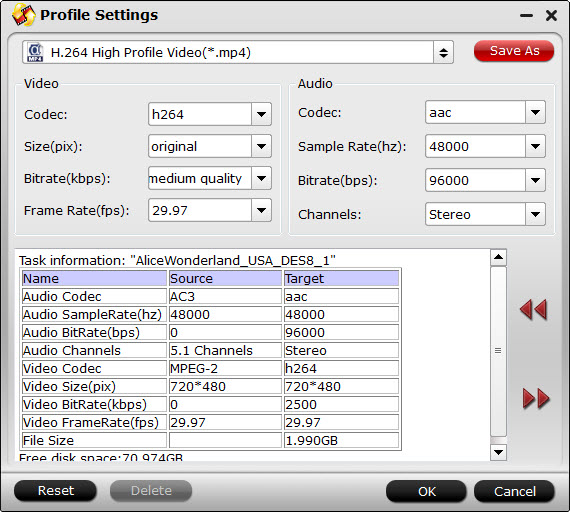
Tip: With the right settings you can retain the quality of the original DVD while also saving space. This is particularly helpful when streaming over your network, depending on your network quality. Simply click Settings bar and you can tweak the settings to your satisfaction and even save it as preset.
Learn >> Plex Supported Format | Best Video/Audio Formats for Sony TV...
Tip: With the right settings you can retain the quality of the original DVD while also saving space. This is particularly helpful when streaming over your network, depending on your network quality. Simply click Settings bar and you can tweak the settings to your satisfaction and even save it as preset.
 Step 3. Finally click the Convert button to begin ripping DVD to 4KTV format.
After encoding process has finished successfully, go into the destination directory and drop the converted files into Plex. Once all this is done, your videos will be ready to play with Plex Media Sever on Windows and stream. to big screen 75 inch 4K TV mentioned above for enjoying anytime you want.
Additional Tips:
This versatile DVD to Plex Converter not only can convert DVD to MP4, it can also encode DVD to MOV, WMV, MKV, AVI, FLV, etc to play on different media players. If you want to rip Blu-ray/DVD movies with multi-tracks keeping, getPavtube ByteCopy. (Here is the comparison).
Read More:
Step 3. Finally click the Convert button to begin ripping DVD to 4KTV format.
After encoding process has finished successfully, go into the destination directory and drop the converted files into Plex. Once all this is done, your videos will be ready to play with Plex Media Sever on Windows and stream. to big screen 75 inch 4K TV mentioned above for enjoying anytime you want.
Additional Tips:
This versatile DVD to Plex Converter not only can convert DVD to MP4, it can also encode DVD to MOV, WMV, MKV, AVI, FLV, etc to play on different media players. If you want to rip Blu-ray/DVD movies with multi-tracks keeping, getPavtube ByteCopy. (Here is the comparison).
Read More:
Good News! Pavtube upgraded its best-selling DVDAid for Win/Mac to version 4.8.6.2, which features in perfect support for DVD/ISO/IFO to m3u8 encoding. Download Pavtube DVDAid:Windows version 4.8.6.2: http://www.multipelife.com/download/dvdaid/dvdaid_setup.exeMac Version 4.8.6.2: http://www.multipelife.com/download/dvdaid-mac/dvdaid_setup.dmgWhat's New:1.support encoding to .m3u8 2.support new DVD movies 3.fix some bugsThis top-rated DVD Ripper is updated for supporting creating .m3u8 from DVD and DVD ISO/IFO files on Windows 10, Windows 8.1, Windows 8, Windows 7 and Mac OS X 10.10 Yosemite, 10.9 Mavericks, 10.8 Mountain Lion so that you can play them on media players such as Winamp, KMPlayer, iTunes, VLC media player etc. In addition, it has strong ability to remove DVD protection, transcode DVD to other video and audio formats, rip DVD to 3D video and edit DVD to create personal movie.Pricing and AvailabilityDVDAid now is offering with $35 with a lifetime free upgrade. Other upgraded products are listed below:Pavtube BDMagic/BDMagic for MacPavtube ByteCopy/ByteCopy for MacPavtube Video Converter Ultimate/Pavtube iMedia Converter for MacPavtube Video Converter/Video Converter for MacPavtube HD Video Converter/HD Video Converter for MacPavtube MTS/M2TS Converter/MTS/M2TS Converter for MacPavtube MXF Converter/MXF Converterfor MacPavtube MXF MultiMixer/iMixMXFNote:The output m3u8 files should be named without space and file path should be in plain English or pure digital, otherwise you couldn't play them successfully. After conversion, you just need to set up a server to enjoy M3U8. All customers are welcomed to get these upgraded hottest and comprehensive products. Get more money-saving bundles at http://www.multipelife.com/special-offer. Come on!For more info about this Pavtube update, just visit: http://www.multipelife.com/pavtube-upgrade-with-m3u8-encoding.html. Source: http://open-mobile-share.com/dvdaid-m3u8-encode/
iPad is a popular iOS device which can be taken as a media player that could store and play various HD movies. The real limitation of these mobile devices is inadequate storage space to carry all of your files. Bring a Seagate Wireless all with you! Got some ISO image files and want to play them on your iPad ( iPad Air, iPad Mini, the new iPad) from Seagate wireless at anywhere you go? If so, you will have to convert ISO to iPad supported file format first via Seagate Wireless since ISO isn't compatible with all iPad models.
Hot Topics About Apple users: HD video to Apple TV | Audio on Apple Watch | Ringtone for iPhone 6...
As we all know, ISO image is easily burnt to DVD disc and transported through internet. But it’s pity that so far no portable device supports this file, making ISO image poor for portability. So if you want to put ISO file to iPad via Seagate wireless for watching on the move, an ISO to iPad Converter is absolutely indispensible. The Pavtube ByteCopy can help you convert ISO files to iPad compatible MP4 format as well as multiple audio tracks saved for iPad playback. Learn >> Why Choose Pavtube? It equiped with Nvidia CUDA and ATI Stream acceleration technology, supply us fast speed, and then save us much time.
Built-in various video and audio codecs, this award-winning iPad ISO/IFO Converter is absolutely necessary for every iPad users to watch ISO movies via Seagate wireless unlimitedly. If you are Mac users, the Mac ISO/IFO to iPad Converter is suggested. Now just download the program and follow the easy guide below.
Now, Just free download and install this Top ISO to iPad Converter:

 How to Convert ISO to iPad friendly formats via Seagate wireless
Step 1. Run Pavtube ISO to iPad Converter, click the “Load ISO/IFO” button to load your Blu-ray/DVD ISO movie. Of course, it also supports Blu-ray and DVD movies.
How to Convert ISO to iPad friendly formats via Seagate wireless
Step 1. Run Pavtube ISO to iPad Converter, click the “Load ISO/IFO” button to load your Blu-ray/DVD ISO movie. Of course, it also supports Blu-ray and DVD movies.
 Step 2. Choose audio track and subtitles for output.
On Blu-ray ISO to iPad Air Ripper main UI, set your wanted subtitles and audio track from the drop-down box of “Subtitles” and “Audio” tab.
Step 3. Choose MP4 as output
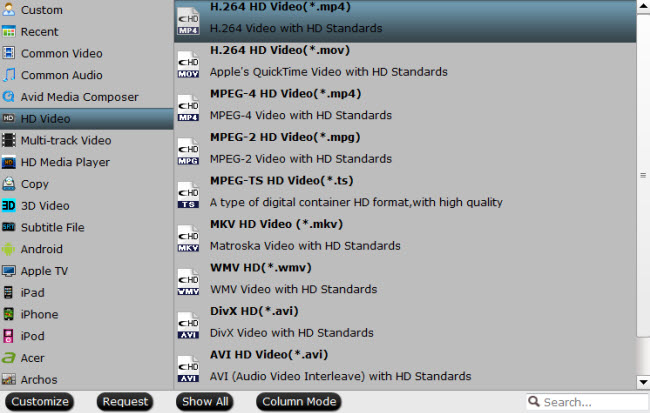
The playback devices like iPads, laptops, smart TVs, game consoles, Apple TV, smartphones and tablets that Seagate Wireless can be used with can support playback MP4 video files. So you can target MP4 as output from DVD movies. Click the format bar to follow “HD Video” > “H.264 HD Video (*.mp4).” or you can search any format as you want. Learn>> iPad Air 2 & Mini 3 Supported Formats.
Step 2. Choose audio track and subtitles for output.
On Blu-ray ISO to iPad Air Ripper main UI, set your wanted subtitles and audio track from the drop-down box of “Subtitles” and “Audio” tab.
Step 3. Choose MP4 as output
The playback devices like iPads, laptops, smart TVs, game consoles, Apple TV, smartphones and tablets that Seagate Wireless can be used with can support playback MP4 video files. So you can target MP4 as output from DVD movies. Click the format bar to follow “HD Video” > “H.264 HD Video (*.mp4).” or you can search any format as you want. Learn>> iPad Air 2 & Mini 3 Supported Formats.
 Tip. The unique ability that this ISO Converter has is that it can rip both DVD and Blu-ray sources with multiple audio and subtitle tracks, chapter markers preserved. For instance, you can rip DVDs to multi-track MKV for playback with the VLC player.
Step 4. Start ISO to iPad Conversion
Hit the “Convert” button to start converting ISO movies to MP4 format for free access by Seagate Wireless supported multimedia devices.
Step 5. Upload ISO movies to Seagate Wireless
After finishing converting all of ISO movies, copy and upload the converted ISO to your Seagate Wireless for easier access on iPads or iPhone, Wi-Fi enabled iPads. Please note that there are limitations on the operating system version of the playback devices can be used with Seagate Wireless, Have fun!
Read More:
Tip. The unique ability that this ISO Converter has is that it can rip both DVD and Blu-ray sources with multiple audio and subtitle tracks, chapter markers preserved. For instance, you can rip DVDs to multi-track MKV for playback with the VLC player.
Step 4. Start ISO to iPad Conversion
Hit the “Convert” button to start converting ISO movies to MP4 format for free access by Seagate Wireless supported multimedia devices.
Step 5. Upload ISO movies to Seagate Wireless
After finishing converting all of ISO movies, copy and upload the converted ISO to your Seagate Wireless for easier access on iPads or iPhone, Wi-Fi enabled iPads. Please note that there are limitations on the operating system version of the playback devices can be used with Seagate Wireless, Have fun!
Read More:
The Roku 2 is really a great combination of on-demand media and easy access to your own extensive media library that made Roku's case, not to mention an attractive price tag. Read Top 5 Media server. If you have the same Roku 2 Blu-ray playback issues as below, you’re in the right place:
Q: " Enter my new best friend the Roku 2. As a streaming only device I was nervous about how it would fare in the wifi black hole of my daughter’s bedroom. I am happy to report, that not only was the audio perfect (aka NOT sounding like a fan), but I was able to stream an episode of LOST in full HD! Even the initial loading of the show seemed to be faster than on the Blu-Ray player. So, my question is that how do watch Blu-ray movies on Roku 2 via Plex? Can you help me? "
 In this situation, we need to know that the Roku 2 supported format range for this feature is not wide enough. It can be gotten from Roku official website that Roku 2 supports media file formats MKV (H.264), MP4 (H.264), AAC, MP3, JPG, and PNG. That’s why we are here to learn how to rip Blu-ray movies to Roku 2 via Plex in the easiest way.
To get Blu-ray movies ready for Roku 2 via plex playback, a Blu-ray ripping tool is needed. Here Pavtube BDMagic is recommended to help you convert Blu-ray to Roku 2 supported video formats with easy operation and high output quality. Besides Blu-ray, you can also use it to rip DVD to playback on Roku 3/Roku 2/Roku. The Windows version is compatible with Windows 2003/XP/Vista/Windows 7/Windows 8/Windows 8.1/Windows 10. Read the review.
If you're using a Mac, please turn to Pavtube BDMagic for Mac, which can help you transfer Blu-ray movies to Roku 2 on any Mac OS X(Yosemite and Mavericks included). Download it right now and start enjoying your Blu-ray movies with full HD quality on Roku 2 through Plex Media Server!
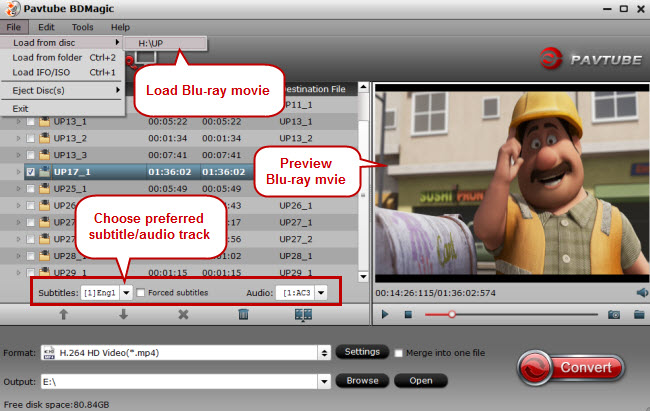
How to Rip and Copy Blu-ray Movies to Roku 2 via Plex Effortlessly
Step 1. Insert the Blu-ray disc you want to convert into your BD drive and click "Load Blu-ray" icon to import the Blu-ray movies. When the files are loaded, you can select the subtitle and audio track as you like.
In this situation, we need to know that the Roku 2 supported format range for this feature is not wide enough. It can be gotten from Roku official website that Roku 2 supports media file formats MKV (H.264), MP4 (H.264), AAC, MP3, JPG, and PNG. That’s why we are here to learn how to rip Blu-ray movies to Roku 2 via Plex in the easiest way.
To get Blu-ray movies ready for Roku 2 via plex playback, a Blu-ray ripping tool is needed. Here Pavtube BDMagic is recommended to help you convert Blu-ray to Roku 2 supported video formats with easy operation and high output quality. Besides Blu-ray, you can also use it to rip DVD to playback on Roku 3/Roku 2/Roku. The Windows version is compatible with Windows 2003/XP/Vista/Windows 7/Windows 8/Windows 8.1/Windows 10. Read the review.
If you're using a Mac, please turn to Pavtube BDMagic for Mac, which can help you transfer Blu-ray movies to Roku 2 on any Mac OS X(Yosemite and Mavericks included). Download it right now and start enjoying your Blu-ray movies with full HD quality on Roku 2 through Plex Media Server!
How to Rip and Copy Blu-ray Movies to Roku 2 via Plex Effortlessly
Step 1. Insert the Blu-ray disc you want to convert into your BD drive and click "Load Blu-ray" icon to import the Blu-ray movies. When the files are loaded, you can select the subtitle and audio track as you like.
 FYI: If you want to keep all the audio tracks (language) and soft subtitles, here’s another choice for you: Blu-ray/DVD Converter Pro.
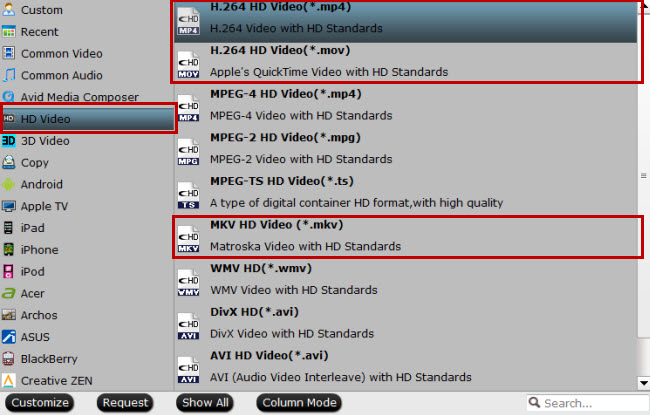
Step 2. Click Format bar, here I suggest you choose HD Video > H.264 HD Video(*.mp4). Of course you can choose other output formats like MKV from the output format list as long as they are compatible with the Roku media player/Plex. Also you can rip Blu-ray to Amazon Fire TV via Plex.
FYI: If you want to keep all the audio tracks (language) and soft subtitles, here’s another choice for you: Blu-ray/DVD Converter Pro.
Step 2. Click Format bar, here I suggest you choose HD Video > H.264 HD Video(*.mp4). Of course you can choose other output formats like MKV from the output format list as long as they are compatible with the Roku media player/Plex. Also you can rip Blu-ray to Amazon Fire TV via Plex.
 Tip:
a. If you like to tweak a little, in the settings, you are allowed to change the frame rate, resolution, bitrate and other specifications of the videos, if the tech terms look taunting to you, proceed to the next step. After that, you can click on “Save as” to rename the profile, such as “Roku or Plex (*.mp4)”. Next time, you can easily find it in “Custom” category.
b. Before conversion, you may want to trim the unnecessary parts from the movie.
Step 3. Click Convert to rip Blu-ray movie to MP4/MKV for Roku 2. After the conversion, drag a converted movie to log in Plex server and add them to the library of Plex. Then set up Plex channel run on Roku 2, you can freely watch Blu-ray with Roku 2!
Read More on Roku Column:
Tip:
a. If you like to tweak a little, in the settings, you are allowed to change the frame rate, resolution, bitrate and other specifications of the videos, if the tech terms look taunting to you, proceed to the next step. After that, you can click on “Save as” to rename the profile, such as “Roku or Plex (*.mp4)”. Next time, you can easily find it in “Custom” category.
b. Before conversion, you may want to trim the unnecessary parts from the movie.
Step 3. Click Convert to rip Blu-ray movie to MP4/MKV for Roku 2. After the conversion, drag a converted movie to log in Plex server and add them to the library of Plex. Then set up Plex channel run on Roku 2, you can freely watch Blu-ray with Roku 2!
Read More on Roku Column:
Have an extensive collection of 3D Blu-rays, but face the problem:"How to watch 3d movie on sony 3dtv without blu ray?please tell me how to watch 3d movie without blu ray.i have sony 3dtv(sony bravia kdl-nx720)but i dont have blu ray.is there any way to watch 3d without blu ray?Tell me the solutions?"  How to rip and convert 3D Blu-ray to MP4 Side-by-Side 3D Video for playback on Sony 3D TV? If you want to convert 3D Blu-ray to 3D video, so as to play, share your 3D Blu-ray movies on Sony 3D TV more conveniently, now just follow this article to finish the conversion while reserving the original 3D effect and video quality. In fact, with the right program, you can get all done easily and quickly. Here, Pavtube BDMagic as the best 3D Blu-ray converter for best video and audio playback on 3D TVs. Now you can download the software and take a try. you can easily convert 2D Blu-ray/DVD sources to 3D videos in MKV/MP4/MOV/WMV/AVI formats with side-by-side, top-bottom, or anaglyph 3D effect. Apart from these 3D video formats, common/HD video formats or video formats suitable for those popular devices are also available.Mac users can have a look at Pavtube BDMagic for Mac. Hot News for all Mac users! Pavtube Studio has launched a user-requested upgrade for all its Mac BD/DVD and package tools: DVDAid for Mac, BDMagic for Mac, ByteCopy for Mac, iMedia Converter for Mac to version 4.8.5.1, which focuses on the addition of the H.265 encoders and decoders.New features of iMedia Converter for Mac v4.8.5.1:1. Supported to encode H.265/HEVC codec 2. Optimize coding parameters 3. Fix some bugs Step 1. Launch and install the best 3D Blu-ray Converter, then click the "Load file(s)" icon to import the inserted 3D Blu-ray, also you can select preferred language in "Subtitles" and "Audio" box.
 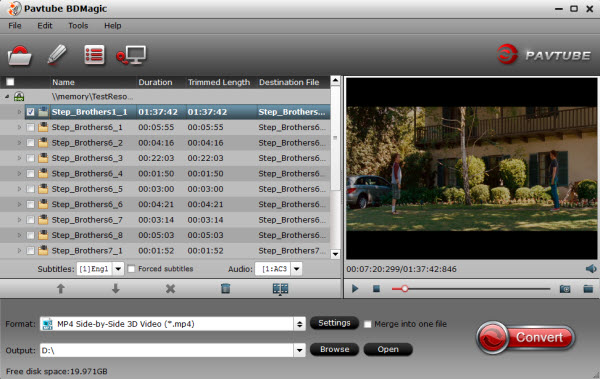 Step 2. Click drop-down "Format" and choose the "3D video>MP4 side by side 3D video" as the 55 inch LED 3D television best format. MKV is also the 3D television compatible format.
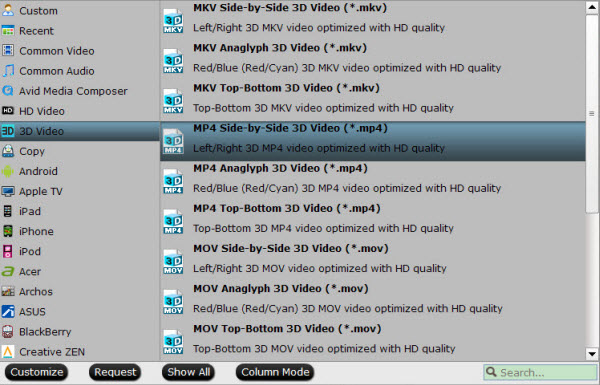 Tip: you can adjust resolution, bitrate, frame rate, etc by clicking the "Settings" button, if you don’t know how to set , please keep original to ensure the 3D video quality. Step 3. Hit the "Convert" button to rip your 3D Blu-ray movie to 3D MP4/MKV video, when it finishes, you can successfully copy your 3D blu-ray on PC and now you are ready to transfer your 3D Blu-ray movies to 55 inch LED 3D television for enjoying. What’s more, the software can rip 2D Blu-ray to 3D video with 3D effect, you can have more try athttp://www.multipelife.com/.Good News: Now you can get ChewTune + Video Converter Ultimate as bundled series to help you convert common SD/HD video/Blu-ray/DVD and DRM videos. It only cost you $74.9 (saving you $19.1) ! Note: If you’re Sony fans, you may owned Sony Bravia KDL-40EX640 TV and have no idea about how to stream Blu-ray & DVD to Sony Bravia KDL-40EX640 TV via DLNA? Read here. What’s more? A list of Top 5 3D Video Players on PC for you, to make easier way to watch 3D movies. Read More: Open and Play 2D/3D Blu-ray collections on Smart TVRipping 2D/3D Blu-ray Movies into iTunes for Apple TVHow to watch Blu-ray on TV via Tivo device?Play 3D Blu-ray Movies on Samsung Gear VR with 3D Effect
Question: How do I watch DVDs on my Chromebook ? The DVDs I need to rip are the Calculus 3 Advanced tutor from learning by example. I need to rip them to SD cards so I can watch them on my Chromebook. Is this steps right? And which DVD ripper is easy-to-use? Please also show me how, many thanks!!! 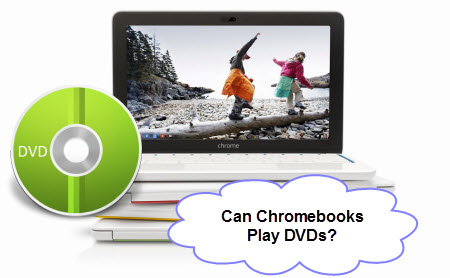 Answer: While it is possible to connect an external USB DVD drive to a Chromebook, you can not currently watch DVD movies with Chrome OS. Unlike simple movie file formats that you might find online, playback of DVD Video requires special decoding software and codecs to work. Google has not licensed this software and included it with Chrome OS, although, it should be possible for third party companies to write DVD video player software for Chromebooks and Chromeboxes. Considering that no Chrome OS devices ship with DVD hardware, it is unlikely that Google will license DVD Video software and include it in Chrome OS. Source: https://www.starryhope.com/chromebooks/faq/chromebook-dvd-video/Chromebook laptop is a new type of online computing thin client based on Google Chrome OS, only workable after being connected to the Internet. Since Chromebook owns relatively smaller hard drive capacity, with no CD/DVD drives, you can not directly play DVD on Chromebook. But there is an easy way to watch movie DVD on it. Just follow the guide below. Learn Guides on >> Can’t View Video on Chromebook | Play Blu-ray on Chromebook | Top DVD Ripping Software review... How to Rip DVD to Chromebook Formats and then Play DVD on Chromebook?* Chromebook Supported Meida File Types: .3gp, .avi, .mov, .mp4, .m4v, .m4a, .mp3, .mkv, .ogv, .ogm, .ogg, .oga, .webm, .wav* Chromebook Supported Codecs: .ogv(Theora), .webm(vp8), .mp4(H264, MPEG), .mov(H264, MPEG), .avi(MPEG4/MP3, DIVX/MP3, XVID/MP3), .3gp(H264/AAC, MPEG4/AMR-NB)* Preparation Tools: Movie DVD Disc | Pavtube DVDAid | USB Flash disk (or SD card) Pavtube DVDAid takes everything from the DVD including the chapters, extras, and subtitles. I’ve had success using the program to convert DVD discs to a format playable by Chromebook, I’ve found the quality to be excellent, and see no difference when compared to playing the discs themselves. [100% safe and clean]. For Mac users, Pavtube DVDAid for Mac is a helpful app to encode videos for further usage. Step 1. Load DVD movieRun the best DVD to Chromebook Converter, click "File" > "Load from disc" to import DVD. Or choose "Load from folder" "Load IFO/ISO" to import DVD folder, DVD ISO or IFO.
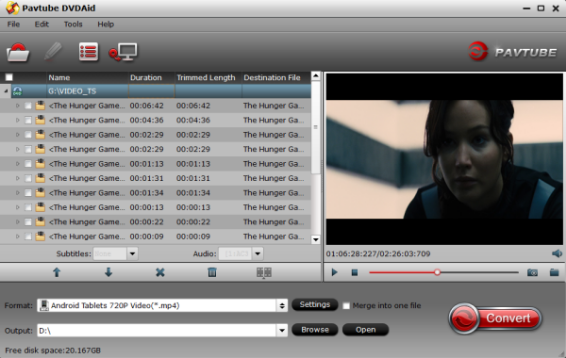 Tip: Freely select the subtitles for you DVD movies from the "Subtitles" option. Thus, you can watch DVD movie on Chromebook or other devices with Subtitle.Step 2. Choose the output formatClick "Format" bar and set "H.264 HD Video(*.mp4)" from "HD Video" as the output video format, and, if you like to tweak a little, in the settings, you are allowed to change the frame rate, resolution, bitrate and other specifications of the videos, if the tech terms look taunting to you, proceed to the next step.
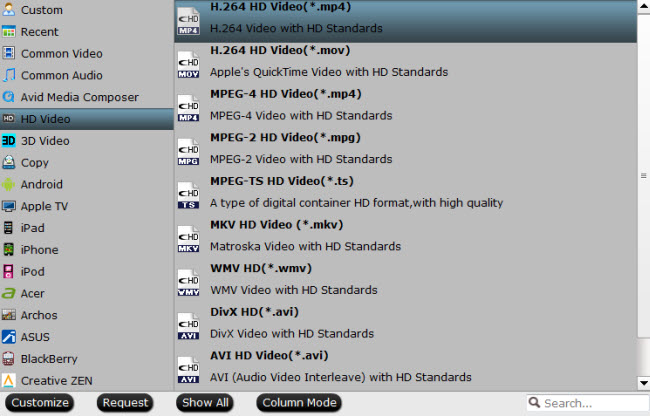 Step 3. Get down to DVD conversion for ChromebookClick "Browse" to determine the destination file you want to save the converted DVD movie. And then hit the "Convert" button to realize DVD to Chromebook conversion. After that, hit "open output folder" to find the generated movie and transfer it to your USB stick.Step 4. How to play ripped video on ChromebookFirst plug the USB stick to your Chromebook. By default, Chromebook uses the built-in media player to play audio and video files. Generally speaking, it will take you half an hour to rip a common movie DVD to MP4 formats. After successful ripping, you can transfer the ripped movie video to Chromebook with USB flash disk and then play watch DVD movie on Chromebook at leisure time. Just simply double-click the target video file in Files app and now you can enjoy DVD on Chromebook offline! Hot News for all Mac users! Pavtube Studio has launched a user-requested upgrade for all its Mac BD/DVD and package tools: DVDAid for Mac, BDMagic for Mac, ByteCopy for Mac, iMedia Converter for Mac to version 4.8.5.1, which focuses on the addition of the H.265 encoders and decoders.New features of DVDAid for Mac v4.8.5.1:1. Supported to encode H.265/HEVC codec 2. Optimize coding parameters 3. Fix some bugs Read More:
Good News on May 15th, 2015! Pavtube upgraded its best-selling ByteCopy for Mac to version 4.8.5.1, which features strong and perfect support for Blu-ray/DVD to H.265/HEVC MP4 encoding on Mac.
New features of ByteCopy for Mac v4.8.5.1:
1. Supported to encode H.265/HEVC codec
2. Optimize coding parameters
3. Fix some bugs
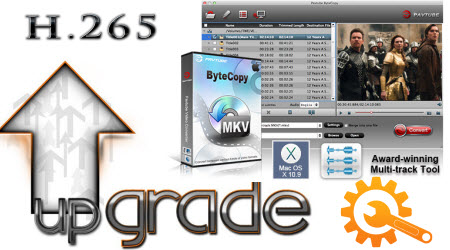 This updated Pavtube ByteCopy for Mac is an easy-to-use Mac tool to remove Blu-ray/DVD protection and convert 2D/3D Blu-ray, 4K Blu-ray, DVD, ISO files to H.265/HEVC MP4 on Mac OS X 10.10 Yosemite, 10.9 Mavericks, 10.8 Mountain Lion, etc. for enjoying with Windows 10, H.265 players like DivX Player, PotPlayer, PowerDVD 14 Ultra, etc, and for storage on Mac. And it also provides hundreds of preset output formats for you to convert BD/DVD movies to compatible format for iPad, iPhone, iPod, Apple TV, Samsung, Amazon, Microsoft Surface, WDTV, etc. on Mac with ease. Most importantly, it has the special ability to backup movies from Blu-ray and DVDs to lossless mkv and MKV/MP4/MOV/Prores video with multiple audio tracks on Mac.
Wondering how to do the conversion?
Start Using Pavtube ByteCopy for Mac
Pricing and Availability
For all the new Mac (especially Mac OS X Yosemite 10.10) users, ByteCopy for Mac now is offering with $42 with a lifetime free upgrade.
Download sites:
Pavtube Official Website | CNET Download Site
Other three upgraded Mac products are listed below:
Pavtube DVDAid for Mac
Pavtube BDMagic for Mac
Pavtube iMedia Converter for Mac
All Mac users are welcome to get these upgraded hottest and comprehensive mac products. Get more money-saving boundles at http://www.multipelife.com/special-offer. Come on!
Further Reading:
Rip DVD movies to H.265/HEVC MP4 on PC
Ripping Blu-ray ISO to H.265 MP4
Rip Blu-ray to HEVC/H.265 MP4 video
Edit Samsung NX1 H.265 video in Adobe Premiere Pro
Top H.265 to H.264 Converter for PC
For more info about this Pavtube update, just visit: http://www.multipelife.com/mac-bluray-dvd-upgrade-for-h265.html
This updated Pavtube ByteCopy for Mac is an easy-to-use Mac tool to remove Blu-ray/DVD protection and convert 2D/3D Blu-ray, 4K Blu-ray, DVD, ISO files to H.265/HEVC MP4 on Mac OS X 10.10 Yosemite, 10.9 Mavericks, 10.8 Mountain Lion, etc. for enjoying with Windows 10, H.265 players like DivX Player, PotPlayer, PowerDVD 14 Ultra, etc, and for storage on Mac. And it also provides hundreds of preset output formats for you to convert BD/DVD movies to compatible format for iPad, iPhone, iPod, Apple TV, Samsung, Amazon, Microsoft Surface, WDTV, etc. on Mac with ease. Most importantly, it has the special ability to backup movies from Blu-ray and DVDs to lossless mkv and MKV/MP4/MOV/Prores video with multiple audio tracks on Mac.
Wondering how to do the conversion?
Start Using Pavtube ByteCopy for Mac
Pricing and Availability
For all the new Mac (especially Mac OS X Yosemite 10.10) users, ByteCopy for Mac now is offering with $42 with a lifetime free upgrade.
Download sites:
Pavtube Official Website | CNET Download Site
Other three upgraded Mac products are listed below:
Pavtube DVDAid for Mac
Pavtube BDMagic for Mac
Pavtube iMedia Converter for Mac
All Mac users are welcome to get these upgraded hottest and comprehensive mac products. Get more money-saving boundles at http://www.multipelife.com/special-offer. Come on!
Further Reading:
Rip DVD movies to H.265/HEVC MP4 on PC
Ripping Blu-ray ISO to H.265 MP4
Rip Blu-ray to HEVC/H.265 MP4 video
Edit Samsung NX1 H.265 video in Adobe Premiere Pro
Top H.265 to H.264 Converter for PC
For more info about this Pavtube update, just visit: http://www.multipelife.com/mac-bluray-dvd-upgrade-for-h265.html