The latest Windows 10 smartphone makes your digital life instantly available everywhere. Windows 10 smartphone comes with free OneDrive cloud storage, so you can put media onto OneDrive for syncing to your Windows 10 smartphone to watch anywhere and anytime.
So, if you have DVD movies and want to play them on your Windows 10 smartphone on car, on train or on plane freely, it would be a great idea to rip DVD movies to OneDrive so that you can play the DVD movies on Windows 10 smartphone from OneDrive at home or at work. Here is a guide to play DVD movies on Windows 10 smartphone via OneDrive easily.
Learn more: Windows 10 VS Windows 8, iOS 9 VS Windows Phone 10 VS Android 6.0
What you need to know about OneDrive in Windows 10:
In Windows 10, placeholders are replaced by selective sync. To change OneDrive settings, right-click the icon in the notification area, select Settings, switch to the Choose folders tab, and click the Choose folders button. You can either sync All files and folders on your OneDrive, or Choose folders to sync, meaning they will be available locally.
OneDrive also supports remote access. Under the Settings tab, if you check Let me use OneDrive to fetch any of my files on this PC, you can access your files remotely, i.e. from another computer via the OneDrive website.
How to Play DVD Movies on Windows 10 Smartphone via OneDrive Easily?
To be able to play DVD movies on Windows 10 smartphone via One Drive, you have to rip DVD to Windows 10 smartphone supported video format. With the help of a professional DVD Ripper, it would be a piece of cake to rip DVD. Here, I recommend you to use Pavtube DVDAid to do the job.<review>
The ability to decrypt DVD disc with copy protections, region code, Disny code, CSS, RCE, Sony ArccOS, UOPs etc has made it the strongest ever to rip DVD. Besides, it can rip DVD disc or convert DVD movies to all Windows 10 smartphones supported video format. Moreover, you can select the language subtitle you want to show in DVD movie, if there are several language subtitles in movie.
More Highlights on Pavtube DVDAid:
* DVD ripper + DVD copier + DVD editor
* Support NVIDIA CUDA and ATI Stream (AMD APP) acceleration technologies.
* Convert/rip/shrink/copy the latest releases of DVD movies.
* Cut off unwanted video parts and just preserve segment out of a complete movie.
* Remove black edges and unwanted area of image in original movie with simple operation.
* Separate one single file into multiple clips according to quantity, duration and output size
* Adjust output aspect ratio, such as 16:10, 16:9, 5:4, 4:3 and 2:1.
* Allows you to batch convert your videos to save your much time.
* Support adding .srt /.ass/.ssa subtitles into movies.
Mac user can choose Pavtube DVDAid for Mac to rip DVD movies, which has updated to support the newest Mac OS X El Capitan.
Learn more choice >>> Top 3 + 3 DVD Ripper for Mac
Free download and install:


Other Download:
- Pavtube old official address: http://www.pavtube.cn/dvd_ripper/
- Cnet Download: http://download.cnet.com/Pavtube-DVDAid/3000-7970_4-76158510.html
Steps to Play DVD Movies on Windows 10 Smartphone via OneDrive
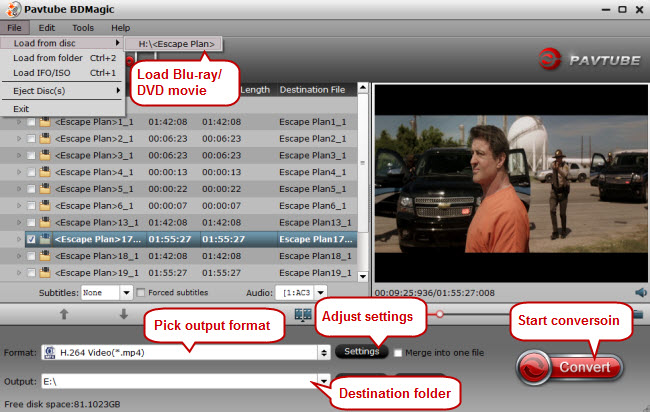
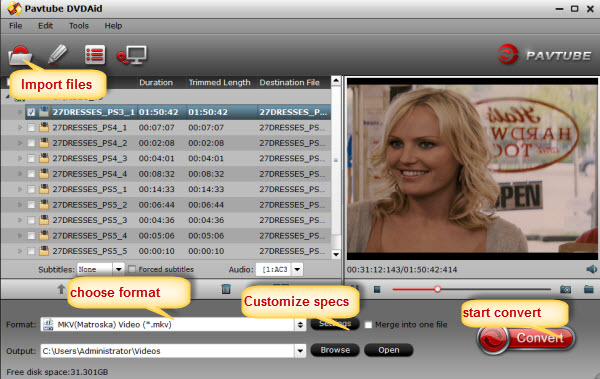
Step 1. Load DVD movies
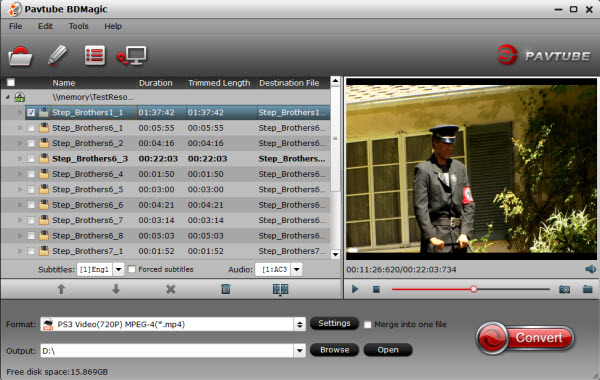
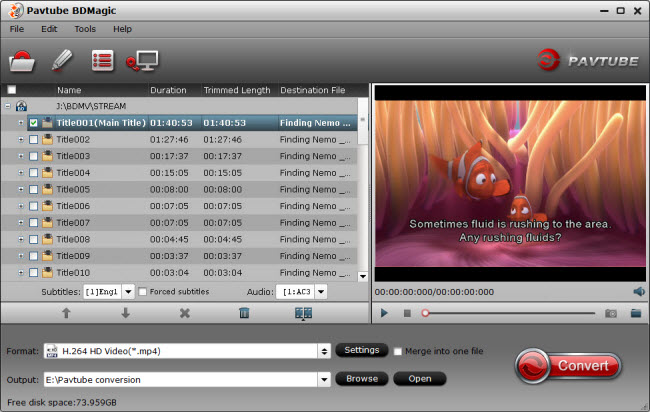
Insert your DVD disc into a DVD drive, run the program on your computer, on the main interface click "File" > "Load from disc" to import the DVD disc to the program.
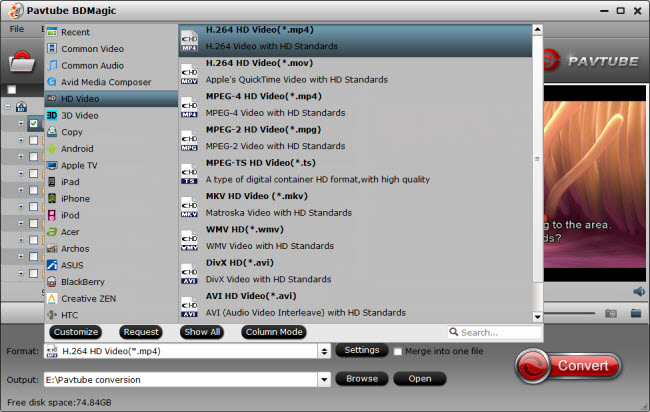
Step 2: Set output format
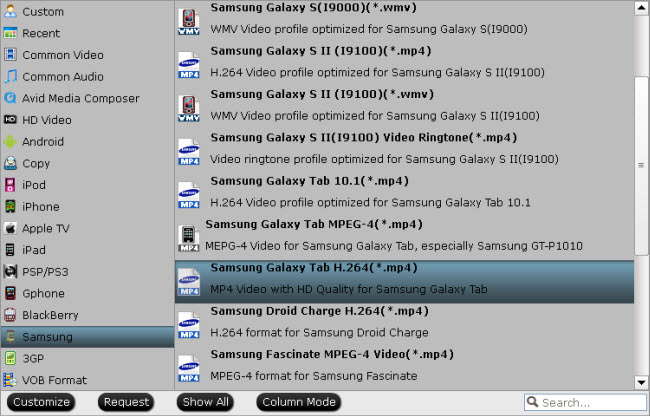
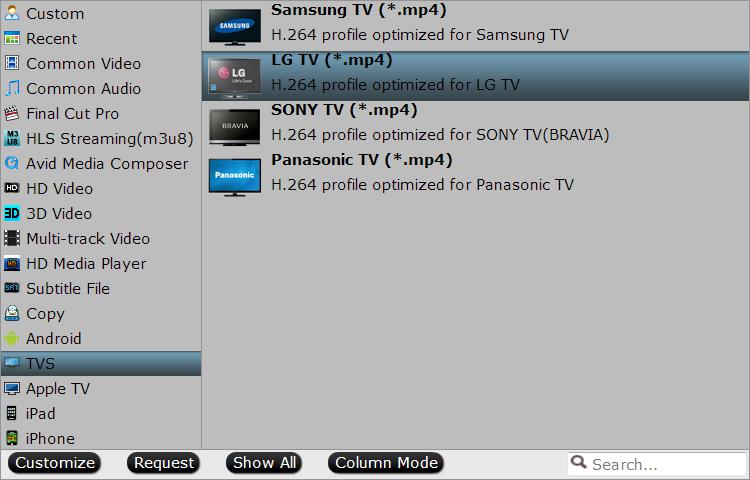
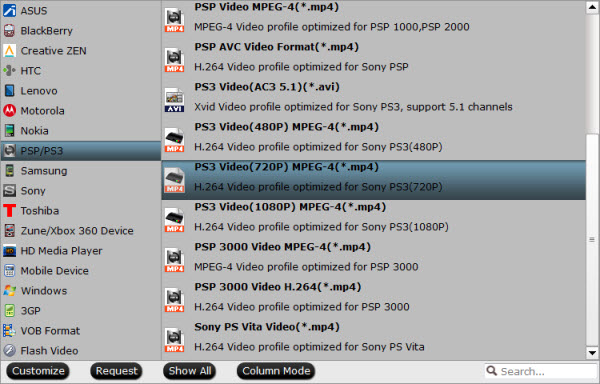
H.264 MP4 format is the most compatible video format for Windows 10 smartphone. You can go for “HD Video > H.264 HD MP4 (*.mp4)” or “Windows > Windows phone 8 H.264 video (*.mp4)” as output video format.

Editor notes:
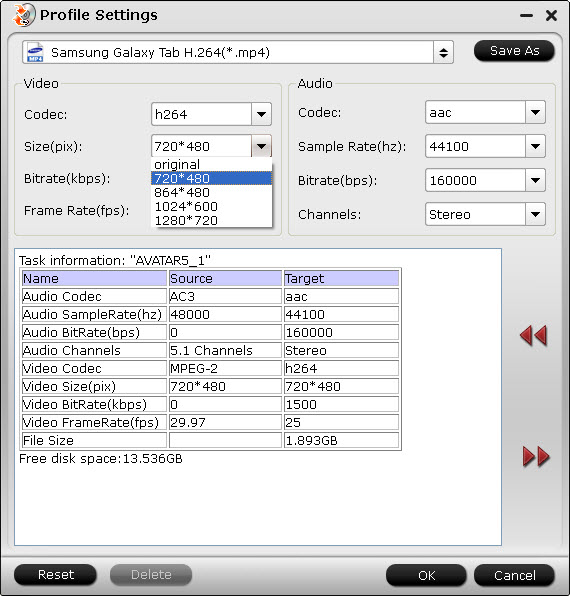
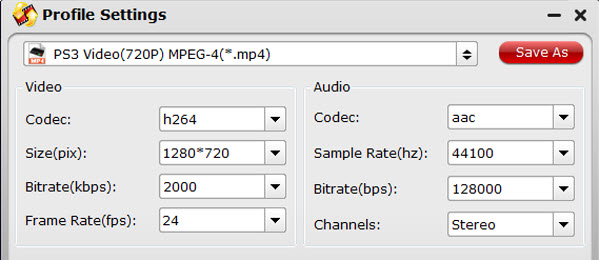
1. Click “Settings” on the interface and you can adjust the parameters including size, bitrate, frame rate, etc. to get a high quality of output files or a smaller files size. You can preview the size at the below chart.
Keep in mind the file size and video quality is based more on bitrate than resolution which means bitrate higher results in big file size, and lower visible quality loss, and vice versa.

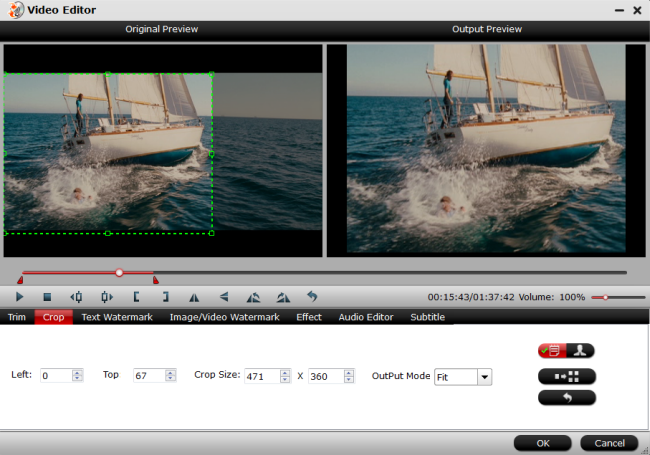
2. Open "Video Editor" window and switch to the "Trim" tab, you can drag the slider bars to include the segment you want to remain, click the left square bracket to set start point, and click the right square bracket to set end point when previewing the video or directly input specific values to "Start" and "End" box.

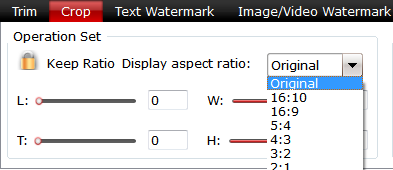
3. Open "Video Editor" window, switch to and click "Crop" tab, click the icon on the right-bottom to swtich to the advanced mode, then you can choose the output aspect ratio such as 16:10, 16:9, 5:4, 4:3 and 2:1 from the drop-down list of "Display Aspect Ration".
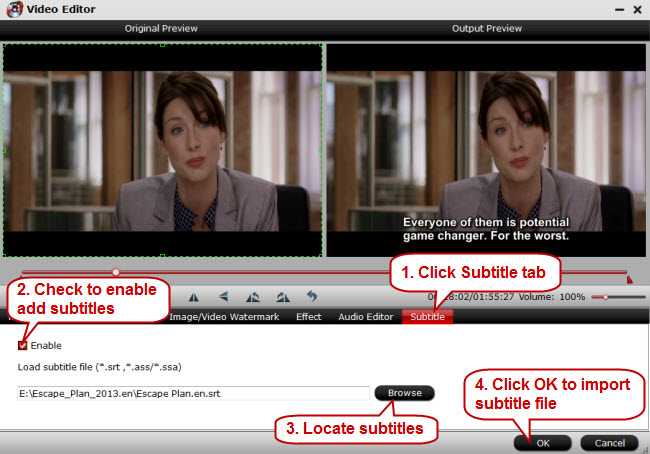
4. Click the "Subtitle" tab in "Video Editor" window, check "Enable", then you will be able to add external SRT/ASS/SSA subtitle files to the video as hard subtitles.(Difference between soft subtitles and hard subtitles)
Step 3: Start to convert
Switch back to the main interface, click the big button "Convert" on bottom-right corner to start conversion. When the process is over, you can find the converted files by clicking the "Open output folder" on the main interface of the program.
Now, transfer the converted DVD movies to OneDrive, so that you can play the DVD movies on Windows 10 smartphone via OneDrive at anywhere and anytime.
Learn more:
Uploading videos to OneDrive:
Most phones and tablets with a wireless connection can automatically upload photos and videos.
* If you have an iPhone, iPad, or Android device: Install the OneDrive app and set it to upload to OneDrive.
* If you have a Windows 8.1 or Windows RT 8.1 tablet:
1. Swipe in from the right edge of the screen, tap Settings, and then tap Change PC settings.
(If you're using a mouse, point to the upper-right corner of the screen, move the mouse pointer down, click Settings, and then click Change PC settings.)
2. Tap or click OneDrive.
3. Tap or click Camera roll.
4. Choose if you want to upload photos, videos, or both. If you choose to upload photos, then choose Upload photos at good quality, or for higher resolution copies, choose Upload photos at best quality.
Getting to your files from anywhere
When your videos are on OneDrive, you can get to them from almost any device, even if something happens to your PC. You can go to OneDrive.com using a web browser, you can use one of the mobile apps, and you can even keep files in sync with other computers by installing the OneDrive desktop app on them.
Storing videos on OneDrive makes sharing them convenient. You can choose whether you want to let people only view the files or also edit them. You can also post links on social networks and get short URLs for sharing in text messages.
Related Articles:
So, if you have DVD movies and want to play them on your Windows 10 smartphone on car, on train or on plane freely, it would be a great idea to rip DVD movies to OneDrive so that you can play the DVD movies on Windows 10 smartphone from OneDrive at home or at work. Here is a guide to play DVD movies on Windows 10 smartphone via OneDrive easily.
Learn more: Windows 10 VS Windows 8, iOS 9 VS Windows Phone 10 VS Android 6.0
What you need to know about OneDrive in Windows 10:
In Windows 10, placeholders are replaced by selective sync. To change OneDrive settings, right-click the icon in the notification area, select Settings, switch to the Choose folders tab, and click the Choose folders button. You can either sync All files and folders on your OneDrive, or Choose folders to sync, meaning they will be available locally.
OneDrive also supports remote access. Under the Settings tab, if you check Let me use OneDrive to fetch any of my files on this PC, you can access your files remotely, i.e. from another computer via the OneDrive website.
How to Play DVD Movies on Windows 10 Smartphone via OneDrive Easily?
To be able to play DVD movies on Windows 10 smartphone via One Drive, you have to rip DVD to Windows 10 smartphone supported video format. With the help of a professional DVD Ripper, it would be a piece of cake to rip DVD. Here, I recommend you to use Pavtube DVDAid to do the job.<review>
The ability to decrypt DVD disc with copy protections, region code, Disny code, CSS, RCE, Sony ArccOS, UOPs etc has made it the strongest ever to rip DVD. Besides, it can rip DVD disc or convert DVD movies to all Windows 10 smartphones supported video format. Moreover, you can select the language subtitle you want to show in DVD movie, if there are several language subtitles in movie.
More Highlights on Pavtube DVDAid:
* DVD ripper + DVD copier + DVD editor
* Support NVIDIA CUDA and ATI Stream (AMD APP) acceleration technologies.
* Convert/rip/shrink/copy the latest releases of DVD movies.
* Cut off unwanted video parts and just preserve segment out of a complete movie.
* Remove black edges and unwanted area of image in original movie with simple operation.
* Separate one single file into multiple clips according to quantity, duration and output size
* Adjust output aspect ratio, such as 16:10, 16:9, 5:4, 4:3 and 2:1.
* Allows you to batch convert your videos to save your much time.
* Support adding .srt /.ass/.ssa subtitles into movies.
Mac user can choose Pavtube DVDAid for Mac to rip DVD movies, which has updated to support the newest Mac OS X El Capitan.
Learn more choice >>> Top 3 + 3 DVD Ripper for Mac
Free download and install:
Other Download:
- Pavtube old official address: http://www.pavtube.cn/dvd_ripper/
- Cnet Download: http://download.cnet.com/Pavtube-DVDAid/3000-7970_4-76158510.html
Steps to Play DVD Movies on Windows 10 Smartphone via OneDrive
Step 1. Load DVD movies
Insert your DVD disc into a DVD drive, run the program on your computer, on the main interface click "File" > "Load from disc" to import the DVD disc to the program.
Step 2: Set output format
H.264 MP4 format is the most compatible video format for Windows 10 smartphone. You can go for “HD Video > H.264 HD MP4 (*.mp4)” or “Windows > Windows phone 8 H.264 video (*.mp4)” as output video format.
Editor notes:
1. Click “Settings” on the interface and you can adjust the parameters including size, bitrate, frame rate, etc. to get a high quality of output files or a smaller files size. You can preview the size at the below chart.
Keep in mind the file size and video quality is based more on bitrate than resolution which means bitrate higher results in big file size, and lower visible quality loss, and vice versa.
2. Open "Video Editor" window and switch to the "Trim" tab, you can drag the slider bars to include the segment you want to remain, click the left square bracket to set start point, and click the right square bracket to set end point when previewing the video or directly input specific values to "Start" and "End" box.
3. Open "Video Editor" window, switch to and click "Crop" tab, click the
icon on the right-bottom to swtich to the advanced mode, then you can choose the output aspect ratio such as 16:10, 16:9, 5:4, 4:3 and 2:1 from the drop-down list of "Display Aspect Ration".4. Click the "Subtitle" tab in "Video Editor" window, check "Enable", then you will be able to add external SRT/ASS/SSA subtitle files to the video as hard subtitles.(Difference between soft subtitles and hard subtitles)
Step 3: Start to convert
Switch back to the main interface, click the big button "Convert" on bottom-right corner to start conversion. When the process is over, you can find the converted files by clicking the "Open output folder" on the main interface of the program.
Now, transfer the converted DVD movies to OneDrive, so that you can play the DVD movies on Windows 10 smartphone via OneDrive at anywhere and anytime.
Learn more:
Uploading videos to OneDrive:
Most phones and tablets with a wireless connection can automatically upload photos and videos.
* If you have an iPhone, iPad, or Android device: Install the OneDrive app and set it to upload to OneDrive.
* If you have a Windows 8.1 or Windows RT 8.1 tablet:
1. Swipe in from the right edge of the screen, tap Settings, and then tap Change PC settings.
(If you're using a mouse, point to the upper-right corner of the screen, move the mouse pointer down, click Settings, and then click Change PC settings.)
2. Tap or click OneDrive.
3. Tap or click Camera roll.
4. Choose if you want to upload photos, videos, or both. If you choose to upload photos, then choose Upload photos at good quality, or for higher resolution copies, choose Upload photos at best quality.
Getting to your files from anywhere
When your videos are on OneDrive, you can get to them from almost any device, even if something happens to your PC. You can go to OneDrive.com using a web browser, you can use one of the mobile apps, and you can even keep files in sync with other computers by installing the OneDrive desktop app on them.
Storing videos on OneDrive makes sharing them convenient. You can choose whether you want to let people only view the files or also edit them. You can also post links on social networks and get short URLs for sharing in text messages.
Related Articles: