Monday, April 24, 2017

Play Blu-ray on LG Netcast/WebOS TV with Plex

Great home theater isn’t just about the biggest, smartest TV or the most sophisticated sound system. Maybe you have collected some Blu-ray discs and want to play them on LG Netcast/WebOS TV with Plex? Yes, The Plex app is made available through the Smart TV alliance for LG Netcast/WebOS televisions. But Blu-ray disc is not played direclt on LG Netcast/WebOS TV with Plex. Read on this guide to learn how to play Blu-ray on LG Netcast/WebOS TV with Plex smoothly.

Best Tool to Play Blu-ray on LG Netcast/WebOS TV with Plex

Since LG Netcast/WebOS TV and plex don’t support playing Blu-ray movies, you can rip your Blu-ray. Just choose a Blu-ray ripper to LG Netcast/WebOS TV and Plex supported video for smooth playing. Today, the DVD Ripper we prefer to use to rip Blu-ray to LG Netcast/WebOS TV/Plex is Pavtube ByteCopy. Just like any other powerful Blu-ray ripping too, it can convert Blu-ray to LG Netcast/WebOS TV and Plex supported format with original video quality and high Blu-ray ripping speed. With an intuitive interface, it is easy to use that you can know the next step easily. Mac user just get its Mac version.

Why choose Pavtube ByteCopy ro Rip Blu-ray

  • Rip Blu-ray to LG Netcast/WebOS TV, Plex supported video
  • Rip Blu-ray to LG TV, Samsung TV, Sony TV, Panasonic TV etc supported video
  • 2 ways to copy Blu-ray: Full disc copy, direclt copy
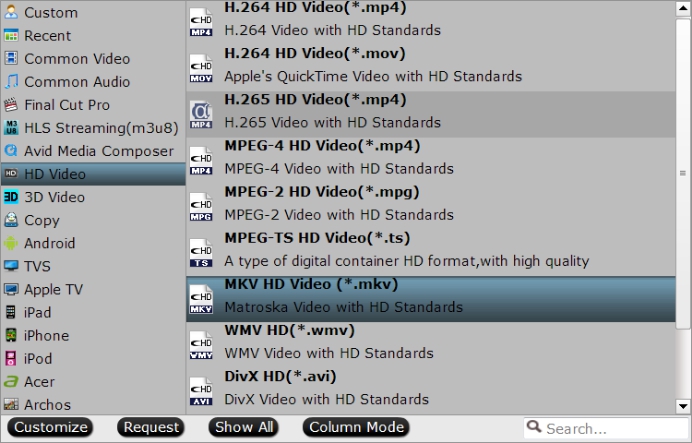
  • Lossless Blu-ray to MKV backup with multiple audio/subtitle tracks
  • Convert Blu-ray to Multi-track MP4, MOV, AVI
  • Export single SRT subtitle file
  • Quick conversion - Brings about conversion at seed of up to 30X.
  • Custom Video: Personalize videos with diversified video editing tools.
  • Allow you to complete the conversion process with three simple clicks.

Free download this Blu-ray ripper for LG Netcast/WebOS TV and Plex

Before ripping Blu-ray, you can learn LG Netcast/WebOS Plex app supported formats including the MKV format. Now follow the detailed guide to learn how to rip Blu-ray to LG Netcast/WebOS Plex app supported format.

How to Convert blu-ray to LG Netcast/WebOS TV and Plex supported video formats?

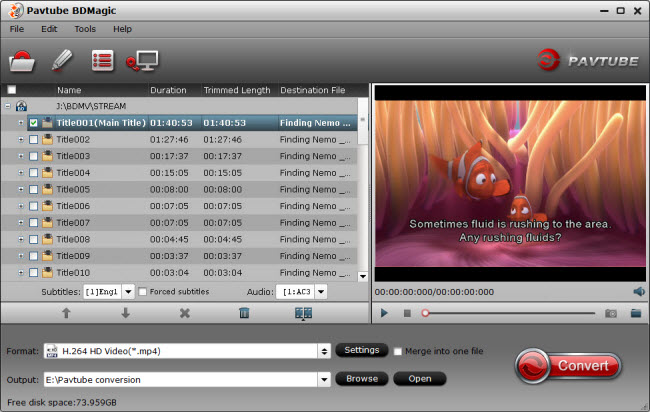
Step 1. Load Blu-ray

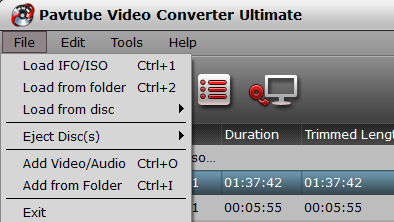
Load Blu-ray disc from optical drive by clicking “File”< “Load File from Disc”.

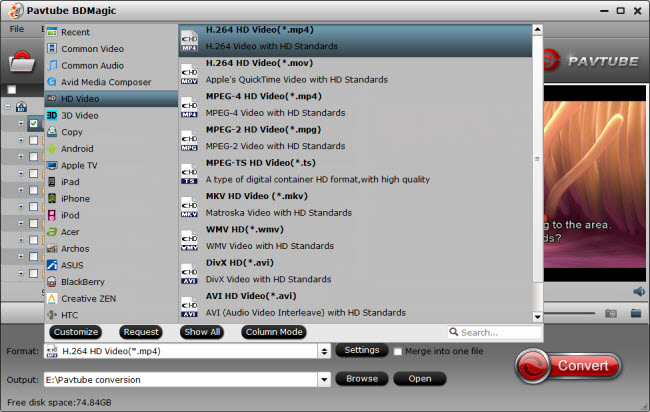
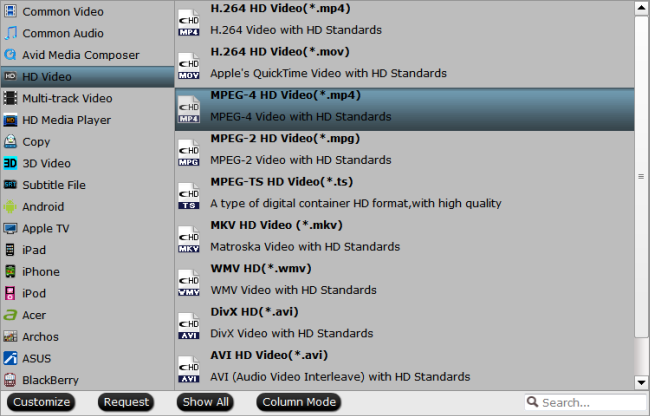
Step 2. Set output format

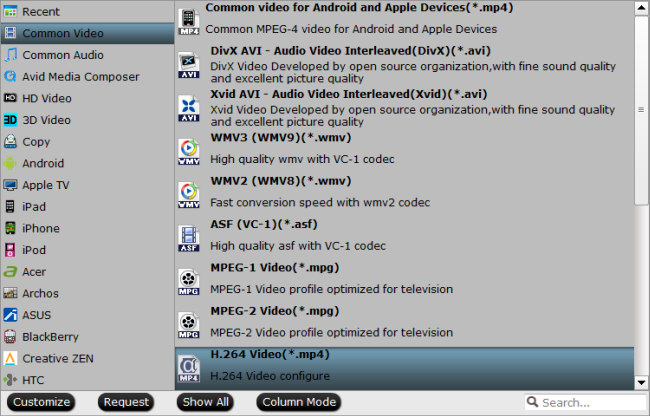
Clicking the Format bar, you can choose output format from the format list or customize which formats to be shown on the list. Here you can choose .mp4 from HD Video or Common Video for playing Blu-rayon LG Netcast/WebOS TV with Plex.

Specify output file format

For streaming Blu-ray to LG Netcast/WebOS TV via Plex, directly output LG Netcast/WebOS TV preset profile formats "LG TV(*.mp4)" from "TVs" extended option list.

3. Start Conversion

Clicking the Convert button on main interface, you can go to Conversion window to start this conversion.

Read More:

Stream ISO Files to LG TV | Video_TS Folder on LG Smart TV

Convert Blu-ray/DVD movies to iTunes | Convert Blu-ray to Apple TV

Rip Blu-ray to WD TV | Copy Videos/Movies to WD My Book Series

Play H.265/HEVC to PS4/Plex | Play M2TS Files with Plex

Rip DVD to Apple TV  | Stream 4K Blu-ray on Xbox One S

Play Blu-ray/DVD/Video on LG Ultra 4K TV | Play 4K XAVC S on Plex

Monday, April 17, 2017

Backup Hundreds of Blu-ray and DVD Movies to Cloud Storage

As Internet lines become faster and servers more affordable, online cloud storage is not a sweet concept any more but a modern service you can really count on when backing up your hundreds of Blu-ray and DVD movies. So, this article will show how to backup hundreds of Blu-ray and DVD movies to cloud storage.

Part One: Best Cloud Storage in 2017 to Store Blu-ray and DVD Movies

Online storage is an integral part of life now, but with so many available it's hard to decide which one to use. So, firstly I want to recommend you the top 3 cloud storage for you to choose.


1. JustCloud

JustCloud use a small desktop application where customers can backup all of their files onto the cloud. They also have free apps for iPhone, iPad, Android, Blackberry, Kindle and Windows so you can backup and access files from any device. If you have rare family photos which you would not want to be accidentally deleted or a music library which took you years to collect and organize, then you should definitely think about getting the services of JustCloud.


2. ZipCloud

ZipCloud is just one of the many online backup services providers available on the Internet today. When you take advantage of their service, you will have a simple, safe and secure way of backing up your data. The founders of ZipCloud are Dan Richards and Brooke Bryan. Since the company’s inception, they have consistently been included among the top ten lists of the best online backup sites. Read on to find out more about the features, security, support and overall rating of ZipCloud as an online backup site.

3. SugarSync

SugarSync has their headquarters based in San Mateo, California and they currently have millions of subscribers around the world. The thrust of their campaign is to allow you to use a service which helps you “sync your life”. By simply downloading the software on your computer and mobile devices, you can gain access to everything that the cloud has to offer.


Part Two: How to Backup Hundreds of Blu-ray and DVD Movies to Cloud Storage

So, after knowing which cloud storage to choose, the next important thing you should know is how to backup hundreds of Blu-ray and DVD movies to cloud storage.

Here, I suggest you to use Pavtube BDMagic to rip and convert Blu-ray and DVD to regular video formats for storage on Cloud Storage,  like MP4, MOV, MKV, FLV, WMV, AVI format etc. Considering the limited space of normal cloud storage, the program allows you to lower converted video size by adjusting video parameters. Also considering to the final usage of your converted Blu-ray and DVD movies, the app provides optimized video presets formats for mainstream devices to let your get videos with the best settings to fit your device. Furthermore, the built-in video editor allows you to easily get desired video part and effects. (Review)

For Mac user, you can turn to Pavtube BDMagic for Mac for downloading. The program has updated to support the newest Mac OS X El Capitan.

Free download and install: 


Other Download:
- Pavtube old official address: http://www.pavtube.cn/blu-ray-ripper/
- Cnet Download: http://download.cnet.com/Pavtube-BDMagic/3000-7970_4-75922877.html

Steps to Backup Hundreds of Blu-ray and DVD Movies to Cloud Storage

Step 1. Load DVD/Blu-ray movies

Click “File” to load your Blu-ray/DVD movie to this program. It will automatically choose the main content to convert. If there are several language subtitles in your Blu-ray/DVD movies, you can select the language subtitle you want to show in your movie by “Subtitle”.


Step 2: Set output format

In drop-down format list, you can choose the optimized preset format for your final device. If you have not decided the final usage of your converted video, you can choose “HD Video” > “H.264 HD Video(*.mp4)” as output format for playing on laptops, tablets, mobile phones etc. 


Tips:

1. If you just want to digital your Blu-ray/DVD for more convenient organization and management, you also can choose tofull disc copy Blu-ray/DVD or main title copy.

2. Click “Settings” on the interface and you can adjust the parameters including size, bitrate, frame rate, etc. to get a high quality of output files or a smaller files size. Keep in mind the file size and video quality is based more on bitrate than resolution which means bitrate higher results in big file size, and lower visible quality loss, and vice versa. You can preview the size at the below chart.

Step 3: Start to convert

After all settings done, hit on the “Convert” button and Blu-ray/DVD to cloud storage conversion will start. After the conversion completes, open output folder and you will find the converted movies.

Now, you can backup your hundred of converted Blu-ray and DVD movies to cloud storage now. In addition to Cloud Storage, you can also backup Blu-ray and DVD to Media PlayeriTunes library or External Hard Drive/Thumb Drive etc.

Related Articles:

Backup Blu-ray/DVD for Amazon Cloud Drive

Backup DVD and Blu-ray collections to home server

 Backup 2D/3D Blu-ray Movies on Mac El Capitan

Backup Blu-ray/DVD for My Passport Wireless Storage

Backup Blu-ray to H.265 HEVC MP4 on Mac OS X

Backup Blu-ray/DVD/ISO to Surface Book

Back Up DVD Collection with Mac

Lossless Blu-ray to MKV Backup

Monday, April 10, 2017

How to Trim Movies for Taking out Extra Scenes?

Movies bring great entertainment for most people all over the world. A movie has an ability of influencing our lives whether negatively or positively. In some movies, there may be some touching scenes that you want to cut out to upload to YouTube or Vimeo to share with your friends. But to common people, they maybe don’t know how to trim movies to get the video clip they want. Here, I will share my some experience on trimming movies for taking out extra scene.

For a non-IT savvy people like me, a user-friendly video trimming tool is needed to trim movies. Pavtube Video Converter Ultimate is the best choice, I think, after I attempted many video softwares. It can accurately trim video length to take out the extra scenes so as to get desired video clip from Blu-ray/DVD/4K/HD/SD movies. And it can accept MP4, MKV, AVI, FLV, MOV, etc format movie to trim video footage and change the video clip to another popular format if necessary. For better looking, you can crop the black area of the video clip. (Read 5 reasons to choose Video Converter Ultimate). If you also want to try this brilliant app, download it in the below:

Free download and install
          

Other Download:
- Pavtube old official address: http://www.pavtube.cn/blu-ray-video-converter-ultimate/
- Cnet Download: http://download.cnet.com/Pavtube-Video-Converter-Ultimate/3000-2194_4-75938564.html

How to trim movies for taking out extra scenes?

Step 1: Add source movie to the app

Click “File” menu, and select "Add Video/Audio" or "Add from folder" to import source movie files.


Step 2: Select output format

If your source movie is Blu-ray/DVD and other unusual format, you can change it to a popular video format in “Format”


Step 3: Trim movies to take out extra scenes

Click “Edit” to find “Trim” icon. This icon allows you to decide where to start and where to end when converting the selected movie, so that unwanted scenes will be cut out after conversion.


Tip: The "Crop" facility enables you to get rid of the black edges and unwanted area of the image. Crop video by dragging and dropping the crop frame Simply move your mouse cursor to drag and adjust the green frame to desired position.


Step 4:  Start to trim movies 

Clicking the Convert button on main interface, you can go to Conversion window to start to trim movies for taking out extra scenes.

Now, you get a video clip from the source movie. As you seen, it is easy to trim movies to take out extra scenes with this program. Just try! Also you can look here if you want to trim blu-ray and DVD movies on Mac.

Source: Best way to Trim Movies for Taking out Extra Scenes

Related Article:

Edit movies on the timeline | Lossless Trimming AVCHD Video

Trim and convert HD recordings for HD TV | Edit 4K Video with iMovie on Mac

Trim MTS without re-encoding on Mac | Play 4K Video on PS4 Pro

Trim Sony HDR-XR160E MTS | Split a large video file into several small files

Top 5 Apps to Split or Merge Video Files on Mac | Split Phantom 4 4K video

Wednesday, April 5, 2017

DVDSmith Movie Backup Alternatives and Similar Softwares

DVDSmith Movie Backup is a totally free DVD copier and DVD backup software which can decrypt and remove all kinds of DVD protections, copy DVD to computer hard drive as DVD folder. You can flexibly copy entire DVD disc or copy main movie only. But from some forums, we found many people have issues using DVDSmith Movie Backup. So any program to replace DVDSmith Movie Backup? More excellent, more professional? Yes, just follow the top 2 alternatives to DVDSmith Movie Backup.

Best alternative to DVDSmith Movie Backup is Pavtube ByteCopy Software. We have to say it is the best DVD copier/ripper in the world. What's more, it is also an excellent Blu-ray copier, ripper.

Top 1. DVDSmith Movie Backup Alternative

Powerful Features of Pavtube ByteCopy

Support to decrypt all the latest copy protection Pavtube ByteCopy has the ability to bypass copy and region protection on a commercial DVD dis. In addition, as the Blu-ray disc encryption frequently changes and becomes harder to crack, Pavtube ByteCopy will continuously upgrade to support to circumvent all the latest copy protection on Blu-ray/DVD including AACS, BD+, CSS, region code, RCE, Sony ArccOS, UOPs, Disney x-project DRM, etc.
Two Copy Ways ByteCopy can 1:1 backup DVD without quality loss. With the “Full Disc Copy” function in the top menu bar, you can preserve the DVD and Blu-ray’s original file structure, backup Blu-ray and DVD disc to Mac with one click. Using “Directly Copy” feature, you can backup Blu-ray main movie or “Directly Copy 3D Blu-ray Disc” content in original M2TS/VOB format with original video quality.
Lossless/uncompressed MKV option and multiple soft audio tracks & subtitles. ByteCopy offers a lossless MKV option in output list, which means you’ll get a real uncompressed MKV file keeping DTS 5.1/7.1 surround audio without any quality loss on big screen. It also offers multi-track MP4/MOV/AVI presets with multiple audio streams and removable subtitles, so you can free switch, turn on/off during playback.
Various output presets. Pavtube ByteCopy supports converting DVD to virtually any popular video and audio format so that you can freely watch movies on Apple iOS devices, Android OS devices, HDTV, 3D TVs, PSP, PS4, PS3, Plex, WDTV Live, Roku 4 and more devices. In recent update, ByteCopy can support ripping Blu-ray/DVD movie to H.265/HEVC MP4 with better video quality compared to H.264 MP4 in same profile presets. It even can create 3D SBS video from 2D/3D Blu-ray and DVD on Mac for your VR Headsets such as ZEISS VR One, Oculus Rift CV1, ANTVR Kit, Samsung Gear VR, etc.
Stable in Latest Mac Operating System ByteCopy supports the latest Compatible with Windows 10, Windows 8.1, Windows 8, Windows 7, Windows XP. Mac version supports Mac OS X including MacOS 10.12 macOS Sierra, Mac OS X 10.11.4 El Capitan, Mac OS X 10.10 Yosemite, 10.9 Mavericks, 10.8 Mountain Lion, 10.7 Lion, 10.6 Snow Leopard, 10.5 Leopard.


How to Use Pavtube ByteCopy to Copy DVD/Rip DVD?

Download Windows version or Mac version


Step 1. Load DVD movie

Click “File” in top left corner and follow “Load from disc” to load the DVD movie to DVD Ripper on Windows or Mac.

Step 2. Two ways to copy DVD movie

A. DVD full disc copy

Full disc copy allows you to keep the whole file structure in your DVD disc complete without any quality loss. Click the “Copy the entire disc” button to start DVD full disc copy.

B. Directly copy

If you hate the extras in the DVD, you can try copying DVD main movie only which will leave out any extras for you. Click the format bar to follow “Copy” > “Directly Copy.”

Step 3. Rip DVD to multi-track MKV/MP4/MOV/AVI

Pavtube ByteCopy also allows you to preserve multi-track information when you choose DVD to multi-track MKV/MP4/AVI/MOV. Click the format bar to pick the proper multi-track output format under “Multi-track Video” option.

Step 4: Start backup and copy DVD

If you choose the second or third way to copy DVD movie, you need to hit the “Convert” button in bottom right corner to start DVD main movie copy or DVD to multi-track MKV, MP4, MOV and AVI conversion. When the process is completed, open output folder and find the ripped DVD file. 

Finally, you can enjoy your DVD movies on computer as you like without hassle. 

Top 2. DVDSmith Movie Backup Alternative

Free DVDAid offers every user the opportunity to rip, encode and edit DVD to almost any video and audio format freely. Without extra payment, you could own a freeware to assist with DVD to video/audio transition which enables you to watch DVDs on other multimedia players without limitation. Plus, with the built-in video editor, Free DVDAid is considered to be a easily handled video editing tool with the ability of trimming, cropping, splitting, merging, adding subtitle file, etc.

  • A 100% Free and Easy way to rip your DVD Movies for Personal Use
  • Support DVD disc, DVD VIDEO_TS folder, and DVD IFO/ISO
  • Rip DVD to AVI, MKV, MOV, M4A, AAC… around 70 video and audio formats
  • Fast conversion speed with the NVIDIA CUDA technology and AMD ® Accelerated Parallel Processing (APP)
  • Customize DVD content with built-in video editor

You can go to learn how to use Free DVDAid software.

Source: techmovieshare.blogspot.com

Related Articles:

Format Factory Alternative | Camtasia Studio Alternative | Handbrake Alternative | MakeMKV Alternative | Super Converter Alternative

MPEG StreamClip Alternative | Superior iMovie Alternative | QuickTime Alternative | iDVD Alternative | Wondershare Alternative |RipIt Alternative

Best MediaCoder Nvidia H.265 Encoder Alternatives | Adobe Flash PlayerAlternative | Freemake Video Converter for mac Alternative | Flip4Mac Alternative

DVD Rippers Review | Pavtube ByteCopy Review | Video Converters for PC Review | H.265/HEVC video decoder Review | 4K Blu-ray Ripper Review

Best VR Movies Review | DJI Phantom 4 Pro+ Review | DJI Mavic Pro Review | Instagram Video Converter Review | Microsoft Surface Review

4K Video Editor Review | Pavtube iMedia Converter Review | Blu-ray to QuickTime Review | Customer Review for Pavtube Media Magician