Tuesday, September 27, 2016

DVD disc types

The purpose of this article is to provide a quick introduction to the most common DVD types. Notice that it's essential to understand these formats before starting to burn DVD discs.

DVD stands for Digital Versatile Disc (or Digital Video Disc) and it was designed for digital media storage, more specifically for replacing the previous VHS and SVHS technology.


DVD physical structure

A DVD is basically a CD with larger capacity; but the DVD has two major attributes that makes it different from the CD: The ability to store data on both sides of the disc, and with dual data layers on each side as well. The total DVD capacity ranges from 4.7 to 17.1 GB, according to the type of disc, the later being a double-sided and double-layered disc.


Internal DVD structure

DVD capacities and disc types


* The indicated disc capacities are higher than the useable ones because they consider each GB as 1000 MB, while in computers 1 GB equals to 1024 MB.
** The DVD-14 is a double sided disc, one of them is single layer while the other is dual layer. This one and DVD-18 are extremely hard to manufacture and are for all practical purposes not available commercially.

DVD-5 (4.38 GB, SS-SL)

The DVD-5 is the simplest type of disc, because it features and unique data layer on one of its sides, using the opposite side for labeling of the disc. Its effective capacity is 4.38 GB, and its structure is identical to the used in the CD.


DVD-5 structure

DVD-9 (7.92 GB, SS-DL)

The single sided, dual layer DVD-9 features two reflective surfaces on the same side of the disc, and this provides almost twice the capacity of the single layered DVD-5. The reading laser can read each layer independently. This provides 7.92 GB for data storage.


DVD-9 structure

Its capacity is slightly smaller than twice the single layer version because its pits are 10% longer to make the second layer easier to read. This disc can be have a label on the unused side.

DVD-10 (8.76 GB, DS-SL)

The DVD-10 disc uses both sides to store data, each of them with a single reflective layer. Its capacity doubles the one from the DVD-5. To playback the other side of the disc, the disc must be extracted and turned over in most drives.


DVD-10 structure

Since both sides of the disc contain data, the label printing can only be done on a thin ring in the center of the disc.

DVD-18 (15.9 GB, DS-DL)

DVD-18 provides the highest capacity of the DVD family, because it stores data on both sides using a dual layer structure on each of them. This provides almost 16 GB for effective storage.


DVD-18 structure

This type of DVD is the most complex to manufacture, because the four data layers must be stamped on the same substrate. In the DVD-Video family, these discs usually contain a movie in Widescreen on one of its sides and the Fullscreen version on the other side.

Source: DVD disc types

Read: 22 Tips to take care of your Blu-rays & DVDs
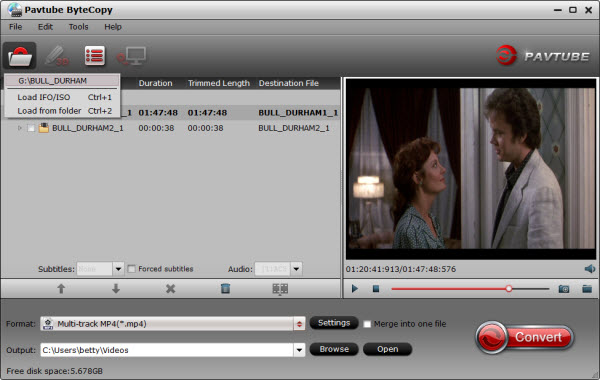
How to Copy DVDs?

Playing DVD movies needs DVD drive and DVD player. This limits DVD playback on portable devices. Besides, due to DVD region codes, you maybe meet DVD streaming issues on your DVD player or PS4, Xbox One S, Xbox One, PS4 Pro, etc. Copying DVD is an effective way to solve all the issues.

It needs  DVD Ripper/Copier to copy DVD to hard drive or convert DVD to multiple media formats. Here we searched some top reviews about top DVD Rippers. You can choose any one to copy and convert your DVD movies.

Top DVD Rippers Reivew:

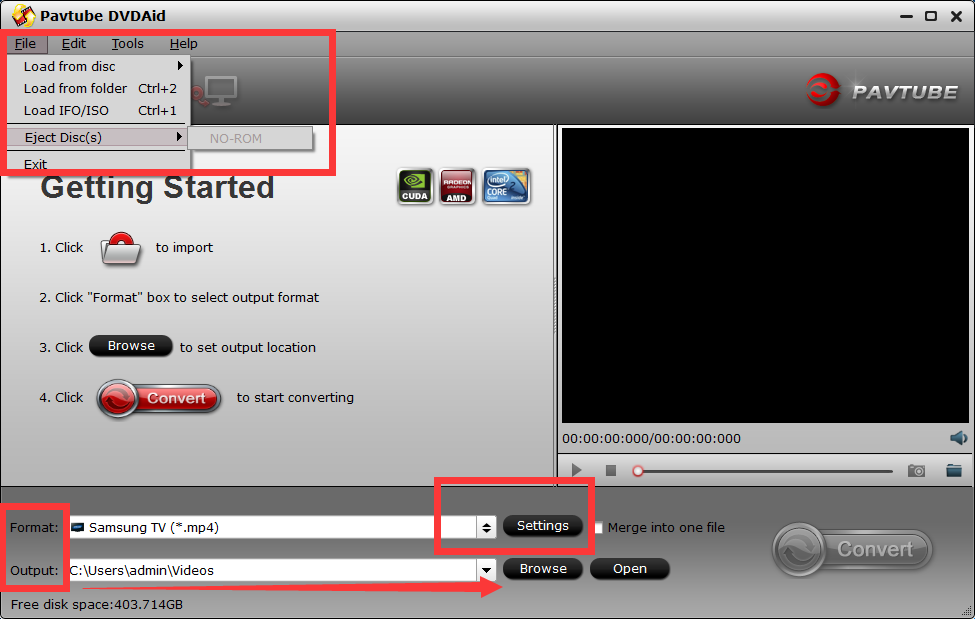
Best DVD Ripper Recommended to copy DVD

Here, we strongly recommend Pavtube BDMagic <Pavtube BDMagic for Mac> . It can handle all the most recent encryption technologies, including region codeDisney copy protectionCSS encryption, Sony ArccOS protection, and it’s updated continuously to handle any new protection schemes. Apart from these features, this DVD to Hard Drive software supports various output formats. You not only convert DVD to MP4, and rip DVD to MKV but also convert DVD to YouTube and DVD to Facebook etc.

Key Features of Top Pavtube DVD Ripper for Hard Drive: 

* 1:1 backup DVD/Blu-ray with original video structure.
* Copy DVD/Blu-ray keeping main title. 
* Rip DVD/Blu-ray to Hard drive in MP4, MOV, M4V with excellent video quality. 
* Make users choose desired subtitle, forced subtitle, keep multiple subtitles, extract srt subtitle from DVD/Blu-ray movies and to add external subtitle to DVD/Blu-ray movies. 
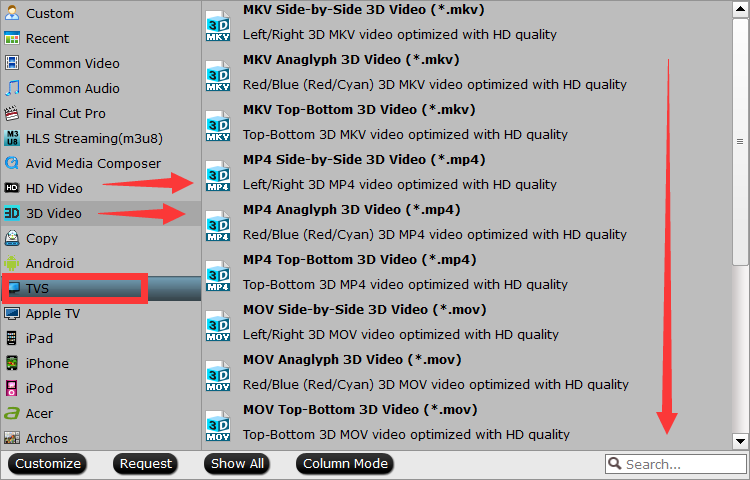
* Supports 300+ main stream output devices such as iPhone 7, iPhone SE, iPhone 6s/6s Plus, iPad Air 3, iPad Mini 4, Samsung Galaxy Note 7, Samsung TV and so on. 
* Enables users to adjust video codec, bitrate, frame rate, size, audio channel, codec, bitrate and display aspect ratio. 

Free Download Top DVD to Hard Drive Ripper: 


Related Articles:

Tuesday, September 20, 2016

22 Tips to take care of your Blu-rays & DVDs

Much like tapes in cassettes or spools and lacquer records, Blu-rays and DVDs although much advanced, are prone to wear and tear. In its life time it moves so many times. Despite all claims, the data is not guaranteed to stay for all the time to come. Pre-recorded, branded and reputable Blue Discs could last a century too. The main threats to such claims are the scratches. Scratches can be so fine that your eyes may not detect them and if the ridges made during the data burning process are cut across, you are bound to lose the data. While movement, it can also be smudged with greasy deposits that could possibly penetrate the fine ridges, not visible to the naked eye.

We may find information on salvaging data from a malfunctioning Blu-rays/DVD, but the success rate of recovery is almost zero.

All we can do is take all the care we can. Here we present the measures that one can take to prolong its life.

  1. When buying blank Blu-rays/DVDs always go for the branded and reputed ones.
  2. Go for the premium quality.
  3. It should be stored correctly.
  4. Original case that it came in is strongly recommended to be used.
  5. Blu-rays/DVDs must be stored in a cool place.
  6. Blu-rays/DVDs must be stored in a dry place.
  7. Blu-rays/DVDs must be stored away from light.
  8. It is best to anchor your Blu-rays/DVD on the anchoring pin, inside the box; this leaves the surface in air.
  9. Cases that can hold multiple Blu-rays/DVDs might assure convenience; what it may not assure are scratches. Exercise caution when using such cases / albums.
  10. When buying albums/cases, choose one that provides the softest lining possible.
  11. Linings if removal, must not be exposed to air else it could accumulate dust.
  12. Such albums/cases must not be left outside; dust particles could accumulate in.
  13. Protect your Blu-rays/DVDs from fingure touch
  14. Wiping if ever, must be done with the softest wiping cloth.
  15. Smudges should be wiped clean.
  16. These are best kept away from reach of children.
  17. Keep them out of reach of pets.
  18. Use water-based permanent markers to label them.
  19. Do not allow ink to reach the recording surface.
  20. Exercise all precaution you can when placing it on the DVD tray so it does not scratch
  21. Do not keep the disc at any place other than the tray or its case
  22. Make Duplicate of Blu-ray and DVD to Protect Physical Discs. By copying Blu-ray and DVD movies to hard drivethumb drivecloud serviceNASexternal hard drive and so on, you can store your physical discs to attic, basement to save space of the cupboard. You also don't need to worry your naughty kids destroy your discs.

Backup a Blu-ray/DVD the Easy Way with Pavtube ByteCopy

If you want to make some backups of your DVD collection, the easiest solution is Pavtube ByteCopy, which can not only rip just about any DVD/Blu-ray, but can convert them into any format you want really easily — so you can put those movies or TV episodes on your mobile device or tablet the easy way. It’s literally as simple as inserting your DVD/Blu-ray, selecting the output format, and clicking a button. Done.

Key Features of ByteCopy:

  •  Powerful, practical and easy to use

  •  Lossless/uncompressed MKV export from Blu-ray/DVD

  •  Multi-track MP4/MOV/AVI output

  •  Back up Blu-ray/DVD disc, folder and/or ISO file to computer or blank disc fast

  •  Professional technology to copy DVD/Blu-ray

  •  3 different DVD copy modes: entire copy, diretly copy, copy Blu-ray/DVD to digital files.

  •  Preview content before copying

  •  Clean interface with all info showed

Although Blu-rays or DVDs – blank or prerecorded – are abundantly available these days, it can be a real loss if you fail to find that rare movie or the rare hands-free exercise DVD. Secondly, losing the DVD that you burned after spending plenty time collecting and burning your favorite stuff can be quite painful. In the remote possibility of losing any of your discs, you would find solace in exercising all cautions described here.

Related Articles:

Tuesday, September 13, 2016

Rip 4K Blu-ray to Plex for 4K TV Streaming

Plex gives us an easy access to 4K TV shows and movies at home or on the go. Are you looking for a way to backup 4K Blu-ray to Plex for 4K TV for sharing and streaming? If you wanna transfer your 4K Blu-ray collection to Plex for streaming widely, just read on this article. We will focus on how to backup 4K Blu-ray to Plex Media Server for streaming and playing on 4K TV and other portable devices, media players, etc. 

Although Plex it self can’t play 4K Blu-ray natively for 4K Blu-ray encryption, there are many ways to rip 4K Blu-ray to Plex supported formats. And to preserve the 4K Blu-ray video and audio quality, the best workaround to get the job done is to rip 4K Blu-ray movies to MP4 format that Plex Media Server/4K TVcan easily support.

There is a number of 4K Blu-ray Ripping software available to help you convert 4K Blu-rays videos if you want to play them on 4K TV via Plex. The best program I can recommend here is called Pavtube ByteCopy which also can is available for  Mac users. It is easy to use for conversion and editing and makes great quality copies of 4K Blu-rays Collections .

Actually, with it you can convert 4K Blu-ray to almost all regular video formats like MP4, MOV, MKV, FLV, WMV, AVI, etc. and even extract MP3, WMA, FLAC, OGG, etc. audio from 4K Blu-ray movies. Best of all, it allows you to copy your 4K Blu-ray movies to hard drive with original structure or main movie only. If you’re using a Windows, please turn to app, which enables you to convert 4K Blu-ray to Plex Media Server for 4K TV.

Free download and install:


Other Download:
- Pavtube old official address: http://www.pavtube.cn/bytecopy/
- Cnet Download: http://download.cnet.com/Pavtube-ByteCopy/3000-7970_4-76158512.html
The Steps: How to Rip/Stream 4K Blu-ray over Plex on 4K TV via Mac OS X El Capitan 

Now you can follow the steps below to rip 4K Blu-ray to Plex for steaming to 4K TV with a few clicks! 

Note: When ripping a 4K Blu-ray disc, anywhere from 30 to 60 GB of hard disk space is needed depending on what you’re ripping. 4K Blu-rays are big, and we’re going to rip the whole thing to our drive first, so depending on the movie you’re ripping and the quality you want in your final movie file, you’ll need a good amount of space. 

Step 1: Insert your Blu-ray disc

To your computer’s drive, then launch the 4K Blu-ray ripping software and click the “Load Disc” button to have the 4K Blu-ray content imported with a BD drive. You can also add DVD discs, VIDEO_TS folder, DVD ISO files are the source files for converting. 


Step 2: Choose output format 

Officially, the TV only supports MPEG-4 and H.264 with .mov, .m4v, and .mp4 extensions video, meaning that’s the only media recognized over Plex’ Direct Play. To stream 4K Blu-ray over Plex to 4K TV, click “Format” bar and choose the “H.264 video (*.mp4)” profile from the “Common” Video category. 

“tv pavtube”的图片搜索结果

Tips: Advanced Settings (Optional). With the right settings you can retain the quality of the original 4K Blu-ray while also saving space. This is particularly helpful when streaming over your network, depending on your network quality. Simply click Settings bar and you can tweak the settings to your satisfaction and even save it as preset. Below is my best format settings for ripping 4K Blu-ray content to Plex, you can take it as reference: 

Step 3: Start ripping blu-ray

Hit the “Convert” button at the bottom of the main interface to start the conversion. It will automatically convert 4K Blu-ray to Plex Media Server compatible video files for further streaming to play on TV. 

Once the conversion is finished, click “Open” to quickly find the converted movies. Then, Add the converted movies to Plex and Plex will recognize, catalog, play and stream these Blu-ray files to 4K TV via Mac OS X El Capitan at ease.

Additional Tips: 

As mentionded above, officially, the 4K TV only supports MPEG-4 and H.264 with .mov, .m4v, and .mp4 extensions video, meaning that’s the only media recognized over USB and Plex’ Direct Play. If you want to prepare all of your media files (VOB, MKV, AVI, MPG, DVD and Blu-ray) for playback on TV, you can get Pavtube Video Converter Ultimate (an all-in-one video, DVD and Blu-ray solution) to achieve your goal smoothly.

Related Articles: 

Tuesday, September 6, 2016

Rip Copy DVD to Computer Stick with Windows/macOS Sierra/El Capitan

That iStick, Google Chromecast, Amazon Fire TV stick and Android stick are growing in popularity speeds up the developing of more new stick products to some extent, like Intel Corporation has just announced its new generation of stick product - Intel Computer, which is pre-installed with Windows/macOS Sierra/El Capitan and onced pluged into a HDMI monitor or smart TV, a fully functional computer takes shape.

Question from DVDUser:
I wish to use an istick to transfer my movie DVD video to an iPad. Will any software allow me to load the movie file on to the stick so that I can then plug the stick into the iPad to play the movie instead of taking up space on the iPad.

Answer: iStick is actually an USB flash drive designed exclusively for Apple devices, including iPhone and iPad. If you'd like to play a movie DVD on iPad through iStick, you just need a DVD to iStick Ripper to rip DVD to iStick/iPad supported video formats (eg. MP4, M4C, MOV, MPG) first, pluge the iStick into Apple device, and then you can enjoy the movie DVD video on iPad at will.

How to Backup ? | Blu-ray DTS TrueHD


Hot Search: DVD to USB Thumbdrive  /  DVD to Computer Stick for iPad /  DVD to Computer Stick on HDMI 

Computer on A Stick 
  • Computer on a stick/PC on a stick namely means a computer/PC in a (USB) stick format, which actually is an composition of an ARM CPU, an operating system (Windows, Android, Linux or Mac) and a flash memory for storage. Early in 2012, several Android sticks like Cotton Candy were out, ranging in price from tens of dollars to 200 dollars. But they all of their configurations are as well as Intel's upcoming computer stick. 
  • Intel Computer Stick is built with Atom quad-core processor, 2G RAM and 32G flash storage forwith Windows/macOS Sierra/El Capitan (1G RAM and 8G flash storage for Linux OS), a micro SD card slot for additional storage, Wi-Fi connection and Bluetooth 4.0. It's undoubtedly the most convenient intelligent device for web browsing, social networking, audio streaming, games and assorted other general purpose tasks like watching movie DVDs. 
Must-Have Tool for DVD to Computer Stick 

Pavtube DVDAid– No. 1 Fast DVD to computer stick converter, which enables you to rip DVD to computer stick, copy main/full title content of DVD to computer stick within minutes, even including those copy protected movie DVDs.

Free download and install:
 

Other Download:
- Pavtube old official address: http://www.pavtube.cn/dvd_ripper/
- Cnet Download: http://download.cnet.com/Pavtube-DVDAid/3000-7970_4-76158510.html

The Steps Tutorial of Rip Copy DVD to Computer Stick 

Step 1. Run Pavtube DVD Ripper and import DVD movie.

Install Pavtube DVDAid and run the software. To load DVD, DVD-ROM is required. Click on “DVD ROM”,You can load DVD folder or DVD ISO/IFO image file in the same way by clicking on “DVD folder”or “IFO/ISO”. 


Step 2. Edit DVD episodes

Select the episode you would like to edit, and click on “Edit”. Pavtube DVDAid features with the following basic editing functions: trim, crop, watermark, effect and audio replace. In the editor interface you can cut off unwanted edges (refer to the thumbnail below), determine the aspect ratio of output video, crop the movie to any length, add personalized watermark to the video, replace the original audio with whatever you like, adjust the volume, etc. Do not forget to click after settings are done. 


Step 3. Set output format and destination.

Click on the format bar and there are various output formats for you to choose from. Apart from common video, audio, HD video, Flash video, there are customized formats for portable devices such as iPad, iPhone, PSP, Blackberry, Nokia, Zune, Creative Zen, Smart TV, VR Headset, Archos and video game consoles. In output path box you can set output destination. To further customize output audio and video parameter, you may click “Settings” button.

Step 4. Converter computer Stick the specified video format

Simply click on “Convert” button to start ripping. You can view the progress information and cancel it halfway. You could set auto shutdown as well.