Monday, September 28, 2015

Rip Various Blu-ray movies to Sony Xperia Z5 with Ease

Sony is expected to welcome new model in its Xperia Z lineup with new devices this year. The new smartphones are expected to launch in September 2015 during IFA. Sony announced three models during its IFA press conference: the Xperia Z5, Xperia Z5 Premium and the Xperia Z5 Compact. Sony has announced that the Xperia Z5 and Xperia Z5 Compact will arrive on shelves in October, with the top-end Xperia Z5 Premium set to follow in November. 

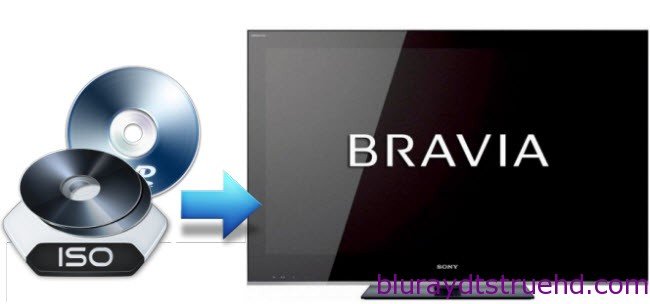
The Xperia Z5 comes with many great features: boasts a 5.2in full HD display, Android 5.0 Lollipop, 3GB RAM and Qualcomm’s notorious Snapdragon 810 processor, However, it doesn't have Blu-ray drive for playing Blu-ray movies obviously. Plus, if you like collecting Blu-ray movies from Blu-ray disc, Blu-ray folder, or Blu-ray ISO image and wanna to watch them on Sony Xperia Z5? Read on to find out the best tutorial to rip and convert Blu-ray movies to Sony Xperia Z5 compatible video/audio formats with ease. 
  
Hot Search: DVD to H.264 MP4 | DVD to MKV | DVD to QuickTime | DVD to PS4 | iTunes to Sony Bravia TV

Here you can try to adopt the Pavtube BDMagic for help. It is easy to use and helps you fast rip and convert (3D)Blu-ray to the Sony Xperia ZV playable format MP4 with perfect audio and video sync keeping HD quality. With its clean interface, fast converting speed and good video quality, converting Blu-ray to Xperia Z5 will be simply finished within a few clicks. Besides, this Blu-ray ripping tool also provide some video editing tools to let you crop the Blu-ray movies black bars, trim the unnecessary part, etc. Read the Top Blu-ray ripping tool

Note: If you are a Mac user, you can turn to BDMagic for Mac, which can help you convert Blu-ray to Xperia Z5 on Mac OS X. 

Free Download Top Blu-ray ripping software for Xperia Z5 here:


Other Download: 

- Pavtube old official address: http://www.pavtube.cn/blu-ray-ripper/
- Cnet Download: http://download.cnet.com/Pavtube-BDMagic/3000-7970_4-75922877.html

Now, let me show you how to get Blu-ray for playing on Sony Xperia Z5 SmartPhone?
  
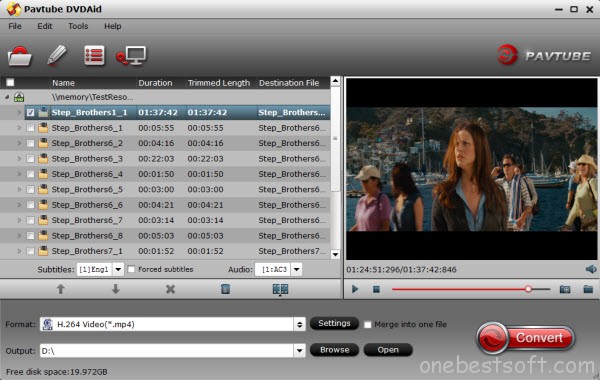
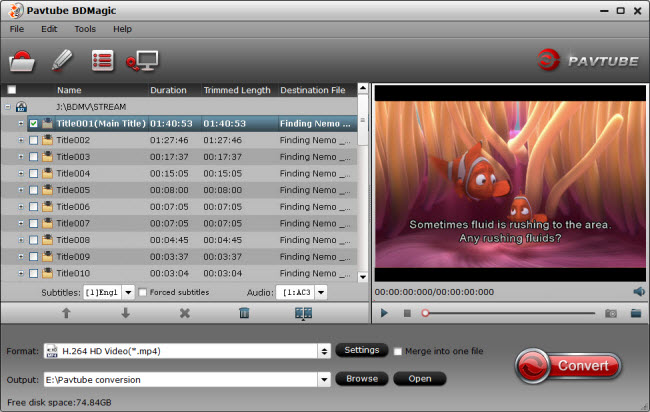
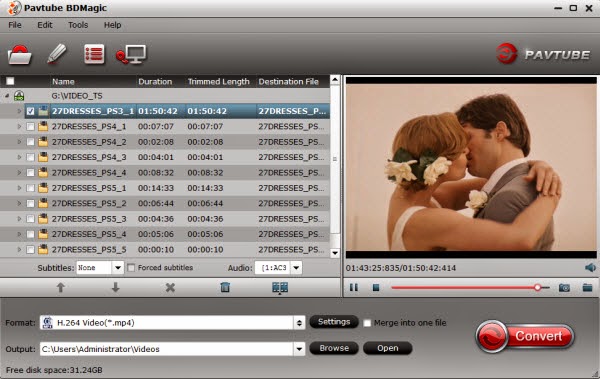
Step 1. Import Blu-ray to Pavtube BDMagic.

Launch the Blu-ray Ripper for Xperia Z5; click the disc icon to select the Blu-ray files you want to convert. Blu-ray, DVD ISO/IFO files are supported as well. After the BD, DVD files are loaded, you can preview them on the right viewing window.


Note:You can also rip and convert latest Blu-ray to various video formats for playback or editing, edit the video before conversion including trim, crop, effect, etc, add *sst and *ass subtitle into video part and so on.

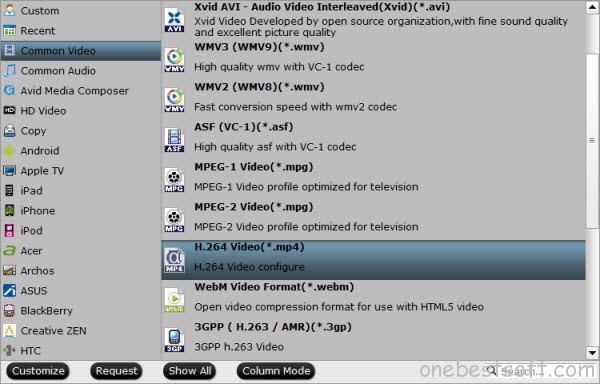
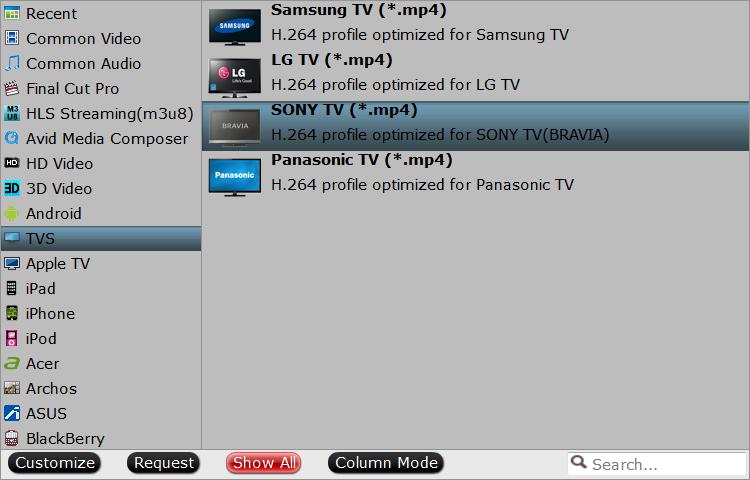
Step 2. Choose target video format for Sony Xperia Z5 .

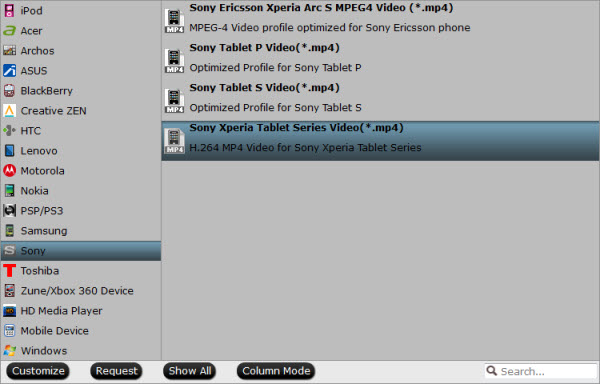
Click the Format bar, and you can directly choose the optimized profiles for Xperia Android Smartphone under "Sony > Sony Xperia P Video(*.mp4)" which can fit Xperia Z5  tablet perfectly. 


Step 3. Best Format Settings for ripping Blu-ray on Xperia Z5 

If you like, you can click “Settings” to change the video encoder, resolution, frame rate, etc. For watching videos on the Android-based device, 720p with 1500~2000kbps is just all right. I found the file size and video quality is based more on bitrate than resolution which means itrate higher results in big file size, and lower visible quality loss. 
  
Step 4. Start Blu-ray to Xperia Z5 conversion. 

When all the settings are OK, click "Convert" button to start ripping Blu-ray movies to MP4 video for playback on Sony Xperia Z5 Smartphone with ease.

When the conversion is over, click "open" to locate the ripped video files. After that, you can connect your Sony Xperia Z5 to computer and transfer the converted Blu-ray files to Xperia Z5 for enjoyment on the go. 

Editor’s Note: If you are considering to get a powerful all-in-one tool to convert videos, Blu-ray movies and DVDs to your Sony Xperia Z5, Nook HD, Galaxy Tab, Nexus 10, Nexus 9, Kindle Fire HDX, Galaxy Note, Galaxy S6, PS4 at the same saving time and effort, the all-in-one Pavtube Video Converter Ultimate program will a nice choice for you. If you are running a Mac OS X computer, iMedia Converter for Mac is the alternative. 

Read More:
Source:http://device-camcorder-tips.blogspot.com/2015/09/rip-blu-ray-to-sony-xperia-z5.html

Thursday, September 24, 2015

Rip DVDs to Seagate Wireless Plus for iPhone 6S/iPad/iPod Touch 6

We travel a lot an have over 500 DVDs in hand, so I bought a 2TB Seagate Wireless Plus then my family members don't have to fight over the laptop for watching DVD movies. In fact, we can get together with friends and family to enjoy DVD movies via Wireless Plus, the question is: how to convert DVD for uploading to Seagate Wireless Plus?


Here what you need is to make use use of a professionally designed DVD to Wireless Plus converter to rip Seagate Wireless Plus video files. And Pavtube DVDAid would be your best choice, which can easily rip DVD movies to Wireless Plus compatible H.264 video, MPEG-4, and Motion-JPEG for video, and AAC, MP3, Audible (formats 2, 3, 4), Apple Lossless, A IFF, and WAV for audio quickly with excellent output video quality.

Besides converting DVD files, it can also compress a DVD to smaller file size, saving the space for your console if you need. In addition, the built-in editor allows you to customize your DVD videos to get the very part and effect you want with ease. I have tested it, now after perfectly ripping DVDs, I can get my DVDs uploaded to my 2TB Seagate with ease and freely watching on my mini iPads, 1 kindle and 1 nook. The equivalent Mac version is DVDAid for Mac. Just get the right version and copy DVD to Wireless Plus with ease. (Windows 10 or Mac Yosemite are supported). 


Other Download:

- Pavtube old official address: http://www.pavtube.cn/dvd_ripper/
- Cnet Download: http://download.cnet.com/Pavtube-DVDAid/3000-7970_4-76158510.html

1. Load DVD movies

First, insert your DVDs into DVD Drive, and then drag the DVD files to the program; Or you can get to "File" Menu, click "Load DVD" to draw into DVD movies you want to rip. DVD folder and ISO image files are supported as well.


2. Select Seagate Wireless Plus compatible formats

Click the Format bar to select output profile for your Wireless Plus, say "H.264 Video(*.mp4)" from "Common Video".


3. Convert DVD movies to Seagate Wireless Plus

After all necessary settings, you can just click the "Convert" button to start converting your DVD movies. After the conversion, click Open to get the output files for your Seagate Wireless Plus.

4. Connect Seagate Wireless Plus to computer for uploading

Now you can copy the converted DVD files to your Seagate Wireless Plus via USB.

Tip: Free apps are available across Android, iOS, and Kindle for download, and after downloading the app, users can view available wireless networks and select the Seagate Wireless. And content can be played in many different ways, via the Media app on iOS, Android, or Kindle Fire, via any browser, via Apple Airplay or to any DLNA devices via minidlna, which is built into the OS.


To play your converted files on your mobile devices, your just need to tap the movie file and play it. Now you have successfully carry your entire DVD media library with you with the Seagate Wireless Plus Portable Hard Drive. Just enjoy while traveling with your family!

Want to get more DVD entertainment? Rip DVD to your Nexus 6/9iTunes 11/12 library or Drobo 5n and TV

Read More:
Source: http://onebestsoft.com/upload-dvds-to-seagate-wireless-plus/

Thursday, September 17, 2015

Playing Blu-ray on Sony 4K Ultra HD TV via USB

Television's latest upgrade, 4K Ultra High Definition, is both awesome and increasingly affordable. Sony 4K Ultra HD TV is one of these brilliant products. Many people bought this TV and can’t wait enjoying ultra high definition movies on it. If you have plenty of Blu-ray collection, you can streaming them on Sony 4K Ultra HD TV with a external Blu-ray drive by HDMI port. But if you get rid of keeping changing Blu-ray disc when you are enjoying movies or don’t want to use a cable, backing up your Blu-ray movies to USB flash drive will be a good idea. 

Copying Blu-ray to USB for Sony 4K Ultra HD TV, on the one hand, can make you enjoy Blu-ray movies without needing heavy external Blu-ray drive and cable. And on the other hand, it offers you convenience carriage and safe storage. And this process will be easy under the help of Pavtube BDMagic(Review). It can easily rip and backup the latest and region-locked Blu-ray to Sony UHD 4K TV supported MPEG1, MP4 formats. In profile settings, it allows you to adjust video codec, size, frame rate, bitrate and audio channel, codec, size, sample rate to get better video quality for Sony UHD 4K TV. Actually, it not only can backup Blu-ray to Sony 4K TV supported formats, it also can change Blu-ray to H.265, M3U8, MKV, AVI, MOV, M4V, etc to play on iPad, Android tablet and so on. 

You can Free download and install BDMagic here: 


Other Download:

- Pavtube old official address: http://www.pavtube.cn/blu-ray-ripper/
- Cnet Download: http://download.cnet.com/Pavtube-BDMagic/3000-7970_4-75922877.html

How to watch Blu-ray on Sony 4K Ultra HD TV via USB?

Step 1: Load Blu-ray movie.

Insert Blu-ray disc into your computer Blu-ray drive, click "File" to load Blu-ray disc.
Tips: Click "Subtitle" and "Audio" drop-down box to select your preferred subtitle track and audio stream.


Step 2: Define output file format.

Click "Format" bar, from its drop-down option list, you can select "MPEG-1 Video(*.mpeg)" as the output file format for Sony 4K Ultra HD TV. 


Step 3: Set video parameters

When Sony 4K Ultra HD TV plays videos via USB, it will not support 4K resolution. If your Blu-ray is 4K, you need to downscale 4K to 1080p video in “Settings”. 


Step 4: Backup Blu-ray to Sony 4K Utra HD TV

After all the settings is done, hit right-bottom "Convert" button to start copying Blu-ray to Sony 4K Utra HD TV. When the process finishes, you can locate the generated MPEG 1 videos in output folder. 

When you put the ripped Blu-ray movies to USB flash drive, insert it into USB port on TV, then you can watch Blu-ray on Sony 4K Ultra HD TV via USB. 

Related Articles:
Source:http://video-tips.jimdo.com/2015/09/17/play-blu-ray-on-sony-4k-ultra-hd-tv-via-usb/

Wednesday, September 16, 2015

Upload DVDs to Dropbox for viewing anywhere

Overview: This is an instructional article on showing how to upload DVD to Dropbox by ripping and copying DVD to a Dropbox readable format.


Dropbox is a mobile document and media storage tool that allows you to sync you files online for backup. Anything like movies and music you save to your computer can be saved to your Dropbox. If you are looking for a way to upload DVD to Dropbox for viewing as above thread mentioned, read on to find the best solution.

Hot Search: Dropbox Transfer Guides | iTunes to Dropbox | Blu-ray to Dropbox | Compress videos to Dropbox | 

As you know, Dropbox doesn't support DVD video format. If you have some nice DVD movies and want to add to Dropbox for streaming and playback on iPhone, iPad, Android, Surface 3, BlackBerry, Plex, PS4/3, PSP, PS Vita, WDTV, smart TV and more media devices, you have to rip and copy DVD to Dropbox readable formats, as MP4, MOV, etc.

To do so, a DVD ripping software is essential. Here Pavtub DVDAid is recommended to you. This DVD ripping tool can rip any encrypted DVD and convert DVD to Dropbox readable MP4, MOV etc. formats as well as other popular formats, like rip DVD to AVI, MKV, M3U8, H.265, WMV, MPG, FLV, SWF, M4V, etc. on Windows (including Windows 10, 8.1 and 8). For the video size limit of Dropbox site, the built-in editor also allows you to extract DVD clips with the very part you want. Or, you can just choose to rip certain chapters of a DVD as you like.

If you are a Mac user, please turn to DVDAid for Mac, support Mac OS X Yosemite 10.10, 10.9 Mavericks, 10.8 Mountain Lion, 10.7 Lion, Snow Leopard10.6, Leopard 10.5. 

Now download the right version of the program and follow the guide below.


Other Download

- Pavtube old official address: http://www.pavtube.cn/dvd_ripper/
- Cnet Download: http://download.cnet.com/Pavtube-DVDAid/3000-7970_4-76158510.html

Part I. How to rip DVD to Dropbox readable video format for uploading?

Step 1. Load DVD movies

Insert the DVD disc into your computer’s DVD drive and run DVD Ripper. You can click the "Load DVD" button to load the DVD files to the program. DVD ISO/IFO, VIDEO_TS folder are supported also.


Step 2. Specify output format

As has been stated above, Dropbox supports MP4, etc video files. So you can just select "Common Video" > "H.264 Video(*.mp4)" as the output video format. Also you can transfer your DVD to media hubCloud Storage and External Hard Drive/Thumb DriveFlash drivePlex for storage and playback.


Step 3. Trim/Edit DVD files

Since Dropbox has limitations about the uploading video size(If you only have the free account, you only have 2 GB of space), please pay attention to the video size when ripping DVD movies for Dropbox. Here we should highlight the trim function on this software. Just click "Edit" to trim the DVD videos to get the very part you want. Besides trimming, cropping, adding watermark, adjusting special effect, are well supported as well.

Step 4. Start converting DVD to Dropbox

When all these settings are ready, you can click the "Convert" button to begin the DVD to Dropbox conversion. When the ripping is done, you can click on "Open" button to locate the ripped videos.

Part II. How to Upload the ripped DVD movies to Dropbox for storage?

1. Sign in to the Dropbox website.

2. Click the Upload button from the very top of the window. The upload button.

3. A window will appear. Click the Choose File button and then select the file on your computer that you’d like to add to your Dropbox.

4. Choose as many files as you like, and then click the Start Upload button.

5. The window will disappear, your files will start uploading, and you'll be shown a progress indicator. That’s it, you’ve added files to your Dropbox!

Detailed steps can be found here.


That's all the instructions to rip and upload DVD to Dropbox for sharing.
  
More Tips

Thursday, September 10, 2015

Copy ISO files to USB for Sony Bravia HDTV playback

Q: “Hope someone can help me out. I have all my Blu-rays and DVDs on USB drive stored as ISO files. I can watch them on my PC, but currently I want to watch these ISO videos on my new Sony Bravia TV. Is there any solution to stream the ISO contents on my HDTV via USB without having to burn copies first?”


People would choose to backup their BD/DVD collection to ISO image files to save physical space and prevent hard disks from damages. But as a data reflection of DVD or Blu-ray disc, ISO files cannot be directly opened or watched without virtual driver.

Is there an easier way to open and watch ISO video file on Sony Bravia HDTV? Transfer and copy ISO files to USB and then watch on TV, this may be a great choice.How to copy ISO files to USB for Sony Bravia HDTV playback?

The best way is to convert BD/DVD ISO to Sony HDTV compatible format with Pavtube BDMagic. With this app, you can simply convert Blu-ray/DVD disc, Blu-ray/DVD ISO, DVD IFO files to H.264 MP4, H.265/HEVC, MKV, AVI, M4V, MOV, and more video file for playback on iPad Air 2, iPad mini, iPhone 6/6 Plus, Galaxy Tab S, Amazon Kindle Fire HDX, Surface Pro 2, PS4, PS3, Xbox, NAS, HDD, HDTV, etc.

Guide of converting ISO file to USB for Sony HDTV

Step 1: Download a free trial of Pavtube BDMagic (BDMagic for Mac) on your computer, install and launch it.


Other Download:

- Pavtube old official address: http://www.pavtube.cn/blu-ray-ripper/
- Cnet Download: http://download.cnet.com/Pavtube-BDMagic/3000-7970_4-75922877.html

Step 2: Import ISO file by clicking “Load IFO/ISO” button to search for the right ISO video from your computer hard drive to this app.


Step 3: Choose optimized video format for Sony HDTV playback. Here we recommend MP4 as output format which is the best for Sony Bravia HDTV.


Step 4: If necessary, click “Settings” to set profile presets as you desire. Parameters like video codec, resolution, bitrate, frame rate, audio channels, and more are allowed to reset in order to achieve a better playback on Sony Bravia HDTV.


Step 5: Hit on the “Convert” icon and ISO to H.264 MP4 conversion begins. When the conversion completes, you just need to transfer converted movie to USB drive, and then you can play ISO videos on Sony Bravia HDTV via USB.

Further reading:
Source:http://bluraydtstruehd.com/2015/03/copy-iso-to-usb-for-bravia-hdtv/