It wasn’t so long ago that DVDs were the new, hip media innovation, the standard-bearer of a brave new world of home entertainment that would banish antiquated formats like VHS and CD into obsolescence alongside the eight-track and Betamax.
DVD’s day in the sun was relatively short-lived with the advent of the Blu-ray Disc. Blu-ray handily dispatched its most direct competitor, HD-DVD. Surprisingly, the humble DVD survived the Blu-ray onslaught, albeit having lost considerable market share to its high-definition counterpart.
Now both DVD and Blu-ray face an unprecedented foe: the Cloud. Entire media libraries are available through an Internetconnection with services such as Netflix, Hulu, iTunes and Amazon. The rise of new media delivery devices raises the question: Does disc media still have a place in our entertainment lives?
The short answer is yes. People have spent a great deal of money on their DVD and Blu-ray collections and as long as manufacturers continue to sell players with optical drives, they’ll still be watched and bought. These plastic discs aren’t dependent on an Internet connection, and applications like the ones found in our review of the best Top DVD copy software enable users to protect their collections against damage and obsolescence.
This isn’t to say that DVD and Blu-ray won’t eventually go away. Both of these formats have a few good years of life left in them. But it will take a very different form than we’ve known in the past. Gone are the days of video rental stores and entire sections of retail shops devoted to home entertainment discs. DVD and Blu-ray will most likely join the CD in its incarnation for personal use.
Believe it or not, CDs still have a pretty big place in our entertainment culture. It’s merely shifted from store shelves to our personal backup libraries. Just like people burn copies of their favorite music album to protect them from a computer catastrophe, so DVDs will protect our movie libraries from a similar fate. DVD copy software for Mac computers offers a great way to back up the investment we’ve made in disc media.
Summary
DVDs may be on the decline, but they are far from dead. The convenience of watching movies onthe Internet is great, and the future holds great innovations in this field. However, consumers don’t always have access to an Internet connection, and they have a strong distaste for paying additional money for movies that they have already paid for on DVD or Blu-ray. Until the entertainment industry totally stops supporting DVD (like they did VHS), these discs will play an integral part in our entertainment lives.
Source:http://dvd-copy-software-review.toptenreviews.com/mac-dvd-copy-software/dvds-vs.-the-cloud-can-disc-media-survive-.html
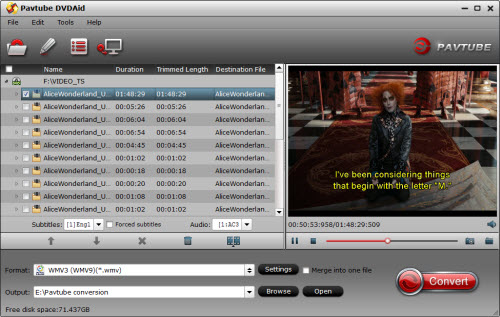
Therefore, you will definitely benefit a lot by making a DVD Copy with DVD cloning software. Although there are lots of DVD cloning software on the market, however, for best video/audio quality consideration as well as the capability to remove DVD copy protection, few can satisfy your needs. Fortunately, there is one award winning tool - Pavtube DVDAid for Windows/Mac (Best DVD Copying Review) can make the job well done.
With the program, you can not only make a 1:1 full disc copy of the original DVD disc without quality loss with all the audio tracks and subtitles well reserved, but also copy only the main DVD movie content and leave out extracts, commentary, etc. In addition, the program can remove all the latest DVD copy protection including Region code, CSS, Sony ARccOS, Disney’s fake, etc.
Free Download and trail:
that would banish antiquated formats like VHS and CD into obsolescence alongside the eight-track and Betamax.
DVD’s day in the sun was relatively short-lived with the advent of the Blu-ray Disc. Blu-ray handily dispatched its most direct competitor, HD-DVD. Surprisingly, the humble DVD survived the Blu-ray onslaught, albeit having lost considerable market share to its high-definition counterpart.
Now both DVD and Blu-ray face an unprecedented foe: the Cloud. Entire media libraries are available through an Internetconnection with services such as Netflix, Hulu, iTunes and Amazon. The rise of new media delivery devices raises the question: Does disc media still have a place in our entertainment lives?
The short answer is yes. People have spent a great deal of money on their DVD and Blu-ray collections and as long as manufacturers continue to sell players with optical drives, they’ll still be watched and bought. These plastic discs aren’t dependent on an Internet connection, and applications like the ones found in our review of the best Top DVD copy software enable users to protect their collections against damage and obsolescence.
This isn’t to say that DVD and Blu-ray won’t eventually go away. Both of these formats have a few good years of life left in them. But it will take a very different form than we’ve known in the past. Gone are the days of video rental stores and entire sections of retail shops devoted to home entertainment discs. DVD and Blu-ray will most likely join the CD in its incarnation for personal use.
Believe it or not, CDs still have a pretty big place in our entertainment culture. It’s merely shifted from store shelves to our personal backup libraries. Just like people burn copies of their favorite music album to protect them from a computer catastrophe, so DVDs will protect our movie libraries from a similar fate. DVD copy software for Mac computers offers a great way to back up the investment we’ve made in disc media.
Summary
DVDs may be on the decline, but they are far from dead. The convenience of watching movies onthe Internet is great, and the future holds great innovations in this field. However, consumers don’t always have access to an Internet connection, and they have a strong distaste for paying additional money for movies that they have already paid for on DVD or Blu-ray. Until the entertainment industry totally stops supporting DVD (like they did VHS), these discs will play an integral part in our entertainment lives.
Source:http://dvd-copy-software-review.toptenreviews.com/mac-dvd-copy-software/dvds-vs.-the-cloud-can-disc-media-survive-.html
Therefore, you will definitely benefit a lot by making a DVD Copy with DVD cloning software. Although there are lots of DVD cloning software on the market, however, for best video/audio quality consideration as well as the capability to remove DVD copy protection, few can satisfy your needs. Fortunately, there is one award winning tool - Pavtube DVDAid for Windows/Mac (Best DVD Copying Review) can make the job well done.
With the program, you can not only make a 1:1 full disc copy of the original DVD disc without quality loss with all the audio tracks and subtitles well reserved, but also copy only the main DVD movie content and leave out extracts, commentary, etc. In addition, the program can remove all the latest DVD copy protection including Region code, CSS, Sony ARccOS, Disney’s fake, etc.
Free Download and trail:

 Other Download:
- Pavtube old official address: http://www.pavtube.cn/dvd_ripper/
- Cnet Download: http://download.cnet.com/Pavtube-DVDAid/3000-7970_4-76158510.html
How to copy DVD to DVD with DVD Cloning software?
Step 1: Load DVD disc to the program.
Launch the software, insert DVD disc into your computer’s optical drive, from “File” drop-down list, select “Load disc” to add the DVD disc into the program.
Other Download:
- Pavtube old official address: http://www.pavtube.cn/dvd_ripper/
- Cnet Download: http://download.cnet.com/Pavtube-DVDAid/3000-7970_4-76158510.html
How to copy DVD to DVD with DVD Cloning software?
Step 1: Load DVD disc to the program.
Launch the software, insert DVD disc into your computer’s optical drive, from “File” drop-down list, select “Load disc” to add the DVD disc into the program.
 Step 2: Make full DVD disc copy.
Click the “
Step 2: Make full DVD disc copy.
Click the “ ” icon on the top tool bar of the main interface, you will be able to copy the entire disc with all the DVD’s original file structure well preserved without changing anything.
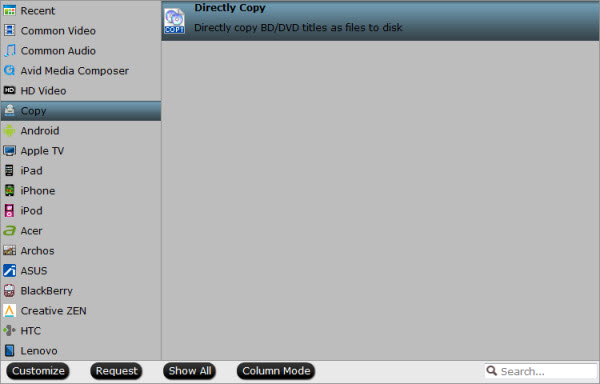
Step 3: Copy DVD with main content.
By choosing “Copy” > “Directly Copy”, you are ale to copy the selected movie file in its original format without quality loss. When directly copy a DVD movie, you will get .vob as output.
” icon on the top tool bar of the main interface, you will be able to copy the entire disc with all the DVD’s original file structure well preserved without changing anything.
Step 3: Copy DVD with main content.
By choosing “Copy” > “Directly Copy”, you are ale to copy the selected movie file in its original format without quality loss. When directly copy a DVD movie, you will get .vob as output.
 Step 4: Start DVD to DVD copying process.
Switch back to the main interface to start DVD copying process with DVD cloning software.
Read More:
Step 4: Start DVD to DVD copying process.
Switch back to the main interface to start DVD copying process with DVD cloning software.
Read More:
The reason why Blu-ray gets so popular in the market is it comes with lossless audio quality with mainly three lossless audio codecs: PCM, Dolby TrueHD and DTS-HD MA. And the Dolby TrueHD and DTS-HD Master Audio can deliver unprecedented home theater experience with 7.1 channels, so there may be no one willing to loose the wonderful audio while backup a Blu-ray movie. So the media players which can support 7.1 Channel will get big market, like Asus O! Play Mini V2 which supports impressive 7.1-channel surround sound. So how can you rip Blu-ray to Asus O! Play Mini V2 with 7.1 Sound? There are many Blu-ray rippers on the market but not all of them can keep 7.1 channel while ripping Blu-ray. Generally, if you want to preserve 5.1 or 7.1 surround sound, you have to output lossless MKV format, not SD MKV, or HD MKV. Fortunately, after I tested several free and paid Blu-ray rippers and discovered Pavtube ByteCopy.This program can keep Dolby True HD 7.1 audio when ripping Blu-ray movie to Asus O! Play Mini V2. It can convert Blu-ray to MKV with lossless video output and multiple audio & subtitle & chapter preservation. It has the professional Mac version which can make you rip Blu-ray to MKV with 7.1 Sound for Asus O! Play Mini V2 on Mac OS X El Capitan. Free download and install: Other Download:- Pavtube old official address: http://www.pavtube.cn/bytecopy/- Cnet Download: http://download.cnet.com/Pavtube-ByteCopy/3000-7970_4-76158512.htmlHow to Convert Blu-ray to MKV with 7.1 Sound for Asus O! Play Mini V2?Step 1: Add Blu-ray to the appRun Pavtube ByteCopy (reasons to choose it) and click the “Load disc” icon to import movie files from Blu-ray Disc.
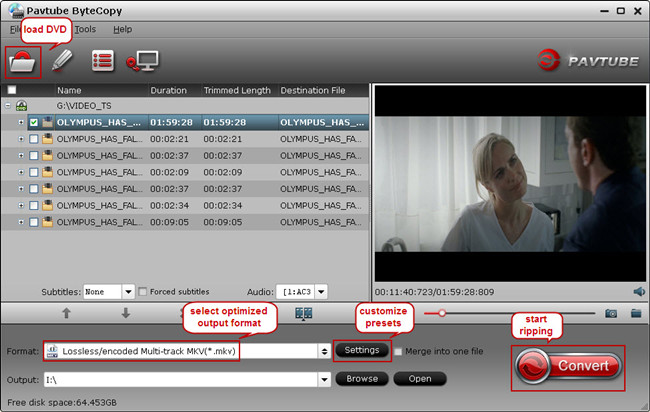 Step 2. Choose MKV format keeping 7.1 audioClick “Format” bar to choose the output format. To preserve riginal Dolby TrueHD 7.1 audio for Blu-ray movie ripping, just select “Lossless/encoded multi-track MKV (* mkv)” from “Multi-track Video” quality in “Format” box. Make sure the original BD disc does contain Dolby TrueHD audio, otherwise you still can’t get Dolby TrueHD 7.1 audio saved.
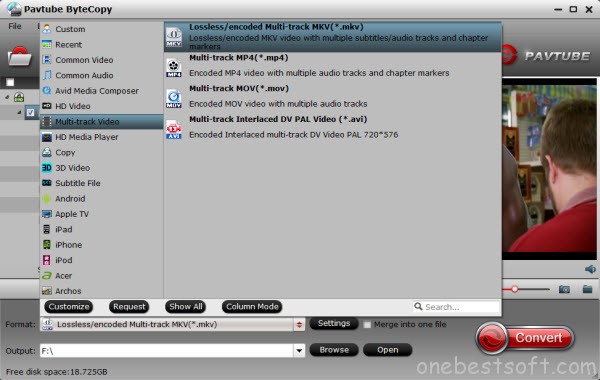 Tip: If you want to customize your own video you can click“Settings” option, which allows you to make adjustments on your audio, video, subtitles. It’s worth mentioning that, by default, all audio & subtitles tracks in a source file are checked to be saved in the MKV container, if there are some tracks you don’t like, you can go to Multi-task Settings window to uncheck and remove them under Audio tab and Subtitle tab. Just keep your desired Dolby TrueHD 7.1 audio channel.
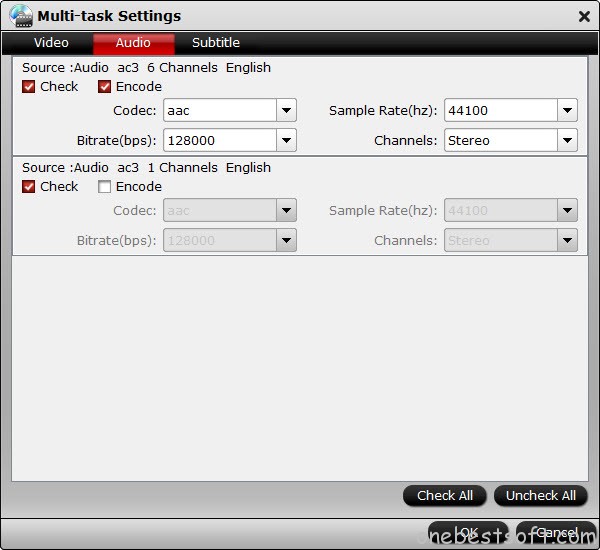 Step 3. Start ripping Blu-ray with 7.1 audioHit the big Convert button, it will start converting Blu-ray movies to Asus O! Play Mini V2 in lossless mkv videos with the original Dolby TrueHD 7.1 audio saved. This Blu-ray ripping will cost some time depending on the original Blu-ray size, you computer configuration, network speed. Additional Tips:
Pavtube ByteCopy legally bypass the copyright protection of DRM and it also supports to export .srt subtitles and add *.srt, *.ssa, *.ass subtitles to BD/DVD movies. You can get it at 20% discount at Pavtube Thanksgiving Coupon and special offer after liked Pavtube Facebook.Related Software:
Step 3. Start ripping Blu-ray with 7.1 audioHit the big Convert button, it will start converting Blu-ray movies to Asus O! Play Mini V2 in lossless mkv videos with the original Dolby TrueHD 7.1 audio saved. This Blu-ray ripping will cost some time depending on the original Blu-ray size, you computer configuration, network speed. Additional Tips:
Pavtube ByteCopy legally bypass the copyright protection of DRM and it also supports to export .srt subtitles and add *.srt, *.ssa, *.ass subtitles to BD/DVD movies. You can get it at 20% discount at Pavtube Thanksgiving Coupon and special offer after liked Pavtube Facebook.Related Software:
BDMagic for Windwos/Mac - The best Blu-ray solution to rip and backup any commercial and region-locked Blu-ray to H.265, M3U8, MP4, MKV, AVI, FLV, etc. DVDAid for Windows/Mac - Capacity of ripping copy-protected and homemade DVD to iPhone 6S, iPad, Surface Pro, Synology NAS, Seagate Wireless Plus, etc with suitable format.Pavtube Video Converter for Windows/Mac - Function of converting Blu-ray/DVD, 4K/SD/HD video in any format to nearly all popular video format you have ever seen.Related Articles:
Synology DS216play is a 2-bay NAS featuring 4K Ultra HD video transcoding and powerful processing capabilities, letting you enjoy high definition media contents, as well as keeping all the other aspects of a fully-fledged NAS uncompromised. If you have some 4K movies, like 4K YIFY movies, uploading them to Synology DS216play is a good idea to save your hard disc space since usual 4K movies take up more storage space.  4K videos contain many kinds of format, like MKV, AVI, MP4,etc. Before you upload 4K YIFY movies to Synology DS216play, I suggest you to unify all YIFY 4K videos to 4K MP4 for MP4 is the most compatible format that nearly all multimedia players can accept it. If your player to watch 4K YIFY movies via Synology DS216play doesn’t support 4K, you even need to compress 4K to 1080p. To process 4K YIFY before uploading to DS216play, you can use Pavtube Video Converter Ultimate. It is an all-in-one video solution with the capability of deal with any videos, like Blu-ray/DVD, 4K/SD/HD video in any format. So it is capability of converting 4K YIFY movies to Synology DS216play with suitable format and high video quality. Besides, it also allows you to compress 4K to 1080p in “Settings” window so that when you want to play 4K YIFY movies via Synology NAS on TV but your TV can’t play 4K movies.Hot search: DVD to Synology DS416 | Blu-ray to Synology DS416 If you are Mac users, you should use Pavtube iMedia for Mac which can make you convert 4K YIFY movies to Synology DS216play on Mac OS X El Capitan and lower system. Both the versions are in the promotion activity at Facebook. Free download and install
Other Download:
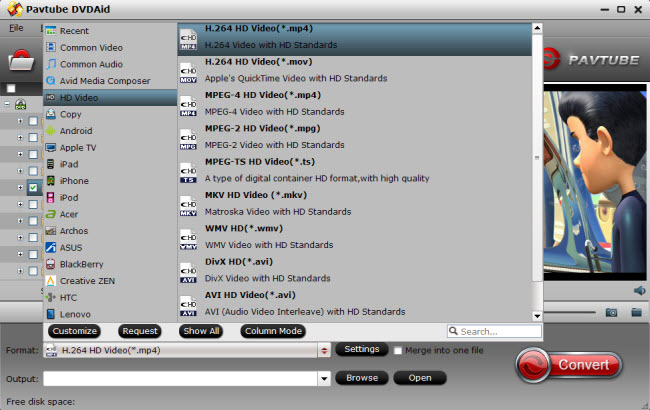
- Pavtube old official address: http://www.pavtube.cn/blu-ray-video-converter-ultimate/- Cnet Download: http://download.cnet.com/Pavtube-Video-Converter-Ultimate/3000-2194_4-75938564.htmlHow to upload 4K YIFY movies to Synology DS216play?Step 1: Add 4K videos.Open the program, click "File" menu, from its drop-down option, select "Add Video/Audio" to load 4K YIFY video to the program. Step 2: Choose output file format.From "Format" bar drop-down list, choose the formats that you want to output for later use. For compatibility consideration, it is idea for you to choose "Common Video" > "H.264 HD Video (*.mp4)" as output file format.
 Tip: If you don’t change output format, you can ignore the step 2. But I do suggest you compress 4K to 1080p for the wide usage of 4K YIFY movies. Open "Profile Settings" window, click "Size(pix)" to select 1920*1080 as the final resolution for output video.
 Step 3: Convert 4K YIFY movies to SynologyAfter all the settings is completed, hit right-bottom "Convert" button to start to convert 4K YIFY movies to Synology DS216play in MP4 format or in 1080p resolution. Then you can locate the video in output folder.When you put converter 4K YIFY moves to Synology DS216play, you can watch these DVD movies on many devices via Synology, like Apple TV, PS4, LG HD TV, iPad. If you don’t know how to set up the connection between your Synology NAS and your DLNA/UPnP-compliant DMAs, here is a detailed guide. And if your DLNA/UPnP-enabled device is an Apple TV, here is a more simple tutorial on setting up Synology NAS with Apple TV. Read More:
Q: “ I would like to copy my 300 or so DVDs to my RN104 then be able to watch them on my Amazon Fire TV, both are connected via 100Mbps Ethernet. I have a 104" screen and a Hi-Fi based 5 channel surround system so sound and video quality is most important, I am not fussed about file size as I have loads of storage on the RN104. I'm using a Cambridge Audio 551R as a pre-amplifier which can decode every current surround format so I'd like to keep the highest quality soundtrack available on the DVD, whether that be Dolby Digital or preferably DTS if it's there. I have been test MakeMKV and Handbreak but faild. Many thanks in advance for anyone out there who can help!” - Fromhttps://community.netgear.com/. Though playing DVDs on New Amazon Fire TV 2 from RN104 is still out of the question because of Amazon Fire TV 2 is lack of the DVD drive. As we know, Amazon Fire TV 2 usually supports video formats including H.263, H.264, MPEG4-SP, etc. And RN104 support MP4 files too. Hot Search: DVD to H.264 MP4 | DVD to MKV | DVD to QuickTime | DVD to PS4 | DVD to DROBO 5NYou may opt for some free DVD rippers like HandBrake to rip DVD to RN104/Amazon Fire TV 2 compatible formats. But such kind of DVD rippers isn't suit for copy protected DVD movies, like Frozen, Guardians of the Galaxy, Transformers 4. In order to fast copy DVDs to RN104 then stream to Amazon Fire TV 2, we need to rip DVD to new Amazon Fire TV/RN104 compatible video formats Pavtube DVDAid, one top-quality DVD ripper, which can easily and quickly rip DVD to the new Amazon Fire TV/RN104 supported H.264 MP4, so that you can connect Amazon Fire TV 2 from RN104d with your TVs including Smart TV, HD TV, 3D TV, 4K TV, and more. After downloading and installing, you can rip and stream DVD to RN104/Amazon Fire TV 2 in several simple steps. (For Mac users, Pavtube DVDAid for Mac is the way to go. (Mac OS X El Capitan include). Other Download:- Pavtube old official address: http://www.pavtube.cn/dvd_ripper/- Cnet Download: http://download.cnet.com/Pavtube-DVDAid/3000-7970_4-76158510.htmlStep 1. Run DVD to Fire TV 2/RN104 Ripper; load DVD.This converter both support DVD folder, DVD ISO/IFO files, your ISO image file would be recognized automatically so there’s no need to run virtual drive to mount it any more.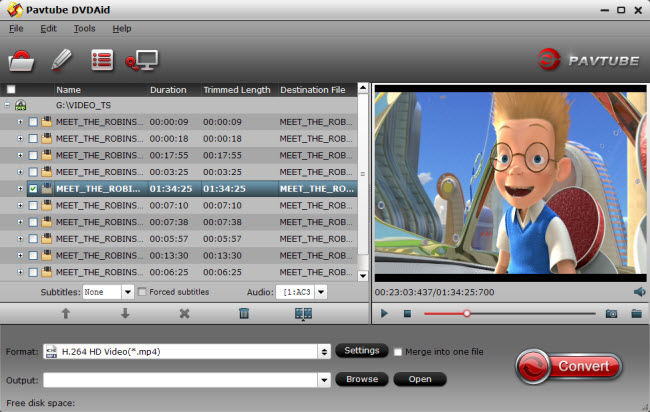 Step 2. Choose output format for RN104/Fire TV 2To put Blu-rays on your RN104 NAS. As RN104 NAS is powerful enough to almost all kinds of formats, you can choose the format according to your own needs.
- Fire TV Supported Video/Audio: H.263/H.264/MPEG4-SP/VC1 & AAC/AC-3/E-AC-3/HE-A/PCM/MP3. And read Plex Supported Video and Audio Format here.
 Tip: From the specification of Amazon Fire TV 2, the video in H.264/AVC codec can be up to 1080p and 30 fps. So you can hit on “Settings” to open settings window where you can adjust the video size to 1080p and frame rate to 30 fps. Since AC3 is not sure playable or not, you can choose AAC and 5.1 channel for audio. If 5.1 sound is not supported, it will be limited to stereo audio.
 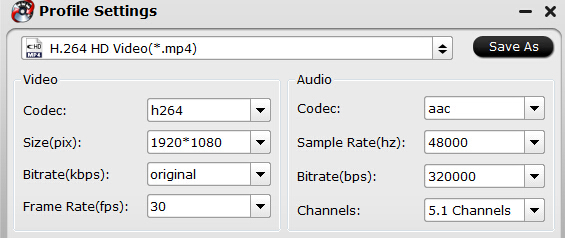 Step 3: Start to rip DVD to Amazon Fire TV 2After all settings, just press “Convert” icon below the preview window. Once the process ends, you can locate the generated file in output folder. Now, put the ripped DVD to RN104 and install a Plex on it. Then install a Plex on Amazon Fire TV 2, too. Try again to play DVD videos on Amazon Fire TV via Plex through RN104 NAS. If it doesn’t work, maybe you should try other option that is to get a player that supports more formats. Dune, WDTV Live and PCH are popular choices (there are others). Many can access your media directly using SMB/CIFS and NFS - so there is no need for plex or ReadyDLNA at all. Read More:
Would like to stream DVD movies to DLNA-compliant devices? This article tell you exactly how to rip DVD to use over DLNA via Mac OS X El Capitan with best quality. DLNA allows us to stream media content between devices connected to the same home network, without having to store the content on both devices. If you are interested in home entertainment, you would have the thoughts of streaming DVD movies to DLNA compliant Mac OS X El Capitan, HD TV or tablet to share with your family members and friends. The point here, DLNA does not support DVD files. In fact, it is easy, fast and worth the effort. Now, we’ll show you exactly how to rip DVDs to DLNA for playback via Mac OS X El Capitan with the fast and easy way. Hot search: Blu-ray to DLNA | ISO to DLNA | MKV to DLNA Well, DLNA does not support DVD or DVD .iso files. If you have lots of DVD movies, you're unable to play them via DLNA, i.e., using a PS4. And therefore you need to rip DVD videos into a DLNA supported format. Supported File Formats for DLNA Streaming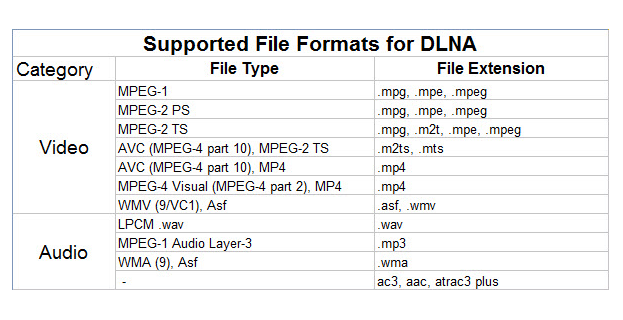 However, if you want to stream DVD via DLNA server on Mac OS X El Capitan, you should rip DVD to a common video format in advance for DVD copy protection only allows DVD Player to stream DVD videos. In this case, you have to need the help of Pavtube BDMagic for Mac. This Blu-ray/DVD ripping tool is designed to rip copy-protected DVD to popular video formats like H.265, M3U8, MP4, AVI, MOV, M4V...which can be played by general media players or devices. Read the review. During DVD ripping process, it can preserve high and nearly original video quality with fast conversion speed. With ripping DVD to common video like MP4, you can successfully stream DVD via DLNA server on Mac OS X El Capitan. What’s more, it does work in Blu-ray as well so that you can rip and backup Blu-ray on Mac 10.11. If you are a Windows user, you can turn to BDMagic for Windows. Good News! To thanks for your continuous support, Pavtube Official Website and Pavtube Facebook are now holding the biggest sale for this Halloween with fantastic 50% off discounts and giveaway. Pay less to get powerful Blu-ray/DVD/Video Converter to build your own home media center on this Halloween! Download the best Mac DVD Ripper for DLNA:
 Other Download:- Pavtube old official address: http://www.pavtube.cn/blu-ray-ripper-mac/- Cnet Download: http://download.cnet.com/Pavtube-BDMagic/3000-7970_4-76177782.htmlHow to Successfully stream DVD videos via DLNA server on Mac OS X El Capitan?Step 1: Load DVD videos Free download BDMagic on your Mac, install and launch it. Click the “Load file(s)” icon on Mac to load DVD videos into this app. You can also load Blu-ray discs, ISO/IFO files etc.
 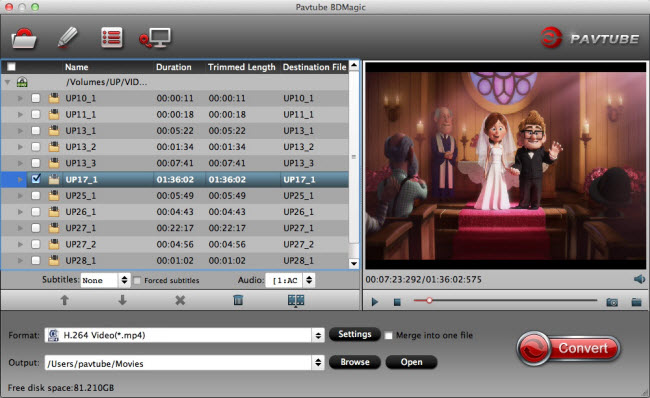 Step 2: Choose video format and set presetsBDMagic for Mac provides hundreds of video and audio profiles for output. You could search for MP4 format which has the wide compatibility with various devices.
 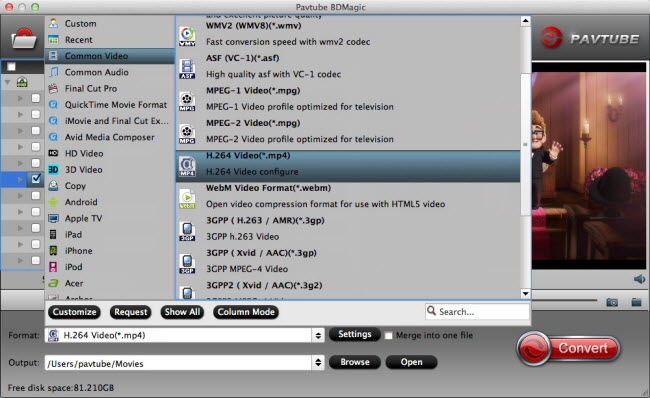 Tip: All formats in thia program are set with optimized video/audio codecs, bitrates, frame rates, etc. But you can still specify as you like by clicking Settings button. In the Profile Settings window, you can choose or specify exactly the parameters you like. And in the Task information section, you can compare the detailed information of the source video and the target video.Step 3: Convert DVD movie to MP4Hit on the “Convert” button and start ripping DVD movie on Mac. When the progress bar hit 100%, the conversion is finished and you can find the output files in output folder. Read More:
We travel a lot an have over 500 DVDs in hand, so I bought a 2TB Seagate Wireless Plus then my family members don't have to fight over the laptop for watching DVD movies. In fact, we can get together with friends and family to enjoy DVD movies via Wireless Plus, the question is: how to convert DVD for uploading to Seagate Wireless Plus?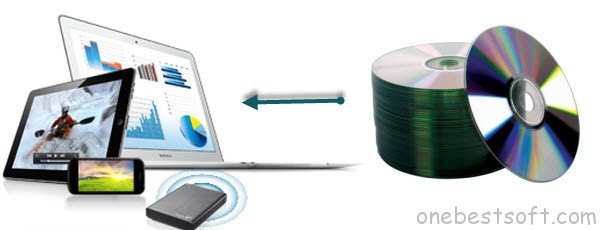 Here what you need is to make use use of a professionally designed DVD to Wireless Plus converter to rip Seagate Wireless Plus video files. And Pavtube DVDAid would be your best choice, which can easily rip DVD movies to Wireless Plus compatible H.264 video, MPEG-4, and Motion-JPEG for video, and AAC, MP3, Audible (formats 2, 3, 4), Apple Lossless, A IFF, and WAV for audio quickly with excellent output video quality.Besides converting DVD files, it can also compress a DVD to smaller file size, saving the space for your console if you need. In addition, the built-in editor allows you to customize your DVD videos to get the very part and effect you want with ease. I have tested it, now after perfectly ripping DVDs, I can get my DVDs uploaded to my 2TB Seagate with ease and freely watching on my mini iPads, 1 kindle and 1 nook. The equivalent Mac version is DVDAid for Mac. Just get the right version and copy DVD to Wireless Plus with ease. (Windows 10 or Mac Yosemite are supported). Other Download:- Pavtube old official address: http://www.pavtube.cn/dvd_ripper/- Cnet Download: http://download.cnet.com/Pavtube-DVDAid/3000-7970_4-76158510.html1. Load DVD moviesFirst, insert your DVDs into DVD Drive, and then drag the DVD files to the program; Or you can get to "File" Menu, click "Load DVD" to draw into DVD movies you want to rip. DVD folder and ISO image files are supported as well.
 2. Select Seagate Wireless Plus compatible formatsClick the Format bar to select output profile for your Wireless Plus, say "H.264 Video(*.mp4)" from "Common Video".
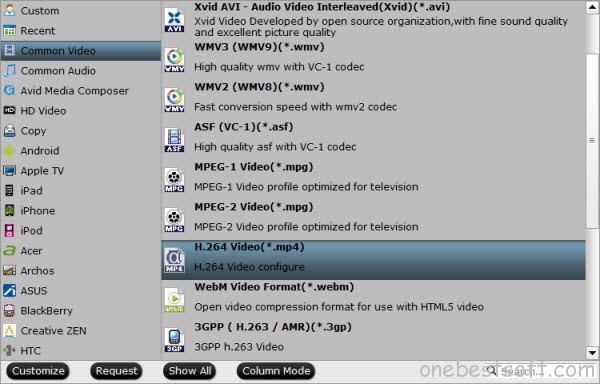 3. Convert DVD movies to Seagate Wireless PlusAfter all necessary settings, you can just click the "Convert" button to start converting your DVD movies. After the conversion, click Open to get the output files for your Seagate Wireless Plus.4. Connect Seagate Wireless Plus to computer for uploadingNow you can copy the converted DVD files to your Seagate Wireless Plus via USB.Tip: Free apps are available across Android, iOS, and Kindle for download, and after downloading the app, users can view available wireless networks and select the Seagate Wireless. And content can be played in many different ways, via the Media app on iOS, Android, or Kindle Fire, via any browser, via Apple Airplay or to any DLNA devices via minidlna, which is built into the OS.
 To play your converted files on your mobile devices, your just need to tap the movie file and play it. Now you have successfully carry your entire DVD media library with you with the Seagate Wireless Plus Portable Hard Drive. Just enjoy while traveling with your family!Want to get more DVD entertainment? Rip DVD to your Nexus 6/9, iTunes 11/12 library or Drobo 5n and TV! Read More:
Source: http://onebestsoft.com/upload-dvds-to-seagate-wireless-plus/
To play your converted files on your mobile devices, your just need to tap the movie file and play it. Now you have successfully carry your entire DVD media library with you with the Seagate Wireless Plus Portable Hard Drive. Just enjoy while traveling with your family!Want to get more DVD entertainment? Rip DVD to your Nexus 6/9, iTunes 11/12 library or Drobo 5n and TV! Read More:
Source: http://onebestsoft.com/upload-dvds-to-seagate-wireless-plus/
Trying to find an easy way to store DVD films on RAID 5 network drive? This article will show you how to copy DVD on RAID 5 for storage and viewing through WAN. “ I am currently saving all my videos as MP4’s which are large files, about 6 to 10 GB for DVD’s. It all works fine internally streaming locally on my LAN. I would like to get them down to around 2 GB so I could stream them through the Internet (WAN) to various other devices or other TV’s I may have remotely. I store all my videos locally on a NAS server that I currently have 10 TB (5 2TB disk) with RAID 5.” 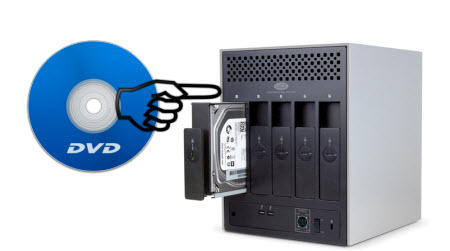 Hot Search: DVD to iTunes, DVD to iPad, DVD to TiVo, DVD to TV…After several days of searching and asking questions on various forums, most guys give me some tips and tricks for converting DVD to Any devices supported video files such as MP4. To achieve this goal, an easy-to-use DVD Converter is the key. Here Pavtube ByteCopy is such a wise choice for you to solve the problem. It is the No.1 fast BD/DVD conversion software in the market which can save your entire Blu-ray and DVD library as back-ups to RAID 5 network drive in AVI format. After that, you can play the files directly on Apple devices, Android Tablets and Smartphones or media players for family members or get them for private comfortable viewing on PC, Mac, iPad, iPad Mini, and Blackberry Playbook. Besides, I can recommended you Pavtube ByteCopy for Mac as the Mac version. Now, you can get the 50% off discount from Pavtube Easter Gifts 2015. The following how-to guide on Windows PC can be taken for reference:
 Step-by-step: Copy DVD to RAID 5 network drive for playing through WANStep 1: Load DVD moviesRun the Blu-ray/DVD Copying Tool and click "BD/DVD disc" icon to load Blu-ray or DVD movies for converting. You can also import movies files from BD/DVD folder, ISO image files.
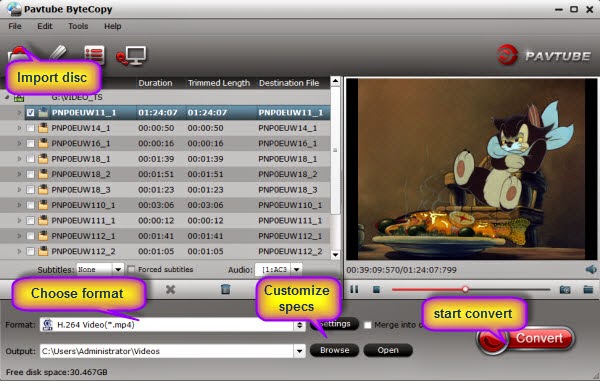 Step 2: Select RAID 5 network drive compatible formatsClick the Format bar to select output profile for your RAID 5 network drive, say "AVI HD Video(*.avi)" from "HD Video".
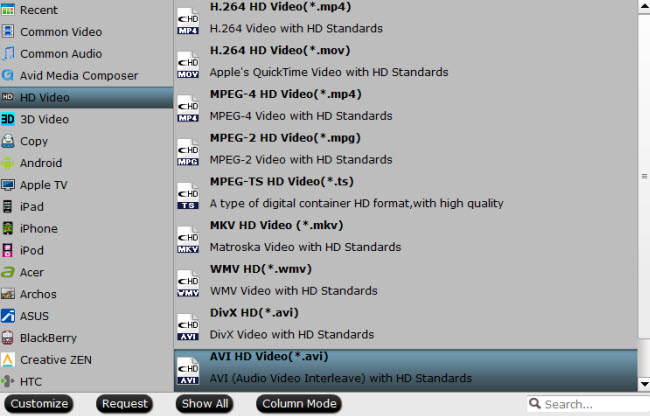 Step 3: Convert DVD movies to RAID 5After all necessary settings, you can just click the "Convert" button to start converting your DVD movies. After the conversion, click Open to get the output files for your RAID 5 network drive. Now you can connect your RAID 5 network drive and copy the converted DVD files via USB cable. Okay, just enjoy wonderful DVD films on mobile devices to RAID 5 for playing through WAN. Read More:
If you intend to Store DVD on LenovoEMC Network Attaches Storage for TV, you need to convert DVD to MP4 in advance so that your HDTV can afford from NAS.
If you have tons of movies on DVD discs, and want to copy them to LenovoEMC Network Attaches Storage for streaming with your Apple TV 3, Samsung TV, WD TV etc, you need to convert these DVD to NAS compatible MP4 or MKV format first. This article here will teach you how to backup and convert DVD to NAS HD MP4 or MKV videos, so that you can preserve them on NAS or playback on HD media player/home theatre for sharing with your families and friends with ease. Well, to backup dozens of DVD movies to LenovoEMC Network Attaches Storage, you need to get the content off the DVD disc as a protection-free and easily readable element for NAS. In this case, powerful third-party software for backup DVD to LenovoEMC Network Attaches Storage is what you need. Here, Pavtube DVDAid is the best one I’ve tried yet. It is capable of ripping DVD to MP4, AVI, MKV for NAS streaming with no quality loss; it also enables you to copy DVD main movies for backup onto NAS in .vob format. Read the review. And what I’ve learned is that MP4 would be one best target format for it is fully compatible with nearly all media devices including iPad, iPhone, PS4, Apple TV 3, etc. If you are running on Mac OS X, turn to Pavtube DVDAid for Mac. If you haven’t got the software, download it now and let’s start the conversion. Step-by-step: How to Backup DVD movies to LenovoEMC Network Attaches Storage for TVStep 1: Install and launch the top DVD to NAS Ripper. Insert your DVD disc into your DVD-ROM, and click the Disc button to load DVD files.  Step 2: Click Format bar and choose your desired format. To store hundreds of DVD's on LenovoEMC Network Attaches Storage, you can rip DVD to .mp4, or .avi, .mkv, etc compressed format. And click Settings bar, you can adjust the level of compression to suit the quality you want.
 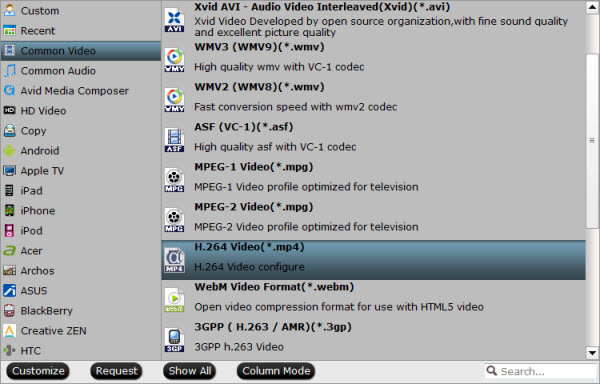 Tip: With the right settings you can retain the quality of the original DVD while also saving space. This is particularly helpful when streaming over your network, depending on your network quality. Simply click Settings bar and you can tweak the settings to your satisfaction and even save it as preset. Step 3: Finally, hit the "Convert" button at the bottom of the main interface to start the conversion. When the conversion finishes, click Open button to find the output files. Make sure the wireless network connection is accessible among the LenovoEMC Network Attaches Storage and HD TV or other media players. Then just enjoy the high quality DVD movies at ease. Much wonderful software bundled with Pavtube DVDAid will provide you more amazing experience in converting videos. Go to Money Saving Software Bundles to get special offer for more software, such as DVDAid + DVD Creator, DVDAid + ChewTune and so on. Read More:
