Q1: How to put a DVD onto iCloud
How can I get my Led Zeppelin DVD on a WD My Cloud hard drive to Nexus 10?
Q2: Can I transfer my licensed DVD's to the Cloud?
Can i transfer my used DVD collection i own to the iCloud or Apple or any other storage company? I want to watch them when i want without having to insert a DVD into a DVD player.
Directory overview
Below content shows you where you may need a Cloud rather than a DVD disc.
1. Computer has no DVD drive or DVD drive is broken or damaged. You need Cloud to playback DVD movies on you Smart TV.
2. Transfer DVD movies via Cloud, especially DVD movie folder and ISO image files. From one computer to another with absence of DVD drive.
3. Save DVD content onto Cloud for storage. Make a backup of DVD movie collections with large capacity Cloud.
4. Play DVD movies via Cloud drive on Macs, iPads, iPhones, iPods, Apple TVs as long as you login in iTunes more conveniently.
Hot searches DVD to Davinci Resolve 12 / DVD to ISO movies / DVD to Samsung Galaxy J3/J5 / DVDStyler Alternatives / DVD to QNAP
The recommended method to Backup DVD
To copy DVD to Cloud without sacrificing video quality and much precious time, Pavtube DVDAid comes to your rescue. The top-notch DVD to Cloud converter for Mac lets you convert DVD movie to digital video format MP4, AVI, MOV, FLV, M4V, etc. for storing and playback to Nexus 10 speedily while keeping the original quality untouched.
One thing worth mentioning is that most commercial DVDs are encrypted to protect its copyright, making it tough to convert DVD to iCloud. Luckily, the mighty DVD ripper is constantly upgraded to convert any copy-protected DVDs, like Big Hero 6 DVD, DVD Interstellar, to name just a few by effortlessly bypassing Region Code, Disney x-project DRM copy protection, CSS, Sony ARccOS, etc. You can also refer to its Windows Version to rip DVD to Cloud on Windows 10/8/7 as you like.
Free download and install:


Other Download:
- Pavtube old official address: http://www.pavtube.cn/dvd_ripper/
- Cnet Download: http://download.cnet.com/Pavtube-DVDAid/3000-7970_4-76158510.html
DVD to a WD My Cloud Hard Drive to Nexus 10 Backing up Guide
Step 1. Load DVD movies to converter
Insert your DVD disc into your DVD-ROM, run the best DVD to Cloud Converter and click ”Load file(s)”icon to load movie from DVD source (Disc, folder, ISO). (Before conversin, you can backup DVD movies on Mac computer first)
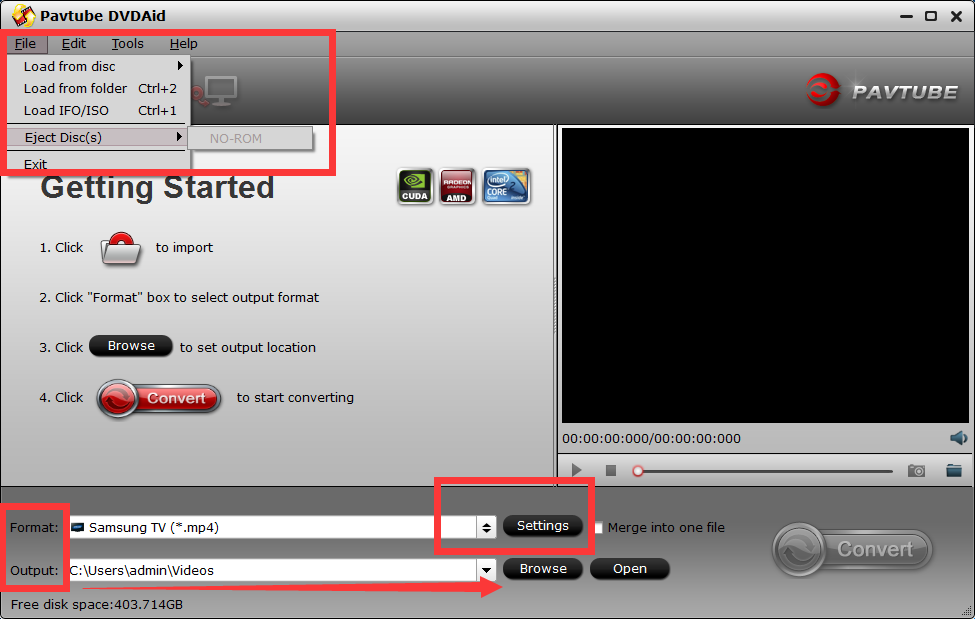
Step 2. Choose output format for Cloud to Nexus 10 playing
Click Format bar and choose your desired format. To store hundreds of DVD's on iCloud, you can choose to .mp4, .mkv, etc compressed format from "Common Video" or "HD Video" as the target format. If you would like to enjoy movies from physical DVD discs to your iPhone, iPad, you can select a decent format from the profile list like "iPad", "iPhone", "iPod" or "Apple TV" comes with the software.

Tip: If necessary, you can click Settings bar to adjust the level of compression to suit the quality you want.
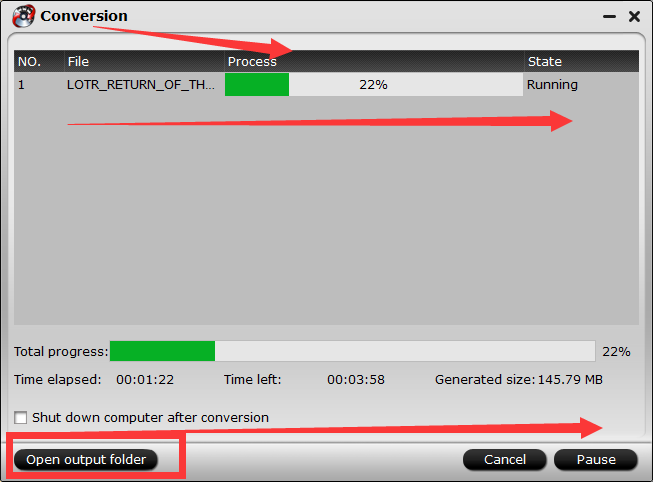
Step 3. Start DVD to Cloud conversion
Click "Start conversion" button under the preview window, and the DVD ripper will start the conversion from DVD movies to Cloud format. Once the conversion finished, you can click Open button to get the resulted videos effortlessly. Now it would be easy for you to download DVD movies through Cloud to to Nexus 10 for great enjoyment.
Cloud has provide many convenient functions for Smart users, and you can share your DVD movies between iOS devices without any limitation. So, why not follow us to have a try?
Tips: iTunes on Macbook and iSquint
Step 1. Then get the DVD you want to add to your iPod and insert it into your computer. If you have set your DVD player application to open automatically when you insert a DVD, it will probably open. Quit it.
Step 2. To find a target to store your files, click the "change" button at the bottom of the iSquint window.
Step 3. Next, locate the file you want iSquint to convert. To do this, navigate through the finder. Once you've selected these options, click the "Start" button att he bottom of the window.
Step 4. Open iTunes and login your iTunes account. Load your converted movies to iTunes and then choose to sync automatically. Then you can open iTunes on iPhone, and download your movies freely.
Related articles
How can I get my Led Zeppelin DVD on a WD My Cloud hard drive to Nexus 10?
Q2: Can I transfer my licensed DVD's to the Cloud?
Can i transfer my used DVD collection i own to the iCloud or Apple or any other storage company? I want to watch them when i want without having to insert a DVD into a DVD player.
Directory overview
- Why Do Backup DVD to My Cloud Hard Drive to Nexus 10
- The recommended method to Backup DVD
- DVD to a WD My Cloud Hard Drive to Nexus 10 Backing up Guide
- Tips: iTunes on Macbook and iSquint
Below content shows you where you may need a Cloud rather than a DVD disc.
1. Computer has no DVD drive or DVD drive is broken or damaged. You need Cloud to playback DVD movies on you Smart TV.
2. Transfer DVD movies via Cloud, especially DVD movie folder and ISO image files. From one computer to another with absence of DVD drive.
3. Save DVD content onto Cloud for storage. Make a backup of DVD movie collections with large capacity Cloud.
4. Play DVD movies via Cloud drive on Macs, iPads, iPhones, iPods, Apple TVs as long as you login in iTunes more conveniently.
Hot searches DVD to Davinci Resolve 12 / DVD to ISO movies / DVD to Samsung Galaxy J3/J5 / DVDStyler Alternatives / DVD to QNAP
The recommended method to Backup DVD
To copy DVD to Cloud without sacrificing video quality and much precious time, Pavtube DVDAid comes to your rescue. The top-notch DVD to Cloud converter for Mac lets you convert DVD movie to digital video format MP4, AVI, MOV, FLV, M4V, etc. for storing and playback to Nexus 10 speedily while keeping the original quality untouched.
One thing worth mentioning is that most commercial DVDs are encrypted to protect its copyright, making it tough to convert DVD to iCloud. Luckily, the mighty DVD ripper is constantly upgraded to convert any copy-protected DVDs, like Big Hero 6 DVD, DVD Interstellar, to name just a few by effortlessly bypassing Region Code, Disney x-project DRM copy protection, CSS, Sony ARccOS, etc. You can also refer to its Windows Version to rip DVD to Cloud on Windows 10/8/7 as you like.
Free download and install:
Other Download:
- Pavtube old official address: http://www.pavtube.cn/dvd_ripper/
- Cnet Download: http://download.cnet.com/Pavtube-DVDAid/3000-7970_4-76158510.html
DVD to a WD My Cloud Hard Drive to Nexus 10 Backing up Guide
Step 1. Load DVD movies to converter
Insert your DVD disc into your DVD-ROM, run the best DVD to Cloud Converter and click ”Load file(s)”icon to load movie from DVD source (Disc, folder, ISO). (Before conversin, you can backup DVD movies on Mac computer first)
Step 2. Choose output format for Cloud to Nexus 10 playing
Click Format bar and choose your desired format. To store hundreds of DVD's on iCloud, you can choose to .mp4, .mkv, etc compressed format from "Common Video" or "HD Video" as the target format. If you would like to enjoy movies from physical DVD discs to your iPhone, iPad, you can select a decent format from the profile list like "iPad", "iPhone", "iPod" or "Apple TV" comes with the software.
Tip: If necessary, you can click Settings bar to adjust the level of compression to suit the quality you want.
Step 3. Start DVD to Cloud conversion
Click "Start conversion" button under the preview window, and the DVD ripper will start the conversion from DVD movies to Cloud format. Once the conversion finished, you can click Open button to get the resulted videos effortlessly. Now it would be easy for you to download DVD movies through Cloud to to Nexus 10 for great enjoyment.
Cloud has provide many convenient functions for Smart users, and you can share your DVD movies between iOS devices without any limitation. So, why not follow us to have a try?
Tips: iTunes on Macbook and iSquint
Step 1. Then get the DVD you want to add to your iPod and insert it into your computer. If you have set your DVD player application to open automatically when you insert a DVD, it will probably open. Quit it.
Step 2. To find a target to store your files, click the "change" button at the bottom of the iSquint window.
Step 3. Next, locate the file you want iSquint to convert. To do this, navigate through the finder. Once you've selected these options, click the "Start" button att he bottom of the window.
Step 4. Open iTunes and login your iTunes account. Load your converted movies to iTunes and then choose to sync automatically. Then you can open iTunes on iPhone, and download your movies freely.
Related articles
No comments:
Post a Comment