There are many occassions that you need to rip your Blu-ray discs on Mac: You want to take Blu-ray movies with you on the go, or just want to protect your expensive Blu-ray discs from scratching and get rid of messing around with physical discs, or you want to play Blu-ray with QuickTime on Mac without needing external Blu-ray drive and transfer Blu-ray to iTunes for ATV, iPad and iPhone playback. Thankfully, there are many programs out there that allow you to make copies of your Blu-rays on Mac (macOS Sierra Included) and let you convert Blu-ray to vairous formats. Here I will show you top 3 different and excellent tools to rip Blu-rays on Mac (macOS Sierra Included).
Table of Content
Part 1: Rip Blu-ray on Mac free with MakeMKV
Part 2: Backup Blu-ray on Mac (macOS Sierra) with BDMagic
Part 3: Lossless Copy Blu-ray on macOS Sierra with ByteCopy
Part 1: Rip Blu-ray on Mac free with MakeMKV
Firstly, you should download and install MakeMKV
Requires x86 Mac OS X 10.6 or later.
NOTE: MakeMKV is not signed by Apple, you might need to adjust gatekeeper options in order to install the program.
After installing the app, enter your disk into your hard-drive and fire up MakeMKV. Obviously, the disk needs to be in a Blu-ray drive. MakeMKV will now run, whirr, and make its noises and, all going well, will show you the title of the disk, along with the disk information. Next, click on the hard-drive icon again to proceed to the next step.
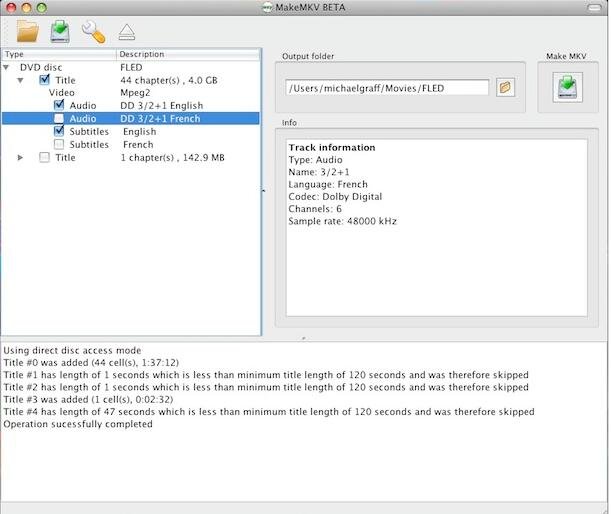
Now you have to decide which disk chapters you are going to rip. Obviously, the movie (or TV show) will be the largest file. Now, with each chapter you want to rip, make sure the box is ticked. BUT you also have to do something else before hitting that “Make MKV” button. If you drop down one of the chapter menus, you will see that subtitles are also enabled. Assuming you don’t want the subtitles, untick those boxes. Of course I chose a disk that DOESN’T have subtitles (thanks God, appreciate that one). But if you drop down the menu of a Blu-ray chapter, the subtitles are there in 99% of cases.
OK, assuming you’ve done all that, click the “Make MKV” button and let the software do its thing.
Part 2: Backup Blu-ray on Mac (macOS Sierra) with BDMagic
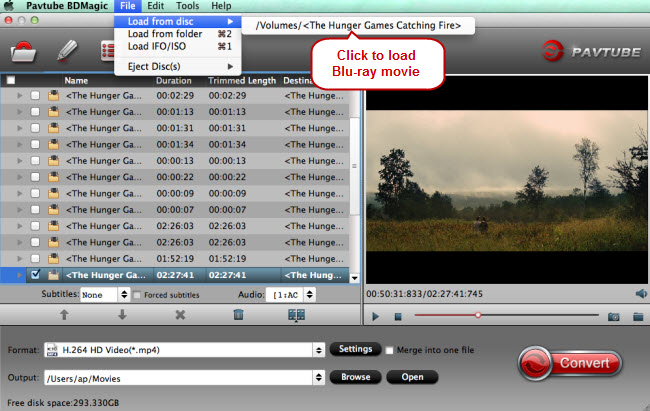
Pavtube BDMagic for Mac is the professional Blu-ray Ripper which is designed to rip and backup any commercial and region-locked Blu-ray disc, Blu-ray Folder, Blu-ray ISO, Video-TS Folder to Hard Drive on Mac (macOS Sierra) in nearly all format video with original video quality. Besides it, it has many optimized preset for mainstreaming multimedia players, like iPad, iPhone, Surface, Android Phones, PSP/PS3, etc. It also allows you to choose your wanted subtitle and audio track while backing up X-Men Blu-ray disc.
Step 1: Run the program on Mac, on the main interface click "File" > "Load from disc" to Load Blu-ray disc from optical drive. DVD is also supported to rip to Hard Drive with Pavtube BDMagic for Mac. When both Blu-ray and DVD exists, the software will load DVD.
Step 2: Hitting the  icon on the top tool bar of the main interface to start to entire backup Blu-ray to Mac Hard Drive with the original video structure and all information in the disc.
Part 3: Lossless Copy Blu-ray on macOS Sierra with ByteCopy
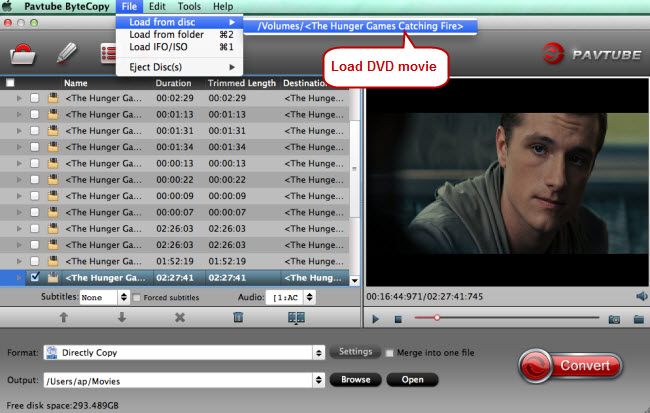
Pavtube ByteCopy for Mac is a lossless BD/DVD Ripper for Mac including macOS Sierra that can get around the copy protection from Blu-ray and DVD then transform the "Disc format" to mainstreaming video format to compatible with various portable devices, game consoles, tablet, laptop, server, cloud storage, etc. It features with wide of output video/audio format, like H.265., M3U8, MP4, MOV, MKV, AVI, etc.
The best part of Pavtube ByteCopy is that it has the ability of backing up your Blu-ray collection to Mac drive in multi-track lossless MKV without quality loss while preserve all chapter markers and ripping Blu-ray movies to MP4/MOV/AVI with multiple subtitle and audio streams. And the windows version can export single SRT subtitle file.
Step 1: Insert Blu-ray disc into disc drive, launch ByteCopy for Mac, and browse to disc drive for importing your Blu-ray movie into this app. It can automatically detect the main title to convert. You can choose desired subtitle and forced subtitle before the next step.
Step 2: To rip Blu-ray to multi-track MKV/MOV/MP4 on Mac (macOS Sierra), click the drop down box of “Format”, and select the “Multi-track Video” option. Here, you can choose “Multi-track MP4(*.mp4)” or “Lossless/encoded Multi-track MKV(*.mkv)”, or “Multi-track MOV(*.mov)” profile. All these formats are designed to output videos with multiple audio tracks.

Tip: You can check the audios you want to keep and uncheck the audios you don’t need. It all depends on your own choices.
Step 3:
The last step you need to do is hit the “Convert” button to start the conversion of Blu-ray content to Multi-track MP4/MKV/MOV on macOS Sierra. Once the process ends, open the output folder to locate the generated video.
With these three motheds, you can successfully copy Blu-ray on Mac (macOS Sierra). You can play Blu-ray on QuickTime on Mac, import Blu-ray to iMovie for editing, sync Blu-ray to iTunes for iPhone 7, iPhone 6S (Plus), iPad Pro, iPad Air 3 and Apple TV 4/3/2/1 and the coming fifth-gen Apple TV.
There you have it! Hopefully this has provided much insight on how you should go about ripping a Blu-Ray disc on Mac. I wish you luck with your endeavors and do let us know if you have a suggestion that we should include in this tutorial.
Src: http://2d-3d-movie-tips.blogspot.com/2016/10/3-tools-rip-blu-ray.html
Related Articles:
No comments:
Post a Comment