Summary: This article is relevant for converting Blu-ray ISO files to lossless MKV with subtitle on Mac so that you can enjoy your Blu-ray ISO files anywhere you want them.

Blu-rays have been a part of our life. If you have ripped your Blu-ray movies to ISO files or have some Blu-ray ISO image files downloaded from the Internet and now want to convert Blu-ray ISO videos to a widely supported video format for easily sharing or playing on some media players, then you are definitely in the right place here! Let's learn how to rip Blu-ray ISO to MKV videos with fast ripping speed and lossless video quality.
Puzzled at what software to use to get the job done? Here a professional Blu-ray/DVD Ripper Pro- Pavtube ByteCopy for Mac is highly recommended to help you turn to Blu-ray ISO to MKV without re-encode and keep all audio and subtitle tracks easily. (Windows version: Pavtube ByteCopy) Review: Top 5 Best Multi-track Blu-ray Ripper Reviewed.
More functions:
How to rip Blu-ray ISO to Lossless MKV format with multi-track and subtitles on Mac
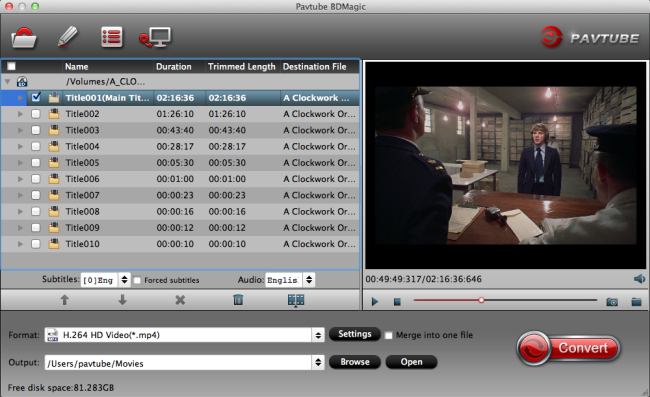
Step 1. Load Blu-ray ISO Files
Install and launch the ISO file converter and click "Load IFO/ISO" icon to add Blu-ray ISO movies from your computer.

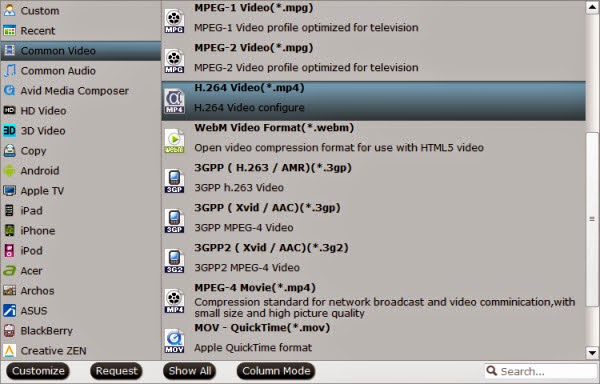
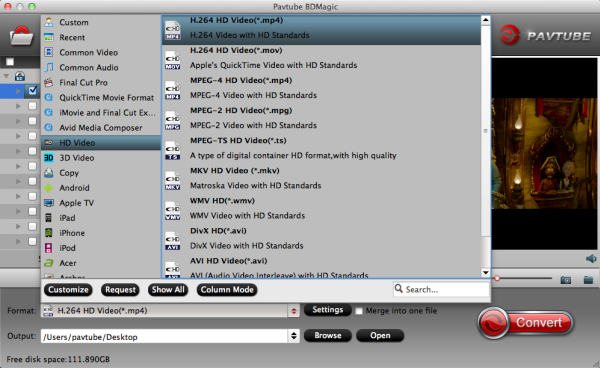
Step 2. Choose output format
Here we recommend "Lossless/encoded Multi-track MKV (* mkv)" under "Multi-track Video" catalogue. Because it will save multiple video, audio and subtitle tracks form original Blu-ray ISO in output MKV and you won't suffer any quality loss.

Tips:
1.If you have some Blu-ray ISO image files and want to convert Blu-ray ISO to MKV, AVI, WMV, MP4, MPEG, MOV, etc format without multi-track, please choose Pavtube BDMagic to get the work done effortlessly.
2.Looking for a way to convert existing Blu-ray ISO collection to Surface Pro 3 so that you can watch them with multiple languages? Simply follow this article to get it done!
3.How to import your favorite Blu-ray/DVD disk movies to FCP X with retaining the surround sound track? Read here and get out of the issues.
Step 3. Adjust profile presets (Optional)
You are allowed to customize profile presets as you like, you could remove unwanted audio track in Audio tab under Settings menu, and uncheck subtitles you do not need in Subtitles tab.

Step 4. Start Blu-ray to Lossless MKV conversion
Hit the "Convert" button to start ripping Blu-ray ISO to Lossless MKV without re-encode and keep all audio and subtitle tracks. When the lossless backup completes, you would get a single large MKV file saved in output file destination.
Bingo! You made it! Now you can enjoy your Blu-ray ISO files freely. If you want to some money saving boundles, you can read here:
ByteCopy($42) + Video Converter Ultimate($65) = Only $79.9, Save $27.1
ByteCopy($42) + ChewTune($29) = Only $54.9, Save $16.1
Blu-rays have been a part of our life. If you have ripped your Blu-ray movies to ISO files or have some Blu-ray ISO image files downloaded from the Internet and now want to convert Blu-ray ISO videos to a widely supported video format for easily sharing or playing on some media players, then you are definitely in the right place here! Let's learn how to rip Blu-ray ISO to MKV videos with fast ripping speed and lossless video quality.
Puzzled at what software to use to get the job done? Here a professional Blu-ray/DVD Ripper Pro- Pavtube ByteCopy for Mac is highly recommended to help you turn to Blu-ray ISO to MKV without re-encode and keep all audio and subtitle tracks easily. (Windows version: Pavtube ByteCopy) Review: Top 5 Best Multi-track Blu-ray Ripper Reviewed.
More functions:
How to rip Blu-ray ISO to Lossless MKV format with multi-track and subtitles on Mac
Step 1. Load Blu-ray ISO Files
Install and launch the ISO file converter and click "Load IFO/ISO" icon to add Blu-ray ISO movies from your computer.
Step 2. Choose output format
Here we recommend "Lossless/encoded Multi-track MKV (* mkv)" under "Multi-track Video" catalogue. Because it will save multiple video, audio and subtitle tracks form original Blu-ray ISO in output MKV and you won't suffer any quality loss.
Tips:
1.If you have some Blu-ray ISO image files and want to convert Blu-ray ISO to MKV, AVI, WMV, MP4, MPEG, MOV, etc format without multi-track, please choose Pavtube BDMagic to get the work done effortlessly.
2.Looking for a way to convert existing Blu-ray ISO collection to Surface Pro 3 so that you can watch them with multiple languages? Simply follow this article to get it done!
3.How to import your favorite Blu-ray/DVD disk movies to FCP X with retaining the surround sound track? Read here and get out of the issues.
Step 3. Adjust profile presets (Optional)
You are allowed to customize profile presets as you like, you could remove unwanted audio track in Audio tab under Settings menu, and uncheck subtitles you do not need in Subtitles tab.
Step 4. Start Blu-ray to Lossless MKV conversion
Hit the "Convert" button to start ripping Blu-ray ISO to Lossless MKV without re-encode and keep all audio and subtitle tracks. When the lossless backup completes, you would get a single large MKV file saved in output file destination.
Bingo! You made it! Now you can enjoy your Blu-ray ISO files freely. If you want to some money saving boundles, you can read here:
ByteCopy($42) + Video Converter Ultimate($65) = Only $79.9, Save $27.1
ByteCopy($42) + ChewTune($29) = Only $54.9, Save $16.1


 on PC and iPad Air 2")