Description: Are looking a freeware for ripping DVD to MKV, AVI, VOB, WMV, FLV, MPG, ? This article will show you great yet easy-to-use software and tell you how to do it.
"Good experience with your Youtube product, Now I needed clips from some educational video discs that I own for a class that I am teaching."
Similarly, you may also encounter this problem. You may want to free convert DVD to WMV for play with Windows Media Player in order to share it with your students, or want to free convert some clips of DVD to MOV/FLVformat so as to post to blog or upload to YouTube and Facebook for sharing with friends, even more want to free convert DVD to AVI/MPG/VOB etc. for playing or editing. Definitely much commercial software can do it for you. But there is free software can work for it, why do you pay extra money for it.
Pavtube DVDAID or Pavtube Video Converter Ultimate is perfect for you. With it, you can easily convert both common DVD and commercial DVD with copyright protection like AACS, region code, etc. Meanwhile, you can convert the latest DVD to MOV, MKV, AVI, VOB, MPG, WMV, FLV, etc. format with very fast speed. Here, this article will show you how the windows version of Free DVDAID works.
Note: Definitely a Mac user can get DVDAID for Mac. And the way to convert DVD for Mac is the same as Windows.
What you need for converting DVD:
* DVDAID (for Windows or Mac)
* DVD drive
* Net connection
* DVD disc you want to convert
* Enough storage space
Click "Download" button to directly use the Pavtube Free DVDAID on your PC/Mac.

 How to copy/convert DVD to MOV/MKV/AVI/MPG/WMV etc on Windows
Step 1. Import DVD source.
Insert one of DVD discs you need to convert and then double click the icon on the desktop to launch the software. Click "Import DVD" icon and select the DVD disc in the drop-down list. It is obvious that the software has already recognized the inserted DVD automatically for you, so you do not need to find the desired DVD manually. Meanwhile, you can choose to "Load IFO/ISO" or "Load from folder".
How to copy/convert DVD to MOV/MKV/AVI/MPG/WMV etc on Windows
Step 1. Import DVD source.
Insert one of DVD discs you need to convert and then double click the icon on the desktop to launch the software. Click "Import DVD" icon and select the DVD disc in the drop-down list. It is obvious that the software has already recognized the inserted DVD automatically for you, so you do not need to find the desired DVD manually. Meanwhile, you can choose to "Load IFO/ISO" or "Load from folder".
 Tips: After having load DVD successfully, the actual Main Title will be ticked automatically by the software. And only by clicking the selected Main Title, you are able to select Subtitles tracks and Audio tracks on the interface and preview the whole movie in the preview window on the right.
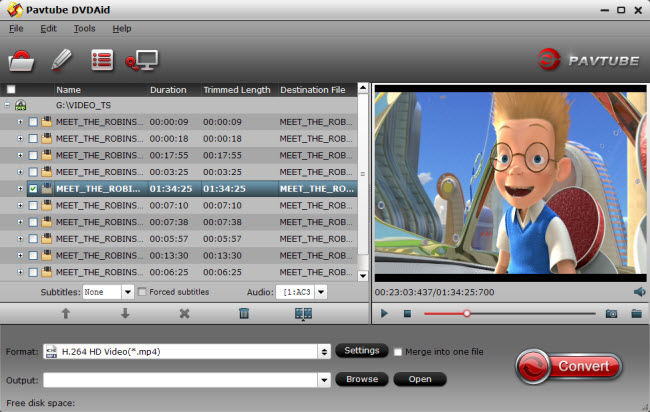
Step 2. Choose an output format and make settings.
Go to Format menu and choose a suitable format you want in the drop-down format list. In actually, you can choose H.264 HD Video (*.mp4) format.
Click "Settings" button on the interface you will do to video and audio parameters of output profiles. Here, you will see detailed parameters, estimated target files size and free disk space. If you want a smaller size when the free disk apace is not enough, you can choose to adjust Bitrates (kbps) and Size (pix). Choosing a little lower Bitrates and Size will help you to get a smaller target file.
Now, you can free convert DVD to MKV, AVI, VOB, MOV, WMV, FLV, MPG, etc. Formats by clicking the "Convert" button. During the conversion starts, you will get the following window about the conversion. You can see the Time elapsed and Time left and it will keep you informed of timely state of conversion. A definite number will give you a clear progress of conversion.
The conversion time depends on the size of your output videos. Once completed, you can click "Open output folder" to locate the generated files. If you have closed the conversion window after conversion, don't worry, "Open" button on the interface can also bring you to the output files, very convenient!
More features about Pavtube DVDAID:
1. Click "Edit" icon on the interface, you will be able to see every individual frame there, rotate and flip it. And what's more, you can cut off the undesired part, crop output size, edit output audio, and add subtitles, etc. Go to try it if you need.
2. Click "Option" icon on the interface and then go to Acceleration option, you can choose to check Enable GPU acceleration, which will help to speed up conversion. Here you can check your graphic card is supported or not.
Pavtube DVDAID will bring you great experience of converting DVD and you cannot suffer any video and audio out of sync issue.
However, if you have no idea about how to choose the most suitable format for a certain device, like iPad 3, iPad mini, ATV 3, Nexus 7, Galaxy Tab 3, S4, Note 2, Surface, Kindle Fire HD, etc., or you want to editing some clips from DVD on Windows/Mac editing software, choosing Free trail version of Free DVDAID for Windows/Mac may be the best choice for you. Trail version supports converting DVD to MP4/M4V files and has built-in the best compatible format for many devices and named after the certain device. So you just need to go to the certain device under format menu and choose a format. That is so easy.
Moreover, "Directly Copy" will help you to 100% backup the intact main movie of DVD, and "Copy the entire disc" will support 1:1 backup the whole movie with original structure and chapter mark. It is a better way to copy DVD for playback and safekeeping. Go to know more about us. Like us on Facebook.
For Windows:
Tips: After having load DVD successfully, the actual Main Title will be ticked automatically by the software. And only by clicking the selected Main Title, you are able to select Subtitles tracks and Audio tracks on the interface and preview the whole movie in the preview window on the right.
Step 2. Choose an output format and make settings.
Go to Format menu and choose a suitable format you want in the drop-down format list. In actually, you can choose H.264 HD Video (*.mp4) format.
Click "Settings" button on the interface you will do to video and audio parameters of output profiles. Here, you will see detailed parameters, estimated target files size and free disk space. If you want a smaller size when the free disk apace is not enough, you can choose to adjust Bitrates (kbps) and Size (pix). Choosing a little lower Bitrates and Size will help you to get a smaller target file.
Now, you can free convert DVD to MKV, AVI, VOB, MOV, WMV, FLV, MPG, etc. Formats by clicking the "Convert" button. During the conversion starts, you will get the following window about the conversion. You can see the Time elapsed and Time left and it will keep you informed of timely state of conversion. A definite number will give you a clear progress of conversion.
The conversion time depends on the size of your output videos. Once completed, you can click "Open output folder" to locate the generated files. If you have closed the conversion window after conversion, don't worry, "Open" button on the interface can also bring you to the output files, very convenient!
More features about Pavtube DVDAID:
1. Click "Edit" icon on the interface, you will be able to see every individual frame there, rotate and flip it. And what's more, you can cut off the undesired part, crop output size, edit output audio, and add subtitles, etc. Go to try it if you need.
2. Click "Option" icon on the interface and then go to Acceleration option, you can choose to check Enable GPU acceleration, which will help to speed up conversion. Here you can check your graphic card is supported or not.
Pavtube DVDAID will bring you great experience of converting DVD and you cannot suffer any video and audio out of sync issue.
However, if you have no idea about how to choose the most suitable format for a certain device, like iPad 3, iPad mini, ATV 3, Nexus 7, Galaxy Tab 3, S4, Note 2, Surface, Kindle Fire HD, etc., or you want to editing some clips from DVD on Windows/Mac editing software, choosing Free trail version of Free DVDAID for Windows/Mac may be the best choice for you. Trail version supports converting DVD to MP4/M4V files and has built-in the best compatible format for many devices and named after the certain device. So you just need to go to the certain device under format menu and choose a format. That is so easy.
Moreover, "Directly Copy" will help you to 100% backup the intact main movie of DVD, and "Copy the entire disc" will support 1:1 backup the whole movie with original structure and chapter mark. It is a better way to copy DVD for playback and safekeeping. Go to know more about us. Like us on Facebook.
For Windows:  For Mac:
How to move Monsters University DVD to Nabi 2 for the kids?
“What’s the news? My friend told me that “Monsters University” is an interesting movie for children, If you want to do something else, you can let the kids watch movies on your tablets. ”- good idea.
Movie information:
Mike Wazowski and James P. Sullivan are an inseparable pair, but that wasn't always the case. From the moment these two mismatched monsters met they couldn't stand each other. "Monsters University" unlocks the door to how Mike and Sulley overcame their differences and became the best of friends. -- Walt Disney.
The Nabi 2 is the successor to Fuhu's popular Nabi tablet, which designed especially for Kids that lets Kids watch their favorite movies and TV shows. There are apps for thatand you can find the Pavtube is pretty good.
Next, I tried free trail from pavtube and here the steps would show you an easiest way convert DVD to Nabi 2 tablet. Keep reading for a brief how-to on the process.
1.Load DVD files into this program
Click “Add Video” to import video files, and click “Load DVD” to import DVD file.
2.Select H.264 as output format for nabi tablet.
Click “Format” and select an output format for conversion. It’s suggested you choose “Common Video >> H.264 Video (*.mp4)” for nabi 2 slab. This format works fine, but you can still make it better fit for nabi 2 in step 3.
3.Do optimal settings for the output MP4 files
Click on Settings you could easily set bitrate, frame rate, codec, channels, sample rate, etc to adjust parameters that affect video quality and file size for the video you prefer. After that, you can click on "Save as" to rename the profile, such as "Nabi Tablet (*.mp4)". Next time, you can easily find it in "Custom" category.
4. Start the conversion.
After above steps, just click "Convert" to begin ripping DVD to Nabi highly compatible MP4 videos.
After finish your conversion, you would find the movies that you converted and for a new user you can see the steps: How to transfer converted iTunes movies to nabi 2 tablet
1. Plug the Micro USB cable from your computer to nabi.
2. A dialog box should appear asking you what you want to do with the new hardware. Select Open Device to View Files. If the box does not show up, you can go to Start Menu > My Computer and double click Removable Disk "No Name.”
3. Next, look for “Movies” folder, or create your own to organize the files you are saving on nabi. Select the files you would like to transfer from your computer by dragging and dropping movies into the folder.
4. Once all files have been transferred, safely remove your device: Click Safely Remove Hardware on the bottom right side of your computer screen, then click USB Mass Storage > Stop.
5. When the DRM-free movies are copied to Nabi 2, you’re free to play them. Open the movies by going to the Gallery app on your nabi 2.
If you want to know more, pls read:
Convert Blu-ray/DVD Digital Copy to play on Nabi (2) kids tablet
How to transfer iTunes movies/TV shows to Nabi(2)Tablet for your kids
Play Disney Blu-ray movie on Fuhu DreamTab for all Kids
Get DVD/ISO/IFO movies onto Nabi 2 for your kid to watch on road trip
Last weekend, I searched the Blu-ray movies in google on my tea time, I saw a Blu-ray movie “American Hustle”, the rating was 7.7, so that I really want to watch it on my Roku 3. I asked my best friend and he told me that there were too many free software on the Internet to ripping/copying Blu-ray movies. I tested trial version of Blu-Ray ripping software. Hoping to find a good one to solve my solutions. Finally I tried MakeMKV but had issues. Preliminary tests with Pavtube went smoothly. Sometime, I can also watch Blu-ray movies on ipad for sofa surfing, Nexus 7 for sofa surfing, anywhere I want to have a rest. I think as a movie lover, this is a good choice.
If you have the same situation, you can download Pavtube Bytecopy and have a try, Practice makes choice, you will be surprised because of the software can convert Blu-ray movies to suitable formats for playing on your all devices with zero quality loss, including Roku 3, iPad Air, Nexus 7, etc. It’s perfect!
View ByteCopy Review to learn more.
Step-by-step guide to move Blu-ray movies to external hard drive
Step 1: Load Blu-ray movie.
Click on the "Load disc" button to import source Blu-ray movie from disc drive to the program.
Step 2: Choose output format.
From the "format" menu, choose one profile for output. You are suggested to select "HD Video>MKV HD Video(*.mkv)" as output format for your external hard drive.
Step 3: Starting ripping Blu-ray movie.
Hit the "convert" button to rip m2ts format from original Blu-ray to a suitable format for playback freely.
Ok, you will get the suitable formats that which you want to. Enjoy it and do not missing the great Blu-ray movies!
Read more:
Top DVD Ripper Review - Get Top 5 DVD Ripper Program for You
Best Blu-ray Ripper Software Reviews - 2014
MakeMKV vs ByteCopy vs DVDfab - Top Blu-ray Ripper
Never miss new released Pavtube ByteCopy 2.2.0 and Pavtube ByteCopy for Mac 2.3.0


