Showing posts with label Others. Show all posts

Tuesday, June 30, 2015

Convert DVD to DivX AVI on PC and Mac Easily and Fast

I have a Network attached storage device (Buffalo) that has DLNA protocol awareness to make it a media server playable on a PS3 and Xbox One. Some movies may be queued up on an iPad for over night stays. I need a Divx converter which can convoluted with all the add in codecs it requires just to make a back up of an old school DVD. Aside from have a movie server in the house, the primary reason I wanted the software is to be able to watch movies we already own for the kids in the back of our Land Rover. So I mainly plan on converting to AVI, Any suggestions?  

I used Google to search on best "DVD Ripper" reviews and then I went through a bunch of sites to see the recommendations with pro's and con's. I choosed Pavtube which called DVDAid. I Love it! It is easy to use as most reviewers have stated. 
  
Tips for about DVD Movie tips: DVD on iPhone 6 Plus | DVD Audio to Lossless FLAC | DVD to Windows Media Center |

Scratching your head and wanna find a way to rip DVD to AVI either for backup or convenient playback/share? To watch movies already own for the kids in the back of Land Rover. Here is a good option: get a professional DVD ripper and convert DVD to AVI with ease. After the conversion, you can surely play your movies on computer, HDTV, portable devices; share them on YouTube and more to have fun. 

You might ask what kind of DVD tool could be a professional one. Here Pavtube DVDAid is recommended. It has an intuitive interface and enables you to convert DVD to DivX AVI as well as MP4, MKV, FLV, MOV, MPEG, WMV, etc. with selected subtitles and audio tracks. For Mac users, Pavtube DVDAid for Mac will do a great job for you. Download the right version and have a look at how it works. 

Backup DVD to DivX AVI for playable on Any devices

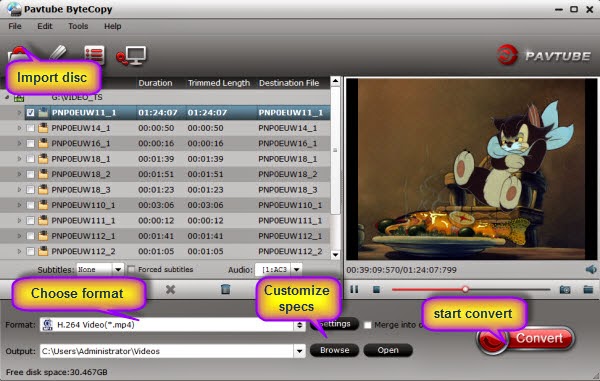
Step 1. Insert the DVD disc into your DVD-ROM and then load the WBO television series DVD movies to the program by clicking the disc icon. A DVD usually contains several subtitles and audio tracks. Just click to select the subtitles and audio soundtracks you need. 


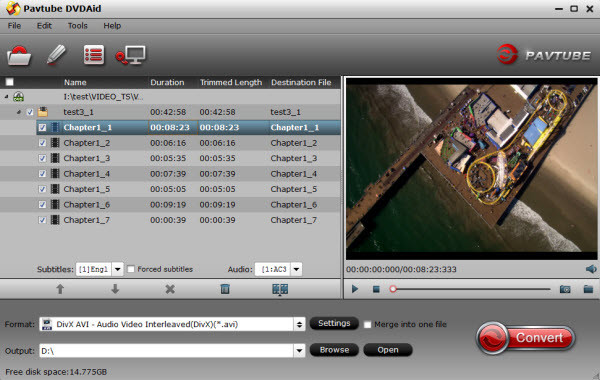
Step 2. Next, click the Format bar. You can then choose AVI from the drop-down list as the output file format. Here, you can choose "DivX AVI - Audio Video Interleaved(DivX)(*.avi)" from the "Common Video" list. 


What's more? For PS3 or Xbox One, you can convert the DVD to MKV or MP4 files, just choose the "HD Video > Select "H.265 High Profile(*.mp4)" as the best one.

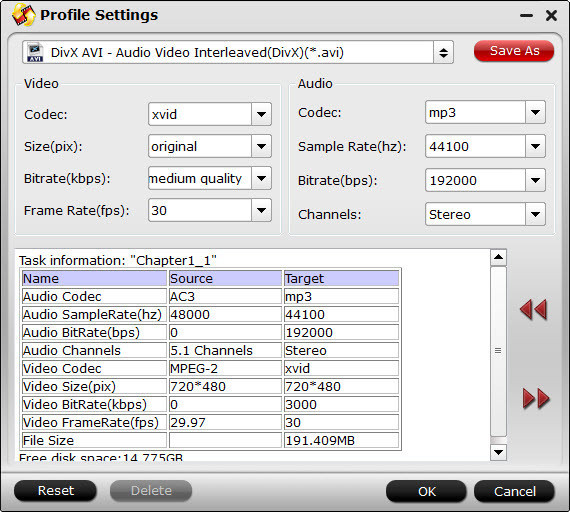
Tip: You can then personalize the output video by setting the video/audio parameters like resolution, frame rate, audio quality, bit rate, etc. 


Step 3. When you're sure everything is OK, click the Convert button of the best DVD to DivX AVI Converter. It will begin ripping DVD to DivX AVI keeping subtitles immediately. Wait for the conversion to be done and click Open to get the converted AVI videos. 

Now you can watch these wonderful DVD Movies cozily on a cruise holiday. Hopefully this page can help you rip DVD to AVI successfully. 


Read More:

Wednesday, September 24, 2014

Transfrom DVDs on MicroSD for playing on tablet or TV

“I purchased my favorite a series of DVD discs and really love it. To prevent scratches them, I wanna convert these DVDs to MP4 format for storage on MicroSD with 64GB. I need DVD to MP4 transcoding to view my clips on tablet or insert them on LG DVD player for playback on TV. What’s more? I like the simplicity of the UI of your tool and prefer it over more versatile video converters. Which tool does this nicely? ” 

If you want to watch DVD movies on your tablet or move them on your SD Card for playback on TV at anytime you like, you will need to rip/compress DVD to tablet or other portable devices compatible video formats like MP4 so that you can play your favorite DVD movies freely on your talet or other ways. To get out of this annoying situation, Pavtube brings this Top DVDAid (Review:Top 3 Best DVD Copying and Ripping Software) to help with DVD to MP4 conversion with just few clicks. 

Step 1: Insert DVD and Add Movie. 

Double click to open Pavtube DVDAid, then insert a DVD disc to your DVD-Rom and click DVD Disc. You can also import DVD folder from your computer hard drive. 

dvd to tablet via sd card
  
Step 2: Choose an Output Video Format. 

Flash card supports storing almost all kinds of video formats. However, when linked to a device for playing, the video file should of the format accepted by the device, for example, a smart TV, a computer and a desktop. So you are required to figure out the exact input video formats supported by the device you are to play the DVD video with. 

dvd to tablet via sd card with mp4
  
For portable devices including all kind of tablets, MP4 is recommended since it has wide application/acceptance, good video quality and small file size. 

For TV, MPEG/WMV/AVI/MKV format is so far accepted by most brands. 

Tip: Pavtube DVDAid let users control/customize output file quality. To improve video quality, simply click “Settings” and set video bitrate up. 

Step 3: Click “Convert”to start. 

If you do not need to change the default output folder and disk, just hit the big “Convert” button to begin the fast DVD to flash card ripping and conversion process. 

Now, you can move the converted mp4 files to your 64 GB MicroSD Card. Here, we take the Samsung Galaxy Note 3 for example. Then, you can watch your movies on tablet or insert them to LG DVD player for playback on TV. 

Want to play DVD on Windows 8.1/8 ? iPhone 6 or iPhone 6 PlusBlu-ray (ISO files) playback on Galaxy Note 4? Find the all soulutions from Pavtube.

Monday, September 22, 2014

How to Play DVD in Windows 8.1 & 8 without any hassles

Summary: If you’re bothered by the DVD playback and DVD ripping issue in Windows 8.1 & 8. Don't worry, there are two sections you can resort to. Read on to get it done. 
  
Section A: How to rip and convert DVD in Windows 8.1/8 
     
DVD Playback support is not included by default in Windows 8 and 8.1. You either need to buy the Windows Media Center pack for $10, or use third party software. If you want to play your DVD movies without any limitation, you need to look for a DVD ripper that is compatible with Windows 8/8.1 to help you rip DVD in Windows 8.1/8. Look no further! I will introduce you one of the best DVD Ripper for Windows 8.1/8. 

Here, Pavtube DVDAid has helped thousands of customers to backup or rip them DVD disc, folder, IFO and ISO image files for playbakc on Windows 8.1/8. Since their business launch, their software has been designed and built to be both comprehensive and simplified in nature. It integrates DVD Backup and DVD transcoding features to help users simply choose the best video presets according to their own terminal requirements in one go. 
  
Note: If you are Mac users, view Pavtube DVDAid for Mac; well support Mac OS X 10.9 Mavericks!
  
Step-by-step: How to convert DVD to suitable format on Windows 8.1/8

Step 1. Load DVD movies. 

Download this best DVD Ripper and launch it. Insert the DVD disc into DVD drive and run the program. Click DVD button to add the DVD movie. As you see, DVD disc, ISO, IFO and DVD folder are all well supported. 
 
best dvd to windows 8.1/8 ripper

Step 2. Choose an output format. 

Click on “Format” bar, select any format you need from the drop-down profile list. You can choose regular video formats like AVI, MP4, WMV, FLV, MKV, MOV, etc from Common Video. Or you can choose a video preset for portable devices like iPhone 6iPad Air, Galaxy Note 4, etc. Here, you can choose “H.264 Video(*mp4)” for playback on Windows 8.1/8. 
  
best format dvd to windows 8.1/8 ripper


Step 3. Adjust specs or edit video before conversion (Optional). 

Click “Settings” button to configure target file quality. After entering “Profile Settings” panel, you are allowed to adjust video and audio parameters such as bit rate, frame rate, sample rate, etc..
  
Step 4. Start ripping. 

When everything is done, click Convert icon to start ripping DVD movies on Windows 8/8.1. When the conversion done, click Open button to get the ripped videos for much more convenient playback on Window 8.1/8 PC or on the go.
  
Section B: How to play DVD in Windows 8.1/8 with third-party media players


Top 1. VLC

vlc dvd player
  
The swiss army knife of media players, VLC plays DVDs and almost everything else out there. It’s completely free and open source. Just download the VLC player, install it, and pop in a DVD disc. Open the VLC application, click the Media menu, select Open Disc, and choose your DVD drive. When you put in a DVD, VLC will skip straight to the menu or the movie itself, skipping all those obnoxious piracy warnings and long trailers. 

Top 2. GOM Media Player

GOM Media Player

Another popular free desktop program that will play DVDs on Windows 8, and virtually every media file that VLC can, is GOM Player. It works similarly to other media players, and some would argue it provides a more crisp picture when viewing DVDs. It too has an insane amount of features available to tweak so you can get the perfect playback experience. It also has an official remote control app for iOS and Android devices.

Top 3. KMPlayer

KMPlayer
  
Like VLC, KMPlayer is a versatile open source multimedia application for playing DVDs on Windows 8. And like both VLC and GOM, it contains its own internal codecs and is able to play virtually any media file you throw at it. It's fast, and doesn't take up a lot of computer resources. It was recently purchased by Pandora and has new features to organize video, music, cover art, and an upcoming app store. 

Now, you can check out these best DVD Ripper and third-party media players, then, you can Effortlessly Watch DVD Movies on Windows 8.1/8. Have fun!

Releated Articles:

Directly copy DVD to VOB files with VLC Media Player on Mac
Store collected DVD movies on my cloud storage 
Backup DVD(ISO) files on home studio via UPnP server

Monday, September 1, 2014

How to Rip DVD to QuickTime MOV for playback on Mac Mavericks

Description: This guide reveals how to convert  DVD video files to QuickTime MOV for playback smoothly on Mac Mavericks.
  
QuickTime is an extensible proprietary multimedia framework developed by Apple Inc., capable of handling various formats of digital video, picture, sound, panoramic images, and interactivity . If you've got some awesome DVDs and want to backup them to Mac, then import to QuickTime player for enjoying.

DVD to QuickTime MOV

However, currently QuickTime Player does not support DVD file. And in that case, you need a Mac dvd to QuickTime Converter to transcode DVD to a format that QuickTime can recognize. MOV is the default video format QuickTime media player supports. To convert DVD to QuickTime MOV on Mac Mavericks successfully and quickly, an easy-to-use yet efficient tool- Pavtube DVDAid for Mac is highly recommended.

It provides super-fast converting speed and high quality output video. Furthermore, it has optimized preset for QuickTime, which can save your much worry. 

To transcode DVD discs to MOV/MP4/Apple Prores with multiple audio and subtitle tracks, that is what Pavtube ByteCoy for Mac <review> can do for you. Suppose you are good at both English and Francia, and want to preserve both of them from original DVD discs when converting. Then you can select the audio you want when enjoying movies.

This guide will show you how to convert DVD movies to QuickTime mov for playing with QuickTime on Mac Mavericks with Pavtube DVDAid for Mac.

Similar Guide: How to Playing Blu-ray on Quicktime on Mac?

Step 1. Add videos into this Mac DVD to QuickTime Converter

After running this DVD to QuickTime mov Converter for Mac, just click either "Add Video" button or "Add from folder" button to load source .DVD files.

DVD to QuickTime MOV

Step 2. Choose the output format and set the destination

Choose configured preseDVD for QuickTime Player. In order to convert DVD files to MOV for using in QuickTime, simply hit "Format" menu and follow "Common Video"> "MOV-QuickTime (*.mov)".

format for rip DVD to QuickTime MOV

Tips:

a. You can click “settings” to adjust the output parameters, such as resolution and bitrate.

b. Edit function is very easy to use, you can trim, crop, add watermark or adjust effect.

Step 3. Start convert

Hit the "Convert" button to kick off to DVD to QuickTime MOV conversion on Mac Mavericks.

After conversion, you can use converted files for natively watching DVD video clips with QuickTime Player on Mac freely or sharing with your friends and family.

Get more solutions with DVD video file:

Make DVD Movies Stored in External Hard Drive/Thumb Drive on Mac
Play DVD/Blu-ray on PC With Multiple Audio Tracks/Subtitles
How to Import Blu-ray to iMovie on Mac?
Importing Blu-ray Discs into Final Cut Pro X on Mac
Import DVD to Final Cut Pro X with multi-track Apple ProRes 422 for Mac

Tuesday, May 27, 2014

How to Convert DVDs for Uploading to YouTube, Vimeo, Break, Metacafe, Dailymotion…

Do you have any DVDs from wedding or funny videos to upload to Online video websites? As you know, Sharing videos online has already become a trendy entertainment among many people. It bring us a lot of fun, from where, we can learn the latest news, watch movies or funny video clips, the most important, it allows us to upload some videos we like to the website for sharing with our friends. Youtube and Vimeo are the most popular websites. Let’s take YouTube as an example. 
  

However, all of the video sharing sites doesn’t support DVD video format. If you have some nice DVD movies and want to share online with others, you have to convert DVD to other format like FLV, MP4, WebM, or other format compatible with the site. 
  
To do so, a DVD ripping software is essential. Here the Pavtube Bytecopy is recommended to you. This DVD ripping tool can rip any encrypted DVDs and convert DVD to FLV, MP4, WMV, WebM, MOV, AVI or other popular formats. For some video size and length limited sites, the built-in editor also allows you to extract DVD clips easily and conveniently. Learn more about this software ... 
  
YouTube supports video formats

YouTube supports a wide rang of video formats including MP4, FLV, WEBM, WMV, AVI, MOV, etc. but VOB is excluded. Also it only accepts videos that are shorter than 10 minutes and smaller than 1G. So if you want to upload video to YouTube with best video quality and minimal size, you should do something about your video before uploading. I did some researches and have figured out how to balance the video size and quality for uploading videos to YouTube. For your reference: 
  
Video container: MP4
Video codec: H.264 (The H.264 provides a better video quality in a smaller file size comparing the MPEG-4 codec)
Audio codec: MP3 or AAC (stereo channel)
Video resolution: 640x480 SD quality video with 4:3 or 1290x720 HD quality video with 16:9 widescreen
Frame rate: 24 frames or better 
  
Now download the right version of the program and follow the guide below.  


Announcement:

Aiming to improve customers' experience and product improvements, Pavtube Studio recently launched its new official website - multipelife.com.Along with the new website, Pavtube has migrated its all BD/DVD Copying & Ripping software products to the new site, fantastic discounts waiting for you:
  • ByteCopy (Windows/Mac)
    More detailed information is published on prweb.com
  •   
    Easiest Solution to Upload DVDs - Convert DVD to a Compatible Format
      
    Step1. Install the Pavtube Bytecopy and launch it after inserting DVD disc. Then choose“Load DVD”. 


    Step2. Choose output format. 

    Since you want to upload DVD to Vimeo, you can go to “Format” drop-down menu to pick up Vimeo accepted format, here I recommend you “Flash Video > FLV H.264 (*.flv)“. Finally start the conversion and then go get a cup of coffee (conversion takes time). 
     
     
    In fact, you can also choose “Commen Video > H.264 Video (*.mp4)“.  


    Tips: How to use the "Split" function?

    First, Check the file that you want to split, then choose the option "Split selected task".

    When the Video Split window pops up, tick off "Enable > Split file size (MB)", and either enter the desired maximum size of each file chunk or choose an appropriate size from the available drop down option. 

     
    Click "Ok" and back to the main interface. With the conversion processed, the video file will be cut automatically. Finally, you wil get multiple video files. 

    Step3. Press “Convert”button to begin the conversion. You can upload the new version video to YouTube after it finishes. 

    For Using DVD Discs - What Should You Pay Attention?

    Precious memories could be treasured on your mind for the rest of your life. Digital memories, which are filmed by your digital camera or camcorder on those sweet and fantastic holidays, should be saved on DVD for the sake of long time collection, so that you could enjoy these funny, touching, comical videos with your family members and even let your offspring be part of these precious moments. Want to find a way to burn your holiday videos on DVD so that you can watch them on your DVD player? 
      
        
    Part one: What Should You Pay Attention?
     Everything in use will suffer more or less losses. A DVD disc is not an exception. If you want to better maintain your DVD discs, you need to keep the minimal loss when using them. To prolong their service life, you should follow the seven aspects below: (BTW, anyone who wish to digitize their physical DVD disks onto computer HDD can turn to thisDVDAID software.) 

    1. You are only allowed to pick up the disc by sticking your finger through the hole or by grabbing the outer edge of DVD disc. Do not touch the disc’s surface.
    2. Keep DVD discs in disc storage case when they are not in use. You should be cautious and avoid any scratches when putting them in storage case. Also do not bend DVD discs when taking them out.
    3. Make sure that you properly put the disc in DVD tray. Any diagonal will make it get stuck when closing the slot, which will damage not only the disc but also DVD player.
    4. Keep DVD discs far from radiators and heating units. Avoid direct sunshine. (Note: magnetic field has no effect on DVD discs. It is wrong when people say so.)
    5. The appropriate temperature for storing DVD discs is between -20°C and 50°C. The relative humidity is 5% - 90%.
    6. Do not stack DVD discs horizontally when arranging them because it will warp the underlying ones. They ought to be placed vertically. Desiccant should be placed in DVD storage case to avoid excessive damp.
    7. Try to remove the thin plastic paper that wraps up the DVD discs. Once it melts, the melted material will do large damage to your DVD discs. 

    Part two: How to pur DVD discs to your all devices? 

    Step one: Download Pavtube DVDAID, install and launch it. Then load the already inserted DVD to the program. 


    Step two: Click “Edit”to trim the part of the video that contains the audio you want to grab and the clipped will become source file automatically. 

    Step three: Hit the pull-down menu Profile and hit Common Audio to select the correct audio format for your device. Power users have many more options to tweak output settings for the video/audio as you like. 

    Step four: Hit “Convert” to start conversion. When it is done, transfer the music to your device. 

    Just have a try and it is easy to use. Hope it can be helpful to you! 

    Part Three: More features about Pavtube DVDAID 

    How to watch DVD movies on Android tablet or mobile phone?
    Store DVD Collection on Cloud Storage and Share with Family
    Backup Existing DVD to NAS server for movie enjoyment 

    Announcement: 

    Aiming to improve customers' experience and product improvements, Pavtube Studio recently launched its new official website - multipelife.com.Along with the new website, Pavtube has migrated its all BD/DVD Copying & Ripping software products to the new site with some brand new names, fantastic discounts waiting for you: 
    • DVD Ripper (Windows/Mac) -> DVDAid (Windows/Mac)
      More detailed information is published on prweb.com
    You may interested in:
    Several Easy Steps to Speed Up Your Computer or Laptop
    Backup/Rip Blu-ray movies to WMV HD videos
    Enjoy DV video on various devices (iPad Air, Android, Windows tablet, PS3, Xbox etc)

    Monday, May 26, 2014

    How to Rip TV Series DVD to Videos with the easiest way?

    TV shows have been part of our life and you may have got a large collection of purchased or rented TV series DVDs. If you’re ever tried to copy a TV series DVD to your computer, you know how hard it is to get it split into individual episodes. Here’s an easy and quick way to rip individual episodes from your TV Series DVD collection for better enjoyment anytime anywhere. 
      
      
    With so many DVDs at hand, would you like to rip an entire TV Series disc set and convert the episodes to individual MP4, AVI files? do you want to rip the TV series DVD to videos so that you can watch them on portable devices like iPhone, iPad, iPod, etc. on the go? Or want to get just some episodes for sharing or editing? If you are just looking for ways to convert TV series DVD to video for more convenient TV shows watching, don't miss this article! 
      
    In all likelihood, any commercial DVD will be copy protected. Some freeware like Handbrake doesn’t have the native ability to remove copy protection. Plus, to get the desired episodes from a DVD, you need a DVDAID that allows you to select the DVD chapters you want to rip and lets you edit the DVD movies so as the get the very part you want. Read on to learn how to.  
      
    More details about Pavtube DVDAID: 

    It is an all-in-one DVD copying and ripping software. Various output video formats, such as WMV, MP4, MKV, MOV, VOB, AVI, FLV, etc. are all well supported. Besides, the built-in editor enables you to edit the TV Series videos such as cut the black bars, trim the ads part off, etc. With this tool, it is very easy to rip TV episodes from DVD to any popular video format like MP4, MOV, MKV, WMA, AVI, FLV, etc with the best quality. If you are using Mac, get DVDAID for Mac. Download the DVD ripping program and below is a way that will work quite well for most people. 

    Guide: How to rip TV series DVD easily and fast 

    At first, you can free download TV series DVD ripper:


    Step1. Add DVD files. 

    Install and launch the ripping program for TV shows DVD. Then click "Load DVD" to import the DVD files you want to convert. To select the subtitles you like, simply click Subtitle and select the one you prefer. 

    Tip: When ripping TV series, please select the titles you want to rip. Otherwise, this DVD Ripper will choose only one title to rip. 

       
    Step2. Choose an output format. 

    Click Format bar and choose your desired format. As you can see, regular video formats like AVI, MP4, WMV, FLV, MKV, MOV, etc. are provided. Meanwhile, lots of video presets for portable devices like iPhone, iPad, Nook HD, etc. are offered to let you get videos with the best settings to fit your device. 

       
    Step3. Edit TV series on your DVD(Optional).

    You can click Edit to crop the DVD so as to get the part you want and get rid of some black bars or trim the ads part off. 


    Step4. Start ripping. 

    Press the "Convert" button to start ripping TV Show DVD. When the conversion finishes, click Open button to find the output files and just enjoy your movies!

    Announcement:

    Aiming to improve customers' experience and product improvements, Pavtube Studio recently launched its new official website - multipelife.com.Along with the new website, Pavtube has migrated its all BD/DVD Copying & Ripping software products to the new site with some brand new names, fantastic discounts waiting for you:
    • DVD Ripper (Windows/Mac) -> DVDAid (Windows/Mac)
    • Blu-ray Ripper (Windows/Mac) -> BDMagic (Windows/Mac)
    More detailed information is published on prweb.com

    Related Guides: 

    Monday, May 19, 2014

    An Easy Way to Rip Audio from a DVD, and Save as WMA, WAV, M4A, AAC, MP3, FLAC, OGG Files

    “How do I extract Audio from a DVD? I have several DVD's that I want to export or else import - (I really don't know which way is better) selected areas within the overall audio. Any suggestions will be most welcome.” 

    “Program to rip audio from DVD, free and easy to use?  I am wanting to rip audio from a DVD (about 10 segments that are 3-5 minutes apiece) into MP3 format to burn on CD. Any suggestions on programs that do this, that are free and easy to use? And before I get a lecture about doing this, let me just say that the particular audio that I want is NOT sold on CD, and I would love to be able to listen to it in my car. Thanks!”

    Have you met this problems? Well, you should be happy now. In this post, I will share you with an easy solution, Pavtube DVDAID, to your problem. This program is a decent DVD audio ripping software which enables you to extract sound tracks from DVD movies easily and quickly, and then save the DVD tracks as WMA, WAV, M4A, AAC, MP3, FLAC, OGG files with excellent quality.
      
       
    At first, you should know the Knowledge about the features of various audio formats:
      
    MP3: most popular audio format, will compress audio file in a smaller size with lossy quality, supported by MP3 player, DVD player and other hardware and software.

    WMA: high compression, quality is better than MP3 and support audio streaming, suitable for online play, supported by most portable media player. 

    WAV: lossless compression, popular among PC users, tone quality is very good but audio size is too big, supported mainly by smart phones like Nokia N90. 

    M4A: Mpeg-4 Audio format, employing DRM technology to restrict copying (an easy way to re-encode DRMed M4As to open MP3s) , use it for iTunes program.

    AAC: higher compression, provide better quality at lower bit rate, support multi-channel, Apple’s standard iTunes and iPod audio format, supported by Apple product, Nokia mobile and other devices.

    FLAC: open format, lossless compression, make smaller size without any information being lost, but cannot store floating-point data, supported by many software and hardware. 

    OGG: similar with MP3, open source, support multi-channel and audio streaming, create smaller file size and keep audio quality. 

    The compression ratio: AAC > OGG > MP3/WMA > FLAC > WAV

    Audio quality: WAC=FLAC > AAC > OGG > MP3 > WMA

    Next, you need to do is:

    Step one: Download Pavtube DVDAID, install and launch it. Then load the already inserted DVD to the program. 


    Step two: Click “Edit”to trim the part of the video that contains the audio you want to grab and the clipped will become source file automatically. 

    Step three: Hit the pull-down menu Profile and hit Common Audio to select the correct audio format for your device. Power users have many more options to tweak output settings for the video/audio as you like. 


    Step four: Hit “Convert” to start conversion. When it is done, transfer the music to your device. 

    Just have a try and it is easy to use. Hope it can be helpful to you! 

    Announcement: 

    Aiming to improve customers' experience and product improvements, Pavtube Studio recently launched its new official website - multipelife.com.Along with the new website, Pavtube has migrated its all BD/DVD Copying & Ripping software products to the new site with some brand new names, fantastic discounts waiting for you: 

  • DVD Ripper (Windows/Mac) -> DVDAid (Windows/Mac)

    More detailed information is published on prweb.com.

  • You may want to read:
    Best Way to Backup DVD The Art of the steal for Repeatedly Watching
    Free Convert DVD to MKV/MOV/AVI/WMV/MPG/FLV 
    Watch popular Movies and TV shows on Transformer Book Duet TD300
    How to rip a DVD to a computer - with three easy methods
    Converting Blu-ray (M2TS) to AVI video with 720p/1080p HD Picture

    Converting Blu-ray (M2TS) to AVI video with 720p/1080p HD Picture


    AVI is the best video format: 

    Firstly, AVI is short for Audio Video Interleaved (also Audio Video Interleave), which is the multimedia container format supported by all well known Video Players and many digital devices, like Windows system native Media Player and Xbox developed by Microsoft. Thus you can convert homemade Blu-ray to AVI and watch it with WMP easily. Secondly, AVI has the special advantage, which supports multiple streaming audio and video formats yet are seldom used. 

    If you wanna transfer the Bly-ray discs to AVI video with 720p/1080p HD Picture, What we need? 

    Pavtube BDMagic is capable of ripping Blu-ray to AVI file format with high quality and as well has clear and simple interface which is easy to handle. What’ more, it also enable to convert to other HD common video formats such as MP4, MKV, MOV, WMV, etc. 

    Here in this article I will teach you how to re-encode M2TS Blu-ray video files to HD AVI files. 
      
    Step-by-step guide:

    Step1: Download Pavtube BDMagic , install and launch.

    Step2: Load the Blu-ray disc into the BD driver of your computer, meanwhile click on Load File(s) button on the interface of Pavtube BDMagic to import the BD files. 


    Step3: Hit on Format bar to select your target format. Move your mouse to HD Video, then you can choose AVI wth HD standard format here. With HD AVI you can have high quality videos, but its large volume may also bother you. So if you do not expect too much on the high definition, you can also choose SD AVI format in the item of Common Video. 


    Step4: Next is to convert. Click on Convert button and just wait a while. When the process is done, you can open the output folder to get the ripped AVI movie. 

    Tips and tricks:

    The Pavtube BDMagic rips not only Blu-ray Discs, but also DVDs.

    Higher bitrate leads to higher video quality and bigger file size. To set higher video quality, click “Settings” and set“botrate” to “high quality” or type in a high value manually. 

    To join chapters together, simply select the files and check the box of “Merge into one file” before conversion starts. 
      
    Other features of Pavtube BDMagic, you can read: Rip Blu-ray to 720p/1080p HD MP4 at fastest speed.

    See Also: